How to rebu
How to Rebuild a Car Engine
How to Rebuild a Car Engine | YourMechanic AdviceAsk a question, get an answer ASAP!
☰
×
GET A QUOTE
| Save Big on Auto Repairs | Get a Quote |
Whether it is to breathe new life into a commuter or work vehicle, or for hobby in a classic car, there are many cases in which rebuilding an engine can be a great alternative to replacing one. Generally speaking, rebuilding an engine can be a large task, but one that is very possible with proper research, planning, and preparation.
As the exact difficulty of a job like this can vary greatly depending on the exact model of engine, and the number different types of engines is great, we will focus on how to rebuild a classic pushrod style engine. The pushrod design uses an engine block shaped like a “V”, places the camshaft in the block, and uses pushrods to actuate the cylinder heads.
The pushrod has been used for many decades, and remains popular to this day due to its its reliability, simplicity, and easy access to parts, when compared to other engine designs. In this step by step guide, we will go over what a typical engine rebuild would entail.
Part 1 of 9: Preparing the vehicle and your tools
Materials Needed
- Air compressor
- Engine assembly lube
- Basic set of hand tools
- Blow gun and air hose
- Brass punch
- Camshaft bearing tool
- Cylinder bore honing tool
- Cylinder bore ridge reamer
- Electric drill
- Engine hoist (to remove engine)
- Engine stand
- Engine rebuild kit
- Fender covers
- Flashlight
- Jack stands
- Masking tape
- Oil drain pan (at least 2)
- Permanent marker
- Plastic sandwich bags and boxes (to store and organize hardware and parts)
- Piston ring compressor
- Rod journal protectors
- Service Manual
- Silicone gasket maker
- Timing gear puller
- Torque wrench
- Wheel chocks
- Water displacement lubricant
Step 1: Research and preview the removal procedure. Before beginning, thoroughly research the removal and rebuild procedures for your specific vehicle and engine and gather all of the necessary tools for the job.
Most pushrod V8 engines have very similar designs, however it is always a good idea to be knowledgeable on the specifics of the vehicle or engine you are working on.
If necessary, purchase a service manual, or find one on online, so that the exact procedures for a thorough, and quality rebuild are followed.
Part 2 of 9: Draining the vehicle’s fluids
Step 1: Raise the front of the vehicle. Raise the front of the vehicle off the ground, and lower it onto jack stands. Set the parking brake, and place wheel chocks underneath the rear wheels.
Step 2: Drain the engine’s oil into a pan. Place fender covers on both fenders, and then proceed to drain the engine’s oil and coolant into your drain pans.
Take precaution to drain the oil and coolant into separate pans, as the two mixed together can sometimes make proper disposal and recycling more difficult.
Part 3 of 9: Prepare the engine for removal
Step 1: Remove any plastic covers. While the fluids are draining, proceed to removing any of the engine’s plastic covers, as well as any air intake tubes or filter housings that need to be removed before the engine can come out.
Place any hardware you remove into sandwich bags, and then label the bags using the masking tape and marker, so that no hardware gets lost, or left over during reassembly.
Step 2: Remove the radiator. Once the fluids are drained and covers removed, proceed to remove the radiator from the vehicle.
Remove the radiator brackets, undo the upper and lower radiator hoses, as well as any transmission lines if necessary, and then remove the radiator from the vehicle.
Removing the radiator will prevent it from possibly being damaged when the engine is being lifted out of the vehicle.
Also, take this time to disconnect any heater hoses going to the firewall, most vehicles will usually have two of them that need to be removed.
Step 3: Disconnect the battery and starter. Next, disconnect the battery, and then all of the engine’s various harnesses and connectors.
Use the flashlight to carefully check around the entire engine, including the underside and near the firewall, to make sure that no connectors are missed.
Also remember to disconnect the starter, which will be located on the underside of the engine. Once all of the electrical connectors have been unplugged, set the harness over to the side, out of the way.
Step 4: Remove the starter and exhaust manifolds. With the harness out of the way, proceed to removing your starter and unbolting the engine’s exhaust manifolds from their respective downpipes, and if necessary from the engine cylinder heads.
Some engines can be removed with the exhaust manifolds still bolted on, while others require definite removal, refer to your service manual for specifics if you are unsure.
Step 5: Remove the air compressor and belts. Next, if your vehicle is equipped with air conditioning remove the belts, and unbolt the air conditioning compressor from the engine and set it aside, out of the way.
If possible, leave the air conditioning lines attached to the compressor, as the system will need to be refilled with refrigerant later if it is opened.
Step 6: Unbolt the engine from transmission. Proceed to unbolting the engine from the transmission bell housing.
Support the transmission with a jack if there is not a crossmember or mount securing it onto the vehicle, and then remove all of the bell housing bolts.
Put all of the removed hardware in a plastic bag, and label it for easier identification during reassembly.
Part 4 of 9: Removing the engine from the vehicle
Step 1: Prepare your engine hoist. At this point, position your engine hoist over the engine, and attach the chains to the engine in a safe and secure manner.
Some engines will have hooks or brackets specifically in place for the engine hoist to hook onto, while others will require you to thread a bolt and washer through one of the chains links.
If you do run a bolt through one of the chains links, make sure that the bolt is of a high grade, and that it threads adequately into the bolt hole, as to ensure that it does not break, or damage the threads, with the weight of the engine.
Step 2: Unbolt the engine from the motor mounts. Once the engine hoist is properly secured to the engine and all of the transmission bolts are removed, proceed to unbolting the engine from the motor mounts, leaving the motor mounts attached to the vehicle if possible.
Step 3: Carefully lift the engine out of the car. The engine should now be ready to come out. Carefully double check to make sure that no electrical connectors or hoses remain connected, and that all the necessary hardware is removed, and then proceed to lift the engine out.
Lift it out slowly, and carefully maneuver it up and away from the vehicle. If necessary, have someone help you with this step, as engines are very heavy, and can be cumbersome to try and maneuver on one's own.
Part 5 of 9: Mounting the engine onto the engine stand
Step 1: Place the engine on an engine stand. With the engine removed, it is time to mount it onto the engine stand.
Position the hoist over your engine stand and secure the engine to the stand using nuts, bolts, and, washers.
Again, make sure to use high grade bolts, to ensure that they do not break under the weight of the engine.
Part 6 of 9: Disassembling the engine
Step 1: Remove all belts and accessories Once the engine is mounted we can begin disassembly.
Begin by removing all of engine’s belts and accessories if they have not been removed already.
Remove the distributor and wires, crankshaft pulley, oil pump, water pump, alternator, power steering pump, and any other accessories or pulleys that may be present.
Remember to properly store and label all of the hardware and parts that you remove to facilitate reassembly later on.
Step 2: Remove the bare components of the engine. Once the engine is bare, proceed to removing the intake manifold, oil pan, timing cover, flexplate or flywheel, rear engine cover, and valve covers from the engine.
Place a drain pan underneath the engine to catch any remaining oil or coolant that may fall from the engine when these components are removed. Again, be sure to store and label all hardware appropriately for ease of assembly later on.
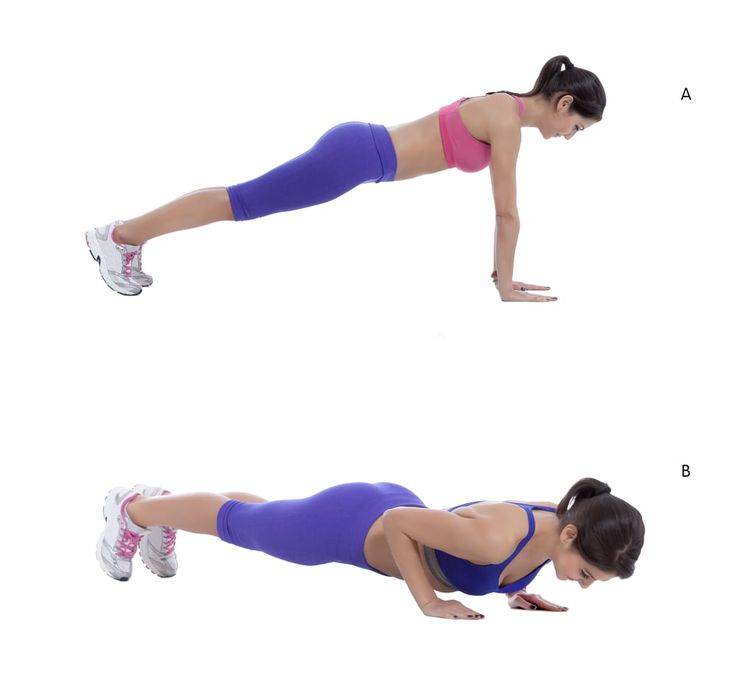
Step 3: Remove the rocker arms and pushrods. Disassemble the cylinder heads’ valvetrain. Begin by removing the rocker arms and pushrods, which should now be exposed.
Remove, and then closely inspect the rocker arms and pushrods to make sure that they are not bent or excessively worn at the contact points. Once the pushrods are removed, remove the lifter retainers and lifters as well.
Once all of the valve train components are removed closely inspect all of them. If you find any of the components to be damaged, replace them with new ones.
As these types of engines are very common, these parts are usually readily available on the shelf at most parts stores.
Step 4: Remove the cylinder head. With the pushrods and rocker arms removed, proceed to remove the cylinder head bolts.
Remove the bolts in an alternating fashion, from outside to inside, to prevent the head from warping when the torque is released, and then remove the cylinder heads from the block.
Step 5: Remove the timing chain and the camshaft. Remove the timing chain and sprockets that connect the crankshaft to the camshaft, and then carefully remove the camshaft from the engine.
If either of the sprockets are difficult to remove use the timing gear puller to remove them.
Step 6: Remove the piston rod caps. Rotate the engine upside down and begin to remove the piston rod caps one by one, keeping all of the caps with the same hardware that you removed from them as a set.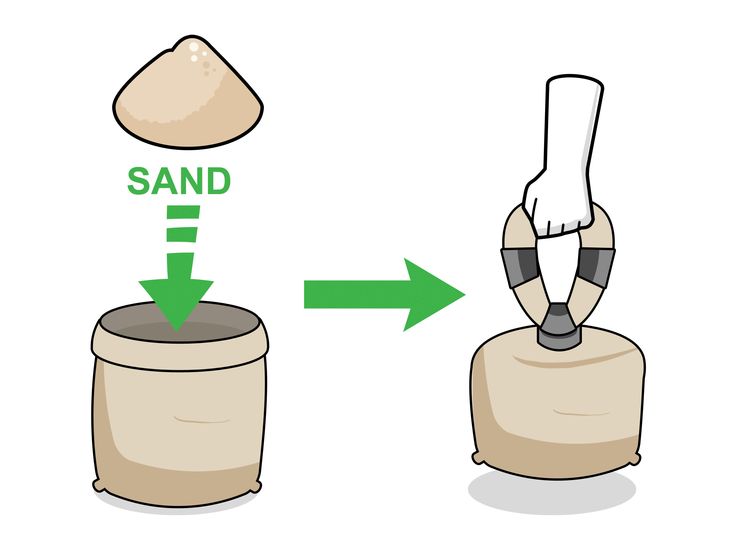
Once all of the caps are removed, place rod journal protectors on each of the connecting rod studs to prevent them from scratching or scoring the cylinder walls when they are removed.
Step 7: Clean the tops of each cylinder. Once all of the connecting rod end caps have been removed, use the cylinder ridge reamer to remove the carbon build up from the tops of each cylinder, and then pull each piston out, one by one.
Be careful not to scratch or damage the cylinder walls when removing the pistons.
Step 8: Inspect the crankshaft. The engine should now be mostly disassembled with the exception of the crankshaft.
Rotate the engine upside down and remove the crankshaft main bearing caps, and then the crankshaft and the main bearings.
Thoroughly inspect all of the crankshaft journals (bearing surfaces) for any signs of damage, such as scratches, scoring, signs of possible overheating, or oil starvation.
If the crankshaft has sustained visible damage, it may be a wise idea to have a machine shop double check it, and machine, or replace it if necessary.
Part 7 of 9: Preparing the engine and components for reassmbly
Step 1: Clean all of the removed components. At this point the engine should be completely disassembled.
Lay all of the parts that are going to be reused, such as the crankshaft, camshaft, pistons, rods, valve covers, front and rear covers out onto a table, and thoroughly clean each component.
Remove all old gasket material that may be present, and wash the parts with warm water and a water soluble detergent. Then blow them dry with compressed air.
Step 2: Clean the engine block. Prepare the block and heads for reassembly by thoroughly cleaning them. Same as with the parts, remove all old gasket material that may be present, and clean the block with warm water and a water soluble detergent to the best of your ability. Inspect the block and heads for signs of possible damage while you clean them. Then blow them dry with compressed air.
Step 3: Inspect the cylinder walls. Once the block is dry, thoroughly inspect the cylinder walls for any signs of scratching or scoring.
If any signs of serious damage are found, consider having a machine shop double check, and if necessary, machine the cylinder walls.
If the walls appear to be okay, mount your cylinder honing tool onto your drill, and lightly hone the walls of each individual cylinder.
Honing the walls will make it easier to break in and seat the piston rings when the engine is started. Once the walls are honed, spray a light coat of your water displacement lubricant to keep the walls from rusting.
Step 4: Replace the engine’s freeze plugs. Proceed to remove and replace each of the engine’s freeze plugs.
Use a brass punch and hammer to tap one edge of the freeze plug inward. The opposite edge of the freeze plug should come up and you should be able to pull it out with a pair of pliers.
Install the new freeze plugs by gently tapping them into place, making sure that they install onto the block flush and even. At this point, the engine block itself should be ready for reassembly.
Step 5: Install new piston rings. Before beginning reassembly prepare your pistons by installing new piston rings if they are included as part of your rebuild kit.
- Tip: Follow the installation instructions provided closely, as piston rings are designed to be installed and function in a very specific manner. Installing them incorrectly may lead to issues with the engine later on down the line.
Step 6: Install new camshaft bearings. Install the new camshaft bearings using the camshaft bearing tool. Once installed, apply a generous layer of assembly lube to each of them.
Part 8 of 9: Reassembling the engine
Step 1: Reinstall the main bearings, crankshaft, and then the caps. Rotate the engine upside down, and then install the main bearings, crankshaft, and then the caps.
Make sure to generously lubricate each bearing and journal with assembly grease, and then install each main bearing cap hand tight.
The rear bearing cap may also have a seal that needs to be installed. If that is the case, do so at this time.
Once all of the caps are installed, torque down each cap to the proper specification, and in the correct sequence, to avoid the possibility of damaging the crankshaft due to incorrect installation procedures.
Once the crankshaft is installed rotate it by hand to make sure that it turns smoothly and does not bind. Refer to your service manual if you are unsure about any of the specifics for installing the crankshaft.
Step 2: Install the pistons. At this point, you are ready to install the pistons. Prepare the pistons for installation by installing the new bearings onto the rods, and then installing the pistons into the engine.
As the pistons rings are designed to expand outward, like springs, use the cylinder ring compression tool to compress them, and then lower the piston down into the cylinder, and onto the corresponding crankshaft journal.
Once the piston is lowered into the cylinder and the bearing on the crankshaft journal, rotate the engine upside down and install the corresponding connecting rod end cap onto the piston.
Repeat this procedure for each piston until all the pistons are installed.
Step 3: Install the camshaft. Apply a generous layer of assembly lube to each one of the camshafts journals and and cam lobes and then carefully install it into the engine block, taking care not to scratch or score any of the bearings when installing the camshaft.
Step 4: Install the timing components. With the cam and crank installed we are now ready to install the timing components, the cam and crank sprockets and timing chain.
Install your new sprockets, and then clock them according to the instructions provided with your timing kit or in your service manual.
For most pushrod engines it is a simple matter of turning the cam and crankshaft until the correct cylinder or cylinders are at TDC, and the marks on the sprockets line up in a certain manner or point in a certain direction.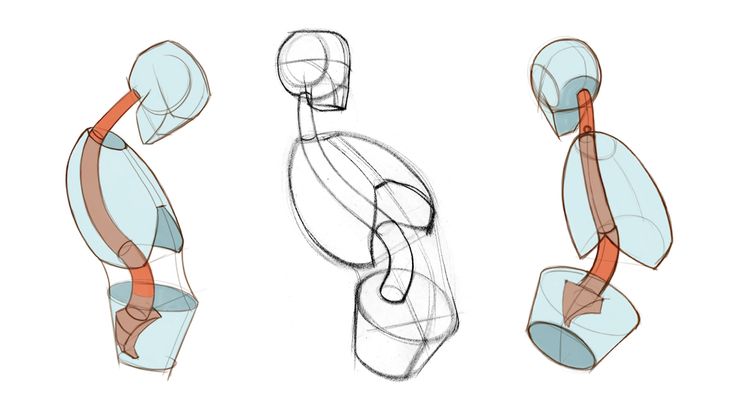 Refer to the service manual for specifics.
Step 5: Test the crankshaft. At this point the rotating assembly should be fully assembled.
Rotate the crankshaft by hand a few times to verify that the cam and crank sprockets are installed correctly and then install the timing chain cover and the rear engine cover.
Make sure to replace any seals or gaskets that are pressed into the engine covers with new ones.
Step 6: Install the oil pan. Rotate the engine upside down and install the oil pan. Use the gasket provided in your rebuild kit or make your own with silicone gasket maker.
Remember to lay a thin bead of silicone gasket maker along any corners or edges where the pan and gaskets meet.
Step 7: Install the head gaskets and head. With the lower end now assembled, we can begin to assemble the engine’s top end.
Install your new head gaskets that should be included as part of your rebuild kit, taking care to make sure that they are installed with the correct side facing up.
Once the head gaskets are in place, install the heads, and then all of the head bolts, tightening them hand tight. Then follow the proper procedure for torquing the head bolts.
There is usually a torque specification and sequence that need to be followed, and often times repeated more than once. Refer to your service manual for specifics.
Step 8: Reinstall the valve train. Once the heads are installed you can reinstall the rest of the valve train. Begin by installing the lifters, the guide retainer, then the pushrods and rocker arms.
- Tip: Remember to coat all of the components with assembly lube as you install them, to protect them from accelerated wear when the engine is first started.
Step 9: Install covers and intake manifold. Install the valve covers, rear engine cover, and then intake manifold.
Use the new gaskets that should be provided with your rebuild kit, remembering to lay a bead of silicone around any corners or edges where mating surfaces meet, and around the water jackets.
Step 10: Install the water pump, exhaust manifolds, and flywheel. At this point the engine should almost be fully reassembled, with only the water pump, exhaust manifolds, flexplate or flywheel, and accessories left to install.
Install the water pump and manifolds using the new gaskets provided in your rebuild kit, and then proceed to install the rest of the accessories in the reverse of the order in which you removed them.
Part 9 of 9: Reinstalling engine into vehicle
Step 1: Mount the engine back onto your hoist. The engine should now be fully reassembled and ready for installation in the vehicle.
Mount the engine back onto your hoist, and then into the vehicle in reverse of the order in which it was removed, as shown in Steps 6-12 of Part 3.
Step 2: Reconnect the engine and fill with oil and coolant. Once the engine is mounted, reconnect all of the hoses, electrical connectors and harnesses in reverse of the order that you removed them, and then fill the engine up to level with oil and antifreeze.
Step 3: Test the engine. At this point the engine should be ready to start. Make your final checks, and then refer to your service manual for the exact procedures for engine start up and break in to ensure you get the optimum performance and life from your rebuilt engine.
All things considered, rebuilding an engine is no small task, however, with the right tools, knowledge, and time, this is a task that is very possible to do on one's own. While YourMechanic does not currently offer engine rebuilding as part of its services, it is always a good idea to get a second opinion before taking on an intensive job such as this. If you need to have your car inspected, YourMechanic provides comprehensive inspections to make sure that you are making the correct repair with your car.
engines
The statements expressed above are only for informational purposes and should be independently verified. Please see our terms of service for more details
Excellent Auto Repair Ratings.
4.2 Average Rating
Service Hours
7 AM - 9 PM
7 days a week
Phone Number
1 (855) 347-2779
Phone Hours
Mon - Fri / 6 AM - 5 PM PST
Sat - Sun / 7 AM - 4 PM PST
Address
We come to you at no extra charge
Guarantee
12-month/12,000-mile warranty
Our certified mobile mechanics perform over 600 services, including diagnostics, brakes, oil changes, scheduled mileage maintenances, and will come to you with all necessary parts and tools.
Get a fair & transparent quote instantly before booking.
Experienced Mechanic?
Earn up to
$70/hr
Apply Now
Need Help With Your Car?
Our certified mobile mechanics make house calls in over 2,000 U.S. cities. Fast, free online quotes for your car repair.
GET A QUOTE
GET A QUOTE
Related articles
Symptoms of a Bad or Failing Thermostat
Common signs include the temperature gauge reading being very high or changing erratically, engine overheating, and coolant leaks.
How Long Does a Crankshaft Position Sensor Last?
The The crankshaft position sensor monitors the rotational speed and position of the crankshaft in the engine. It reports this information to the engine management system to control the ignition system timing. The crankshaft position sensor is used with the...
How to Check the Choke on a Carbureted Engine
The The choke is a plate in the carburetor (https://www.yourmechanic.com/article/how-does-the-carburetor-work-within-the-fuel-system) that opens and closes to allow more or less air into the engine. Similar to the throttle, the choke plate rotates from a horizontal to vertical position to open up...
Related questions
My car is skipping.
Hello. This can be caused by a number of things. It can be anything from a faulty sensor to a tune-up issue. I usually check the computer for codes and check all of the sensor readings with a scan tool. ...
...
Cylinder Deactivation System in Bank 1
The diagnosis and repair of this type of problem will require the work of a professional. The cause may be as simple as a low oil level (https://www.yourmechanic.com/services/oil-level-is-low-inspection) or the need for an oil change (https://www.yourmechanic.com/services/change-oil-and-filter) or as complicated as...
Car engine replacement
The 2002 and 2003 Camry and Solara, at least, used that engine. Inasmuch as engines are computer controlled, replacements have to be absolutely EXACT, otherwise the engine may not even start because the engine sensor interface with the existing PCM...
Browse other content
Cities
Services
Estimates
Our service team is available 7 days a week, Monday - Friday from 6 AM to 5 PM PST, Saturday - Sunday 7 AM - 4 PM PST.
1 (855) 347-2779 · [email protected]
Read FAQ
GET A QUOTE
Everything You Need To Know
Whether it is to breathe new life into your engine to restore it to like new condition, or to customize it for maximum performance, or for hobby in a classic car, there are many cases in which an engine rebuild is better than simply repairs of parts. Rebuilding an engine can be a challenging and intimidating task, but is still possible in your own garage with this complete guide on how to rebuild an engine.
In this guide, you will find not only the detailed step-by-step procedures plus handy pro tips, but also an informative and important discussion on the different options for any car owner who needs an engine upgrade or overhaul. These include when to rebuild an engine and when to repair, as well as a comparison between engine rebuilding and replacing the existing engine with a “remanufactured engine”.
Piecemeal Repair Vs. Complete Engine RebuildThere are two approaches to upgrading an engine that deteriorates after many miles. You can either replace individual parts when required to save money, which is called the “piecemeal” approach, or you can do a complete engine rebuild.
The piecemeal approach is to replace only the parts that are worn or broken and leave everything else untouched. This maintenance approach typically attempts to make do with standard sized replacement parts such as bearings, rings, pistons and valves.
Obviously, the sole underlying motivation here is economic, and you can expect such stand-alone repairs will keep your vehicle rolling without significantly improving the engine’s performance.
So when does the piecemeal approach make sense? When the vehicle and/or engine may not be worth spending much money on due to old age or low resale value, so only those parts that absolutely have to be replaced to keep the engine running are replaced. Other repairs can wait for the next owner.
The second approach to engine upgrade is to do a complete overhaul when the engine needs major repairs and/or you are hoping for much improved performance. This is surely the more expensive approach, but also delivers much more longer-lasting and improved results.
By replacing major wear components such as the rings, pistons, bearings, exhaust valves, timing chain or belt, the engine is restored to “like-new” condition. This approach may involve the purchase of an engine kit or buying the needed components individually depending on the owner’s preferences.
It usually also requires having machine work done such as turning the crankshaft, and resurfacing the cylinder heads.
Source: ScooperRebuilding Engine Vs. Replacing With A Remanufactured EngineIf you’re opting for a complete engine overhaul, you are left with two options: rebuilding it or replacing it with a “remanufactured engine”. There are pros and cons to each choice.
First, not all engines are rebuildable. If the engine block is cracked or otherwise severely damaged, rebuilding it is likely not possible.
Secondly, the needed internal parts for your engine might not be available, although the aftermarket usually has sufficient supply for components for the more popular engines. It is always safe to first check availability before starting on the real work.
The third consideration is how good you are with car DIYs and how much time you have. Rebuilding your engine on your own makes the most sense if you’re sure that the engine block can be reused, if the needed parts are available and affordable, and if you have the time and the ability. The rebuilding process usually requires machine work and do expect to spend up to a week, most likely longer, on this project.
If the above conditions are not met, consider replacing your old engine with a remanufactured engine. Most remanufactured engines are done by reputable companies and are accompanied by a warranty.
Do shop around to estimate whether this option will be more affordable than rebuilding an engine yourself, the availability of a remanufactured engine compatible with your vehicle, and the logistics of getting a 600 lb. engine off a freight truck.
How To Rebuild An Engine: What You Will NeedIf you plan to disassemble your existing engine down to the bare block and rebuild, you’ll need a few things.
Engine HoistsYou’ll need to start by pulling the existing engine out of your vehicle. Most DIYers use an engine hoist, also known as an engine crane. For removing an engine in your own garage, basic engine hoists rated for 1 or 2 tons of lifting capacity will be more than suitable for the job.
When your engine is supported by chains on both sides, it can tilt to one side if the weight is unevenly distributed, a challenge when removing an engine. To correct this, an engine load leveling bar allows you to move the horizontal support bar left or right as needed to balance and straighten out a lopsided load. Some load leveling bars are included with hoists.
An Engine StandOnce you get the engine out and away from the vehicle, you’ll need to get it off the hoist. An engine stand allows the engine block to be affixed to it firmly and securely. Most stands offer the ability to rotate an engine block to any position so you can easily work on all sides.
Other Tools- Engine rebuild kit
- Camshaft bearing tool
- Cylinder bore honing tool
- Cylinder bore ridge reamer
- Piston ring compressor
- Rod journal protectors
- Silicone gasket maker
- Timing gear puller
- Torque wrench
- Wheel chocks
- Engine assembly lube
- Water displacement lubricant
- Basic hand tools set
- Electric drill
- Brass punch
- Air compressor
- Blow gun and air hose
- Fender covers
- Jack stands
- Flashlight
- Masking tape
- Permanent marker
- Oil drain pan (at least 2)
- Plastic sandwich bags and boxes: to store and organize hardware and parts
- Service Manual
When an engine has accumulated a lot of miles, the internal parts may be worn or damaged and have to be replaced. Which engine parts you replace when you rebuild your engine will depend on their condition.
Within the engine block, typical wear items include pistons, piston wrist pins, piston pin bushings, piston rings, rod bearings, and main bearings. Crankshafts are machined if possible, and are replaced if they cannot be machined. Connecting rods can be reused or replaced.
You may need cylinder head gaskets, valve covers, valve cover gaskets, oil pans, oil pumps, harmonic balancers and timing covers. If you are rebuilding your existing cylinder head, you’ll need new intake and exhaust valves, valve springs, rockers, push rods, and their associated hardware. Sometimes you might be able to buy complete cylinder heads with related camshafts and valves found within. You’ll also need new head bolts in order to clamp the heads to the block.
Some other needed parts include water pumps, valley pans & related gaskets, throttle body assemblies, and flywheels.
READ MORE
- 11 Common Engine Problems You Should Not Ignore
- Things You Ought To Know About How To Rebuild A Transmission
- Best Fuel Pump For Optimal Engine Performance 2020
Below are the steps to follow for a complete car engine rebuild.
Step 1: Position the vehicle near your hoist
You’ll need a big and well-lit garage with an even surface, with enough room to position your hoist and maneuver around.
Step 2: Remove engine cover
Mark the hinge bolts so you’ll be able to find them later. Loosening them carefully, have a helper assist as you slide it off. Note that some hoods have electrical connections for headlamps, signal lights, and fog lights that are mounted on it. Disconnect them too.
Step 3: Disconnect the external engine components
For safety reasons, it is important to note that you must disconnect the ground cable on the battery before you do anything else.
- Then, drain the coolant and radiator hoses. Be very careful not to damage the metal clamps, which are more difficult to replace than the rubber hoses.
- Remove the radiator and fan shroud.
- Loosen the alternator, the tension assembly, cooling fans, and belts.

- Disconnect the intake air supply and the fuel lines. In case your car has a fuel system which is pressurized even when the engine is not running, drain the fuel and relieve the pressure before disconnecting them.
Tips: It’s recommended that you take close photos and label the parts with markers for reference as you proceed, considering the many parts of an engine. This will greatly ease the reassembly process later on.
Step 4: Remove all electric connections to the motor
To disconnect the transmission, first you need to disconnect the exhaust manifold and unbolt all visible electric connections to the transmission. You can leave the spark plug wires for later.
Step 5: Remove the bolts that attach the transmission’s bell housing to the engine
Jack up the car and put it on jack stands, then support the transmission from underneath with other jack stands. It’s very important to use some support under the transmission before you disconnect the bolts as once you loosen them, there won’t be anything supporting the transmission.
Note: In most cases, the transmission itself doesn’t need to be removed from the vehicle, as long as it can be safely supported when the engine is removed.
Step 6: Use the hoist to remove the engine
Connect the hoist to the lifting points on the cylinder heads, or the biggest bolts near the top of the engine and adjust the leveler slowly to start lifting the front.
2. Disassemble the Engine BlockStep 1: Get the manual for your particular vehicle
It is essential that you refer to the engine manufacturer’s instructions to grasp all the proper specs and particularities necessary to rebuild your particular engine.
Tips: Check the ID and casting numbers on your engine to ensure that the engine you think you are working on is actually the engine you are working on.
Step 2: Inspect the engine
Check for any signs of overheating, cracking and scorching on the block. Check for any fluid sweeping out of the many plugs and joints between components. Also check for any excessive gasket sealer left behind from previous maintenance.
Step 3: Inspect external components
Inspect the alternator belt for signs of wear by spinning the pulley and listening for any unusual noise. Next, inspect the distributor for signs of looseness by putting some pressure on it. Also inspect the clutch assembly for wear.
Step 4: Remove the exhaust manifold
If the exhaust manifold bolts or studs are corroded, be careful to break them loose without damaging them. Using lubricants may help. Otherwise, extremely stubborn bolts may require heat to loosen.
Step 5: Disassemble the rest of the engine
Start with the oil pan and the valve covers, then the cylinder heads. Protect the lifter rods when lifting the cylinder heads: if they are bent or damaged, they will need to be replaced.
Step 6: Check the cylinder bores
If the cylinders are too worn, the chance for a successful rebuild will be thin. You may want to use a micrometer to determine the bore diameter, or, you can get a good idea of the wear to the cylinder walls by looking at the cylinder ridge. The ridge is the point where the cylinder is not worn because the rings do not rise that high in the bore. The cylinder wear should be below this point.
Generally, if the wear is less than 2/100 of an inch, the original pistons can be reused, otherwise the engine needs to be bored and oversized pistons need to be used.
Then, remove the ridge on the cylinders near the top of the bore with a cylinder reamer. This will allow pistons to be removed without damage and to allow the reinstallation of the pistons with new rings.
Step 7: Remove piston and rod assemblies
After removing the rod caps from the rods, place rod journal protectors on the rod ends and protect bolts to prevent them from scraping the engine block. Once removed, replace the same rod cap back on the matching rod and keep them as numbered paired or matched sets. Keep the parts marked or in order to later return them to the correct cylinder from which they were removed.
Step 8: Remove and inspect the crankshaft
Remove the crankshaft using crank mounting plates. Keep old main bearings in order, inspect them for wear and excess dirt. Remove the camshaft, balancer shafts, and auxiliary drives. Keep everything organized as you will need to put these back in the correct order. Remove the cam bearings, paying attention to their position.
Check for cracks and any signs of overheating. Measure different crankshaft dimensions: journal diameter, out of round, taper, and run out. Compare this to the dimensions listed in the shop manual.
If some dimensions do not match, mark them and send the crankshaft to a machine shop to have it resurfaced. Then measure the crankshaft again so that you can replace the bearings to get the crank to bearing clearance within specification.
Step 9: Finish disassembly
Remove the core plugs, brackets, guide pins, and everything else still attached to the outside of the engine block. Check the engine block for any cracks.
Step 1: Compress the valve springs
Use a valve spring compressor to compress the valve springs. Then, remove the valve keepers and slowly release the valve spring out of compression. Once you can remove the compression tool, remove the valve springs and shims. Again, keep these components in order.
Step 2: Remove the valve from the head
For each valve, you need to remove any carbon buildup or dirt from the valves and valve head. Do not force it out to avoid scratching the guides. Use a dye to find any cracks.
Step 3: Check each valve head
Check for any flatness which is out of specification so that it can be corrected at the machine shop. Inspect the guides for excessive wear and check for recession of the valve seats. Remember to also check for:
- Worn valve stems which are out of specification using a micrometer.
 Replace.
 - Worn keeper grooves. Replace.
- Replace valves with excessively thin margins.
- Length, tension, and squareness: Replace any springs which are worn beyond specification.
Step 4: Recondition the worn valve guides
Replace and machine the recessed valve seats and reface all valves which are not going to be replaced. Then lubricate the valve stems with engine oil and install valve seals.
4. Reassemble the Engine BlockWe’re halfway through the steps on how to rebuild an engine. Now for reassembly, remember the disassembly procedures and work in reverse. This is why keeping pictures, marking and keeping parts in order will greatly ease you through the steps.
Step 1: Clean removed components
At this point the engine should be completely disassembled. Lay all of the parts that are going to be reused out and thoroughly clean each component Next, wash the parts with warm water and a water soluble detergent. Then blow them dry with compressed air.
Step 2: Clean the engine block
Perform the same cleaning and drying to prepare the block and heads for reassembly. Inspect the block and heads for signs of damage.
Step 3: Install crankshaft and main caps
Grease the camshaft bearings with high pressure grease, then install the camshaft. Since the caps are sensitive to position and direction, snug the caps and then torque them onto the block from the center moving out. Rotate the crank to see if it binds up.
Step 4: Install the timing chain or belt to specification
Align the timing marks at Top Dead Center and set the degree wheel correctly on the cam, with the crankshaft/piston timing and proper valve timing sequences for intake, compression, power, and exhaust strokes of the engine.
Step 5: Install new pistons, rings, gaskets, and seals
Check piston ring end gaps for OEM clearances. If the rings are too small in diameter they’ll have excessive end gaps, but if they’re too large then they’ll be too tight and can bind, perhaps even breaking when the engine heats up.
Step 6: Install head gasket
The gasket may be directional, so be sure to install in the correct direction.
Next, install new valve heads. Lube the bolt threads and washers with Original Equipment Manufacturer (OEM) lubricant or sealer, then torque the bolts down in 3 stages using the OEM specified pattern.
Step 7: Install a new valve train
Always lubricate the parts as you install them and adjust the valves as necessary.
5. Reinstalling the engineStep 1: Mount the engine back onto the hoist
The engine should now be fully reassembled and ready for reinstallation. Mount the engine back onto your hoist, and then into the vehicle. Remember how you removed it before; now you’re only working in reverse order.
Step 2: Reconnect the engine
Again, in the reverse order of when you removed them, reconnect all of the hoses, electrical connectors and harnesses. Next, refill engine oil and antifreeze.
Step 3: Test the engine
Make your final checks to make sure every component is where it originally was. Now the engine should be ready to start. Now, to ensure that you get the optimum performance and lifespan from your rebuilt engine, refer to your manual for the exact procedures for engine start up and break in.
we teach to solve ciphers from letters, pictures and numbers
Mathematics and logic for children / Rebuses
We tell in order the rules for compiling and solving puzzles. Tasks in front of you with explanations and tips to work out the answer search algorithm. With LogicLike you will learn how to solve any puzzles and other logic tasks. We have everything you were looking for!
Try our logic development course!
Select student age to start
4-6 years old
1st class
2 class
3rd class
4-5 class
older than
Powered by LogicLike. com 5500 logic puzzles with answers: rebuses, tasks, questions and puzzles.
What is a rebus?
Rebus is an entertaining puzzle, encryption of one or more words using illustrations, letters, numbers and symbols. To solve a rebus means to decipher a word, a phrase or a whole phrase conceived by the author.
The young why-man demands to explain “Why solve puzzles at all ?!” Useful cheat sheet - to help you.
The benefits of puzzles for children and adults
- logic develops : to "count" correctly picture, you need to speculate on the relative position of the puzzle elements, pick up correct rules;
- develops memory : if a long word, you need to memorize the unraveled parts of a word or phrase, as well as erroneous assumptions;
- developing out-of-the-box thinking : cipher picture can be interpreted in different ways, and solving puzzles for speed can turn into an exciting game;
- regular training develops intelligence and thinking speed ;
- increases vocabulary .

On the LogicLike platform over 5,000,000 students
- Develop logic and thinking
- Improve grades at school
- Successfully preparing for the Olympiad
- Interestingly spend time with benefit for mind
Start classes
How to learn to solve puzzles?
Step by step, we will introduce you to examples of entertaining puzzles of different difficulty levels. We present some of the tasks with answers and a description of the solution.
You will overcome all the material from and to - you will be able to solve such puzzles for one or two.
Basic rules for reading puzzles
- Puzzles are read from left to right, in some cases - from above way down. There may be exceptions that the engagement writers can communicate by text or arrows.
- Punctuation marks and spaces are ignored. This rule is relevant for large and complex puzzles in which a long word or an entire phrase.

- Any picture or symbol in encryption has a meaning. None a comma or an image is not given in a rebus just like that. The picture and symbol may represent the whole word or part of the word, depending on other conditions of the rebus.
- All words in the rebus are read in the nominative case, but with singular and plural need to be careful. If the picture shows a pair of legs, eyes, or several fruits, the author of the rebus probably wants you to read the word in plural.
- One of the most difficult tasks in the rebus is to understand “what say the author? In other words, correctly interpret the picture. In the picture you can “see” a dog, but the author could think of the word “dog” or even “Hachiko”. boy with light hair can be the word "boy" or the word "blonde".
- The rebus always has the same solution! And if there are several, about this you the author should warn.
- Got to solve a big difficult puzzle? Be ready, that a sentence is encrypted in it, in which there will be not only nouns, but also other parts of speech.

Commas in puzzles
Among the simplest puzzles that can be offered to preschoolers or younger students are rebuses in which there is one or more commas next to the picture. The commas show that the word that the picture depicts, you need to remove the letter. Sometimes commas are drawn upside down, but it doesn't matter.
Consider the essence of the rule using the example of two puzzles below. The number of commas is equal to the number of letters, which need to be removed.
Commas on the left - remove 3 letters at the beginning of the word.
Find out the answer
Answer:
light bulb - kidney.
2 commas before the picture - remove 2 letters at the beginning of the word, 1 comma after pictures - remove the last letter in the word.
Find out the answer
Answer:
cloud - varnish.
Tell your child to be attentive, think outside the box, and always come up with multiple solutions.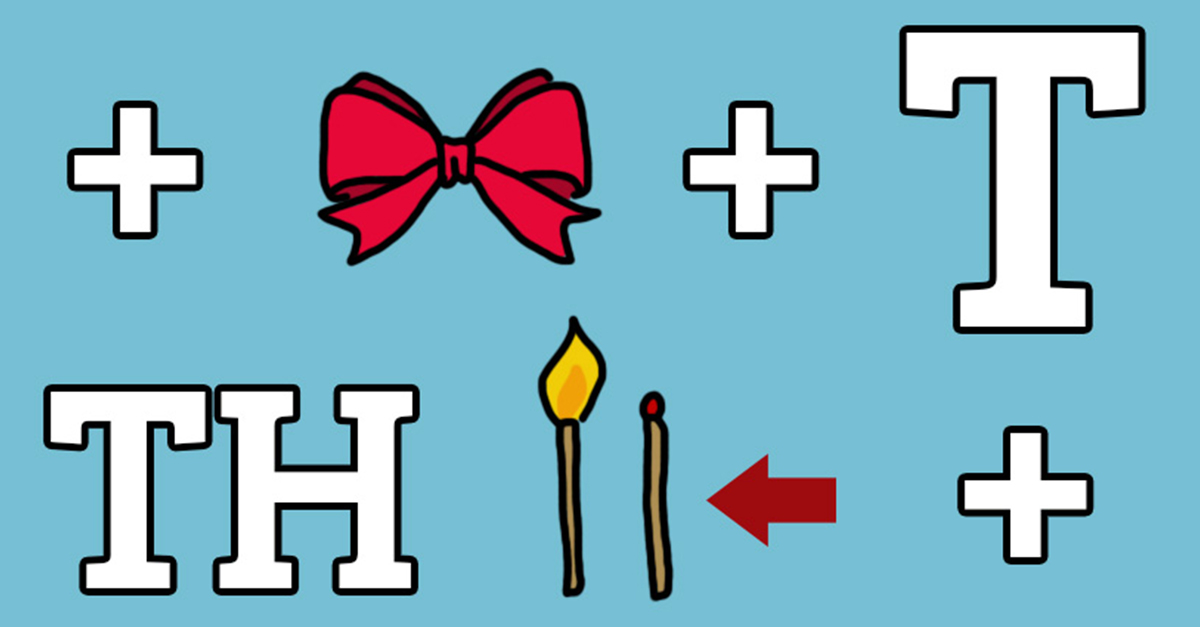
Select the child's age
to start classes
5-8 years old
9-14 years old
Learning to solve puzzles with letters
The letters in the puzzles complement the pictures and help create more complex puzzles. If one or several letters are to the left or right of the picture, so they need to be added to the word at the beginning or in the end.
We see MOT in the figure, add the letter K to the beginning of the word and get the word MOLE.
Letters in puzzles can be combined with other symbols and signs.
This puzzle combines a pattern, commas and letters. You need to read it like this: from the word UMBRELLA we subtract two letters at the end (two commas on the right) and we get the syllable ZO.
Find out the answer
Answer:
PATTERN.
Solution
Before "ZO" add the letter "U", after - "R". We get the word PATTERN.
The "=" sign between two letters means that the letter from the word in the picture must be replaced with the one which comes after the "=".
In the word "HERON" we change the letter "C" to "K".
Find out the answer
Answer:
Drop.
Instead of the first letter in equality, there can be a number. Then you need to calculate which one the letter corresponds to the number, and replace it with the one that comes after the "=".
The third letter in the word EAR is O.
Find out the answer
Answer:
Fly.
Decision
Conditional rebus change the letter "O" to "A", and to the word "EAR" add the letter "M".
If the letter next to the picture is crossed out, it must be removed from the word.
We take the letter “L” from the word “ELEPHANT” and get the word “DREAM”.
LogicLike - a complete development package children 4-12 years old
Logic
Memory and attention
World
Riddles
Mathematics
Chess
Technology
Start classes
Letter puzzles (no pictures)
You can encrypt a word for a rebus without drawings and symbols, but only with the help of letters. In that case, we pay attention to how letters or syllables are located relative to each other, and choose the appropriate suggestion.
- If one letter, syllable or word is above another, read them it is necessary with the prepositions "above" or "under".
- When one letter is located after another, choose between prepositions "for" or "before".
- One letter can contain another or several. In that In this case, we use the preposition "in".
The syllable "GA" is located "UNDER" the syllable "RU".
Find out the answer
Answer:
Girlfriend.
Behind the letter "K" is the syllable "NI". But in this rebus, the preposition "for" we do not fits, so we try “before”.
Find out the answer
Answer:
Apron.
The syllable "TA" is inscribed in the capital letter "A".
Find out the answer
Answer:
Vata.
Drawings in puzzles
If an ordinary picture in a rebus means a word, then an inverted one requires reading the same word from right to left. Can be combined with letters, numbers and various symbols.
In this rebus, we read the word "ZUBR" in reverse and get "RBUZ".
Find out the answer
Answer:
Watermelon.
Does the arrow next to the picture point to the left? The author of the rebus requires you to read the word backwards direction.
Instead of "KIT" we read "TIK".
Find out the answer
Answer:
Bow.
Solution
"BAN" + "TIK" = "BOW".
Solving puzzles with numbers
The easiest way to use numbers in puzzles is to replace part of a word.
Find out the answer
Answer:
Magpie.
If the number next to the picture is crossed out, you need to remove it from the word.
We read the word "CAKE" on the contrary and subtract the first word from the resulting word "TROT" the letter "T".
Find out the answer
Answer:
Rot.
In the rebus, a row of numbers can be located above the picture. If there are exactly as many numbers as there are letters in word, we simply swap the letters in places, as indicated by the number series.
There are 5 letters in the word "BOAR" and the same number of letters are shown above the picture. Just we line up the letters in the order indicated in the number series, and get a new word.
Find out the answer
Answer:
BANK.
If there are fewer numbers above or below the picture than there are letters in the word, then we use only those that correspond to the numbers in the number series.
It is easy to see that there are fewer numbers in the riddle than there are letters in the word "CROCODIL" or "ALLIGATOR". It remains to choose the correct word and letters from it.
Find out the answer
Answer:
Rabbit.
Solution
From the letters of the word "CROCODILE" we have collected a new word - RABBIT.
Logic tasks are a great option for joint activities with children. Look for the keys to secret ciphers in pictures, arrange speed competitions between teams of friends. unravel intellectual riddles and develop logic and thinking with LogicLike.
We develop thinking and horizons
More than 2,000,000 children and parents from all over the world are already engaged on the LogicLike website.
Start classes! Start classes!
HOW TO SOLVE PUZZLES (rules of solving)
What are the rules for solving puzzles?
How to solve puzzles?
Rules for solving puzzles or
We hope that after reading the information below, you, dear visitors of the All Rebuses website, will not only cope with any puzzles without much difficulty, but will also be able to compose them yourself.
For clarity, each given rule will be accompanied by a picture with an example of the corresponding rebus.
What is REBUS?
Rebus is a riddle in which the desired word or phrase is depicted by a combination of figures, letters or signs. (Explanatory Dictionary of S. I. Ozhegov)
Although, maybe you are already ready to solve any puzzles on the selected topics?
Then, I propose to go to the category SOLVING THE REBUS ON THE TOPIC and choose the topic that interests you. For example:
Solve puzzles about wild animals
Solve puzzles about school subjects
Solve puzzles "Names of women"
Solve puzzles "Names of men" or some event, to make it more exciting and developing, I suggest choosing the right rebus from the category FIND A READY REBUS (WITH ANSWER). For example:
Puzzles with answers to words starting with the letter A
Puzzles with answers to words starting with the letter B
Puzzles with answers to words starting with the letter B
puzzle words in articles for your convenience, dear puzzle lovers, are arranged in alphabetical order.
Or maybe you are looking for puzzles to use when compiling the currently very popular quests? Then, these collections of puzzles are just for you:
Puzzles for the quest (with answers)
Solve puzzles about the house (with answers)
So, how to solve (solve) puzzles?
Rules for solving puzzles
Rule 1
The picture in the rebus (the image of something or someone), as a rule, means the nominative case in the noun.
Rule for solving puzzles 2
An arrow pointing to some part image, says that from the whole picture you need to read (take into account) only this part of it.
The rule "How to solve puzzles" 3
The necessary part of in the image can also be highlighted in another way, for example, is circled .
Rules for solving puzzles. Rule 4
The commas before the picture indicate that at the beginning of the word indicated by this picture, you need to remove as many letters as there are commas.
The rule "How to solve the puzzle" 5
Commas after pictures indicate that at the end of the word indicated by this picture, you need to remove as many letters as commas are shown.
The rule "How to solve puzzles" 6
An inverted image (picture) means that the word should be read "in reverse".
Rule for solving puzzles 7
The “arrow” sign , depicted from right to left, also indicates that the word should be read “back to front”.
The rule "How to solve puzzles" 8
The numbers near the picture (on it, below it, above it) show which letters, and in what order, need to be taken into account.
Rules for solving puzzles. Rule 9
The crossed-out numbers near the picture (on it, below it, above it) show which letters do not need to be taken into account (not read).
The rule "How to solve the puzzle" 10
The equal sign between letters means the replacement of one letter (or combination of letters) with another.
The rule "How to solve puzzles" 11
The arrow between the letters shows which letter needs to be replaced, and with which.
Rule "How to solve puzzles" 12
The crossed out letter (letters) indicates which letter(s) do not need to be read.
Rule "How to solve a puzzle" 13
The letter located next to the strikethrough indicates that it should be read instead of the deleted one.
When solving puzzles, one must also take into account the spatial arrangement of letters relative to each other.
I will give some possible arrangements of letters and ways to read them.
The rule "How to solve the puzzle" 14
The letter(s) located OVER another letter(s) is read together with the letters N A D and the letter below.
Rules for solving puzzles. Rule 15
The letter(s) located UNDER by another letter(s) are read together with the letters UNDER and the letter(s) located above.
Rules for solving puzzles. Rule 16
The letter(s) located ON another letter(s) are read together with the letters H A and the letter(s) below it(them).
Rule "How to solve puzzles" 17
The letter(s) located ZA with another letter(s) are read together with the letters ZA and the letter(s) located in front of it(them).
Of course, in option 1 (as in the other examples above and below) it can be read in a different way: “NA NA R”, “ZAR NA”, etc. But, this is precisely the task of solving the rebus to choose from several possible options.
The rule "How to solve puzzles" 18
The letter (s) located In another letter, we read together with it, the letter In and the letters that are shown next to each other, if any.
The rule for solving puzzles 19
The letter, the image of which is “scattered” ON on the surface of another letter (number, sign), is read together with it and the letters П О .
Rule for solving puzzles 20
The letter, the image of which consists of OF other letters, is read together with the letters AND Z and the letters of which it consists.
These are the basic rules of . They, of course, can be used one by one or combined, used in different (separate) puzzles in different quantitative proportions.
But, I think that the author, the creator of the rebus, has the right to approach the process of creating the rebus creatively , which means that he can introduce his own creative elements, apply unexpected approaches to the logic of encrypting certain words. This, in my opinion, makes the process of unraveling even more exciting, and at the same time, the range of mental operations is wider.
Examples of a creative approach to creating puzzles and, accordingly, solving them
Various signs, mathematical operations, formulas can be used in such puzzles, various non-standard approaches are applied.
Here are some examples of such creative solutions when creating puzzles:
I suggest move on to solving puzzles on selected topics , for example:
Solve puzzles about flowers
Solve puzzles about transport
Solve puzzles about fruits
Solve puzzles about dog breeds
Or maybe you want to find a ready-made puzzle (with an answer) for a certain word to make it to the children in class, in order to captivate them, introduce an element of game activity into lesson? Then this section is for you:
FIND A REBUS WITH THE ANSWER
" on the "All Articles" page and puzzle words in the articles for your convenience, dear readers, are arranged in alphabetical order.