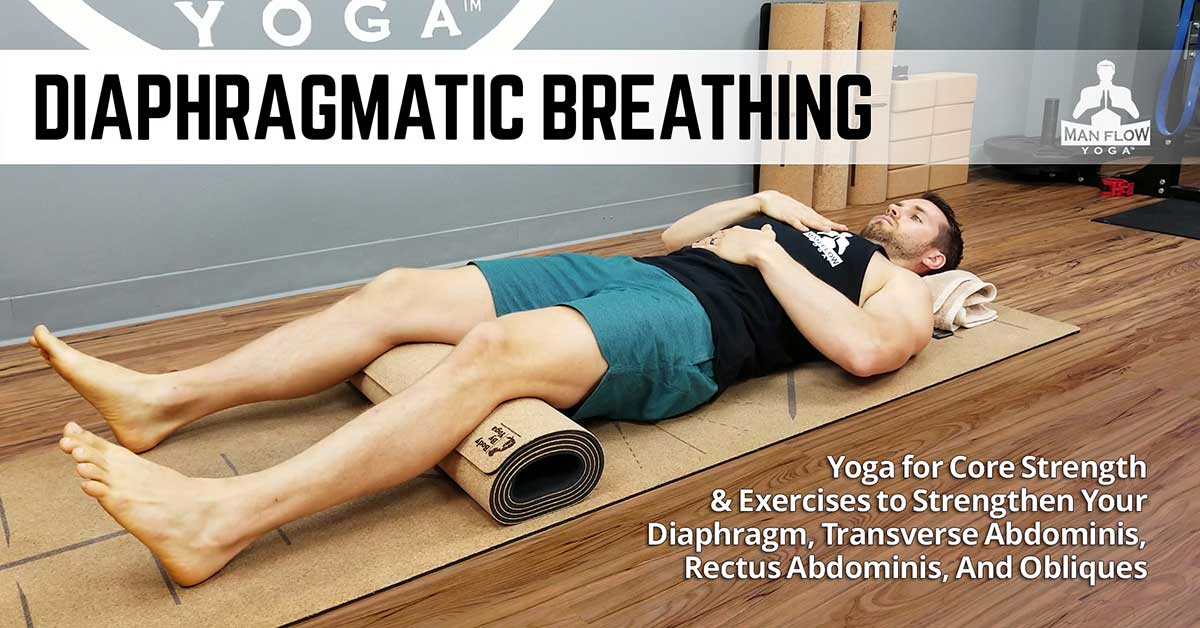
Diaphragmatic breathing script
How to do Diaphragmatic Breathing: 7 Simple Exercises [with Script in PDF]
For most people, belly breathing is very easy to learn. Diaphragmatic breathing, on the other side, requires a bit more practice.
So in this blog, I'll share with you a sequence of simple breathing exercises that you can practice to do diaphragmatic breathing properly.
In my previous blog, I talked in detail about the differences between belly breathing and diaphragmatic breathing, and what are their benefits. I encourage you to read that article first so that you can clear any doubts you might have.
Meanwhile, just keep in mind that whenever I mention diaphragmatic breathing I'm referring to thoraco-diaphragmatic breathing (or diaphragmatic ribcage breathing), and not just belly breathing.
How to do diaphragmatic breathing
The breathing sequence below is based primarily on what I've learned from my teachers at the Himalayan Yoga Tradition in India. And it is the same sequence I use during my online pranayama classes. I've written it down as a script though so that you can use it on your own.
I also created a free PDF with a Diaphragmatic Breathing Training Guide based on the script below. To download it you just need to sign up to my mailing list here.
I teach this sequence in a mindful and meditative way, to learn not only how to engage the diaphragm properly, but also to induce a sense of calm and tranquility.
It takes about 30 minutes. The whole pranayama class takes 75 minutes.
If you would like to join my online yoga classes you can also sign up to my mailing so that you can be notified of my weekly schedule.
Whenever you try this sequence on your own make sure that you are breathing through the nose at all times. Nose breathing and diaphragmatic breathing goes hand in hand.
Observing the breath in prone position
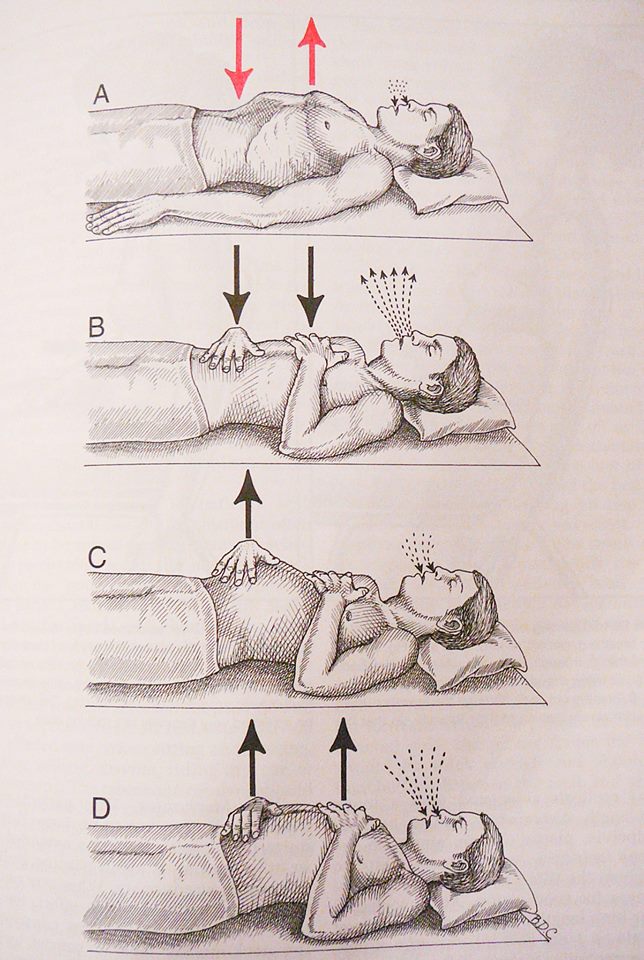
1. Laying down in makarāsana (crocodile pose)
- Lay down on the abdomen and keep the chest lifted by keeping the elbows bend, shoulder-distance apart, at a 45-degree angle from the armpits.
- Rest the forehead on the forearms.
- Keep the legs apart and relaxed, with the feet pointing outwards.
- Relax the neck, shoulders, back muscles, hip joints, legs, ankles, and feet.
- Allow the whole body to relax.
- Feel the pressure of the abdomen against the floor while you observe the movement of the breath.
- Notice how this pressure changes during the inhalation and exhalation.
- Then try to notice the movement of the side body and back body, expanding on the inhalation and contracting on the exhalation.
- Do this for about 7 minutes
This posture, called makarasana or crocodile pose, is very important for developing the diaphragmatic breath.
By laying down on the abdomen we simulate the intraabdominal pressure (explained in my previous blog) which forces the breath to move to the side body and back body.
Additionally by keeping the chest lifted this posture naturally prevents upper chest breathing.
Observing the breath in supine position
2.
 Laying down in shavāsana (corpse pose)
- Now turn your body and lay down on your back.
- Keep the legs about 30 degrees apart from each other.
- Place the right hand on the belly and the left hand on the chest (the order of the hands is not important).
- Keep the arms relaxed with the elbows resting on the mat.
- Observe the natural breath by observing the right hand rising on the inhalation and falling back down on the exhalation.
- At the same time make sure there is no movement on the left hand. In other words, no movement on the chest.
- Continue observing the natural breath for about 7 minutes.
When we lay down on our backs we will naturally breathe only with the abdomen. So this becomes belly breathing and not diaphragmatic breathing. But it is still beneficial and important to practice.
This breathing exercise is both, a form of breath awareness practice and a relaxation exercise. I recommend you try this at home whenever you are struggling with anxiety or stress.
I teach this simple breathing technique to induce a deep state of relaxation, to remove any fatigue, and as a transition before sitting up. This is all necessary for practicing pranayama.
To be able to actually practice diaphragmatic breathing when laying down on our backs, we would need to place a sandbag (or some other heavy object ) on the abdomen. The idea is to restrict the movement of the abdomen.
This is not very practical during online classes so we simply focus on abdominal breathing.
3. Deep abdominal breathing
After a few minutes, while still laying down on our backs, we practice deep abdominal rhythmic breathing.
- Breathe in to the count of five allowing the belly to expand fully
- Breathe out to the count of five allowing the belly to relax completely
- Breathe slowly and deeply using only the belly. Make sure there is no movement on the chest
- Do this seven times.
- After seven times return to the natural breath
Deep abdominal and rhythmic breathing can help to remove irregularities from the breath.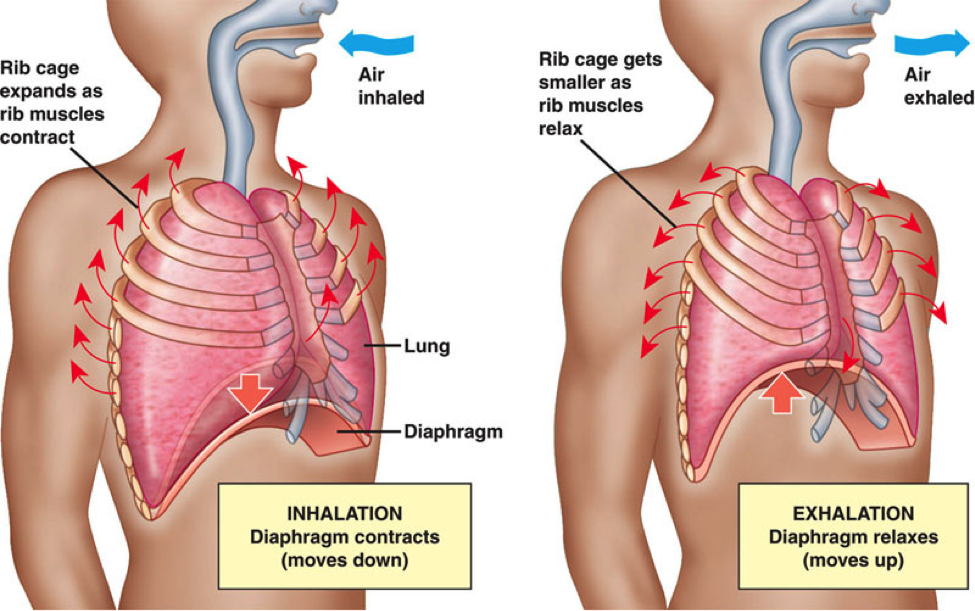 It can also help to enter an even deeper state of relaxation, especially after you return to the natural breath.
I recommend you try this breathing exercise whenever you are having trouble falling asleep. It works wonders.
Feel free to increase the count if that's more comfortable for you. You can also increase the number of repetitions if you wish.
4. Complete breath
Then we practice the complete breath.
- Breathe in to the count of eight.
- Start with the belly up till the count of five, and then continue with the chest till the count of eight.
- Allow the chest to expand fully so that you can inhale to your full lung capacity
- Breathe out to the count of eight, allowing the lungs to empty completely.
- Do this five times.
- After five times return to the natural breath
The idea of this exercise is to gain control and become familiar with the difference between belly breathing and chest breathing.
It also helps to energize the body before we sit up, after several minutes of laying down on the back.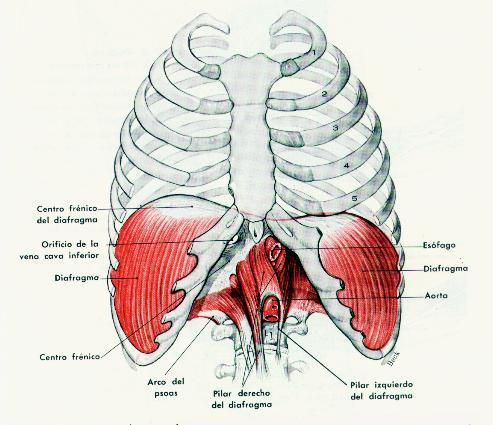
Observing the breath in sitting position
After observing the breath for several minutes in a prone and in a supine position, we move to a sitting posture.
This is where many people have difficulties.
In my experience, although most people will be able to easily practice diaphragmatic breathing when laying down on the belly or on the back, the moment we sit up they immediately start breathing with the chest.
I have seen this even among advanced yoga practitioners.
The reason, I believe, is because of lack of practice sitting crossed-legged on the floor, and also because of not knowing how to sit with the back straight and upright. That's why I always encourage my students to sit on a chair if needed.
You can visit my previous blog How to Sit for Meditation and Pranayama [with a Straight Back] to get some suggestions for finding a comfortable posture.
If we struggle with the sitting posture it will create tension in the body and therefore tension in the breath.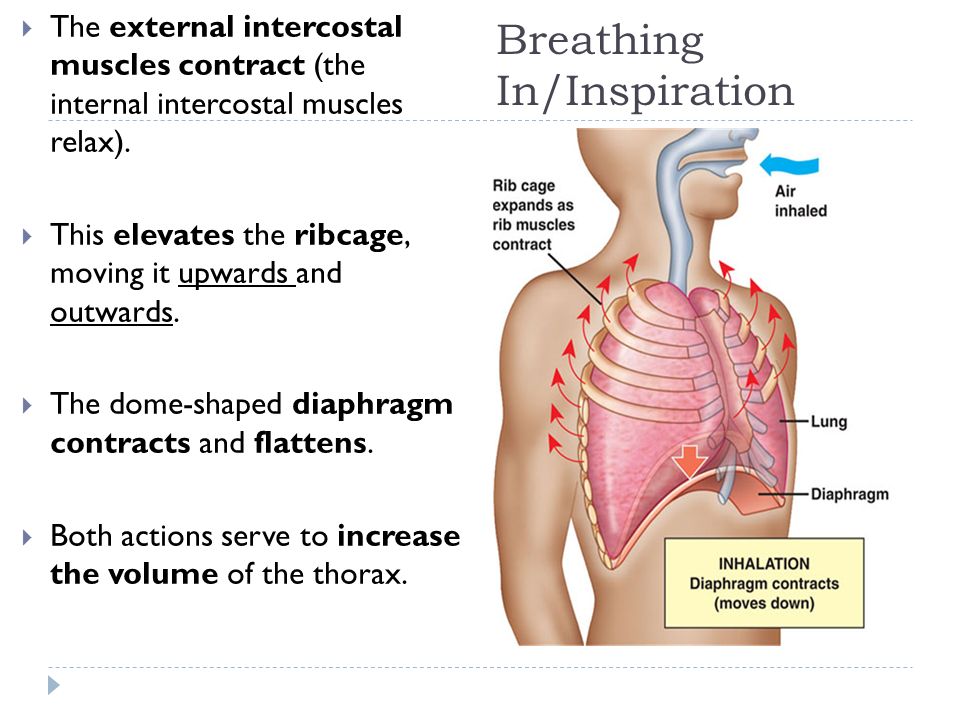 This discomfort is also going to force us to breathe with the chest.
Whatever sitting posture we use, it should feel so steady and comfortable that allows the body to relax completely without losing the alignment. This will allow the breath to move freely in the abdominal area.
Besides this, we also need to make sure the breath feels very relaxed, soft, effortless, and spacious. It should be silent, continuous, and at all times through the nostrils.
Having this in mind, this is what we do when sitting up.
5. Right hand on the upper abdomen. Left hand on the chest
- Sit comfortably with the back straight and upright.
- Keep the head, neck, and spine in alignment.
- Maintain the natural curvature of the spine keeping the lower abdomen slightly in.
- Place the right hand on the upper abdomen and the left hand on the chest (the order of the hands is not important).
- Observe the natural breath.
- Notice how the belly pushes the right hand out during the inhalation.
- Notice how the belly moves back in during the exhalation.
- Make sure there is no movement on the left hand or the upper chest.
- Make sure there is no movement on the shoulders.
- Do this for about two minutes.
In this exercise, we could be either doing belly breathing or diaphragmatic breathing. That's why it is important to sit properly, keeping the lower abdomen in, to make sure we are actually breathing diaphragmatically.
Our main focus here though is on making sure that there is no movement on the upper chest. The next exercise will ensure we engage fully the diaphragm.
6. Left hand behind on the mid back
- After a couple of minutes move the left hand behind, to the mid-back. So the right hand is on the upper abdomen and the back of the left hand on the mid-back.
- Notice how the mid-back expands during the inhalation pushing the left hand out.
- Notice how the mid-back contracts during the exhalation allowing the hand to move back in.
- Try to feel both, the upper abdomen and the mid-back, expanding and contracting with each breath.
- Make sure there is no tension on the back and no movement on the spine.
- Do this for about two minutes.
This is the most difficult step but it is also the most important. It is here where we actually feel the three-dimensional movement that characterizes the diaphragmatic breath.
If you feel no movement on the mid-back you just need to bring your full awareness to this area and imagine that you are breathing in and out through it.
Eventually, you will start feeling the movement of the back.
7. Hands on the lower ribs
- Now place the hands on the lower ribs, just above the waist.
- Feel the breath moving deeply into the bottom part of the lungs.
- Notice how the lower ribs expand on the inhalation.
- Notice how the lower ribs contract on the exhalation.
- Make sure there is no movement on the upper chest and shoulders.

- Do this for about two minutes.
Here we are ensuring that the movement is in all three dimensions, not only the upper abdomen and back body but also the side body.
After this, you can relax the arms down placing the hands on the thighs or knees, and continue observing the breath for as long as you wish.
Conclusion
If you practice these breathing exercises regularly you will certainly experience the many benefits of diaphragmatic breathing.
You will also understand, based on your own personal experience, the differences between belly breathing and diaphragmatic breathing.
Like I mentioned in my previous blog, diaphragmatic breathing is the foundation for meditation and pranayama. That's why I always start my pranayama classes with this sequence.
But not only that. Diaphragmatic breathing is also crucial for mental and physical health, and even for physical performance. So anybody can benefit from learning how to breathe diaphragmatically.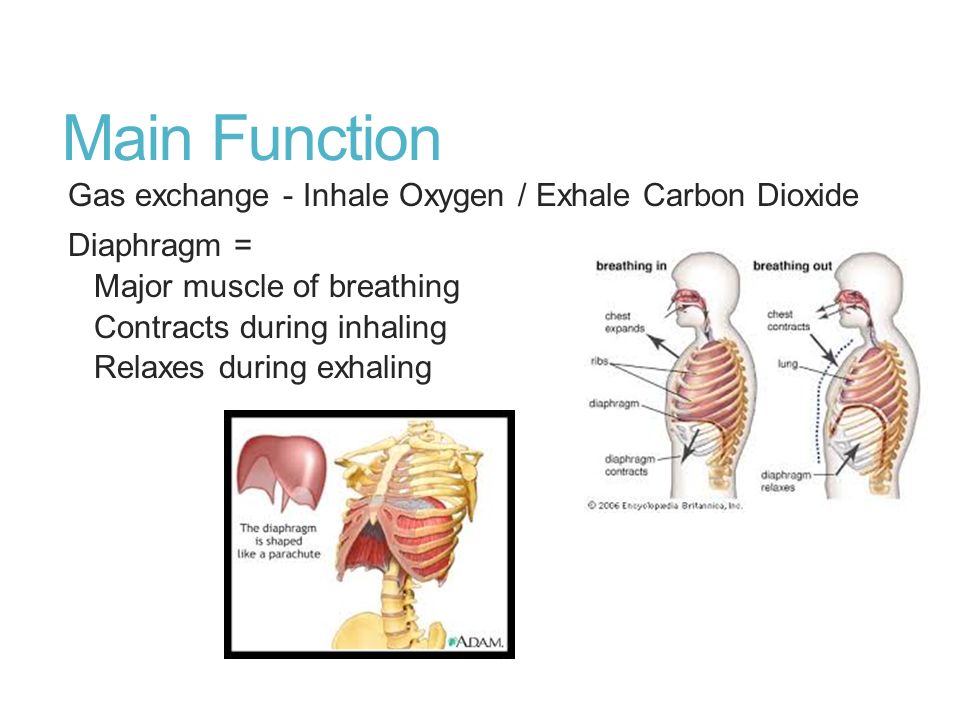
If you would like to join my online classes you can subscribe to my mailing list here to be notified of my weekly schedule. Once you subscribe you'll be able to download my free meditation e-book.
Feel free to share your thoughts in the comment section below.
Belly Breathing for Kids: Fun Ways to Practice Diaphragmatic Breathing at Home
- Share
- Tweet
Belly Breathing for Kids: Balloon Breathing & Breathing with a Plush Toy
Diaphragmatic breathing (or belly breathing) is one of the most widely used exercises in clinical practice.
In psychological practice, training in deep breathing is often used either as a standalone technique to control excessive physiological arousal or as part of a relaxation package.
Post Index:
- What is Belly Breathing
- Benefits of Diaphragmatic Breathing
- How to do Diaphragmatic Breathing
- Belly Breathing for Kids
- Balloon Breathing
- Using a Plush Toy to Learn Deep Breathing
What is Belly Breathing /Diaphragmatic breathing / Abdominal breathing
Diaphragmatic breathing or abdominal breathing is often referred to as belly breathing.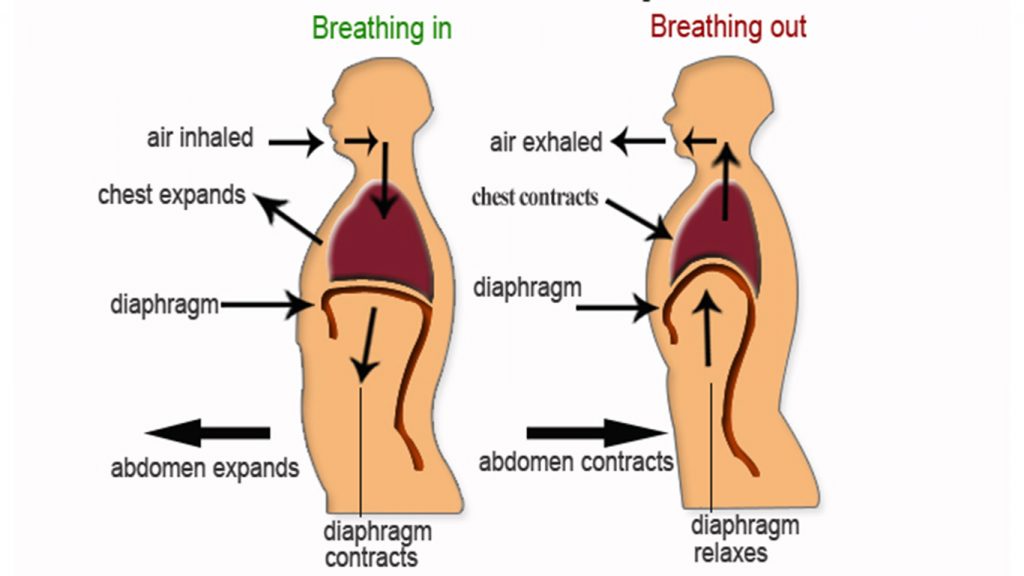
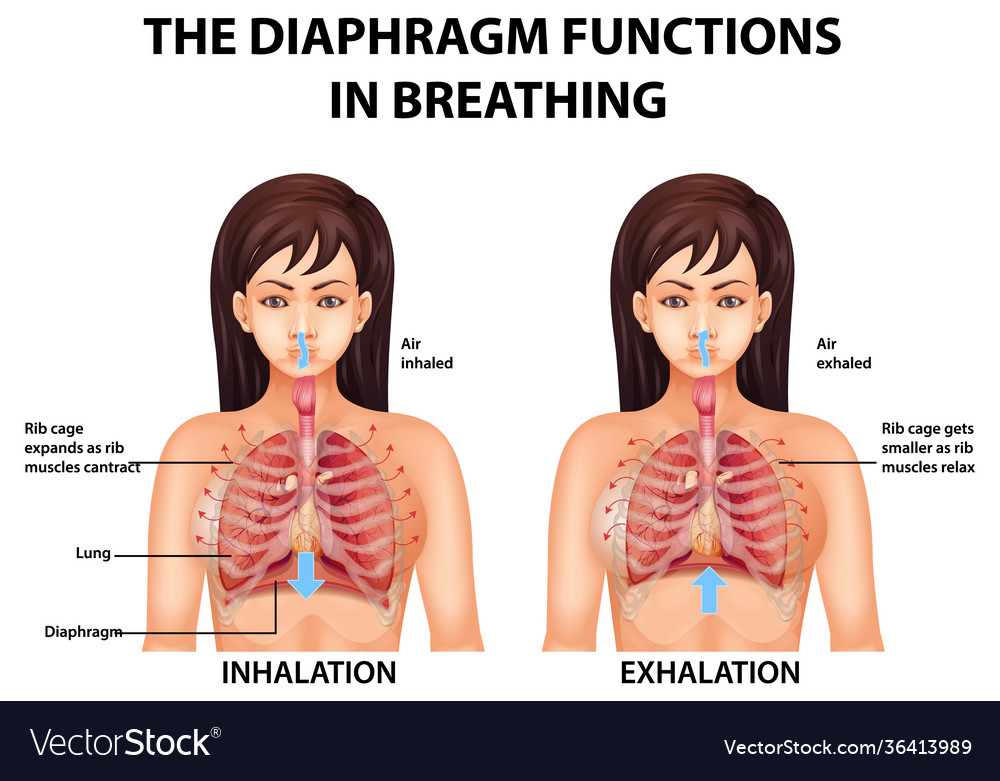
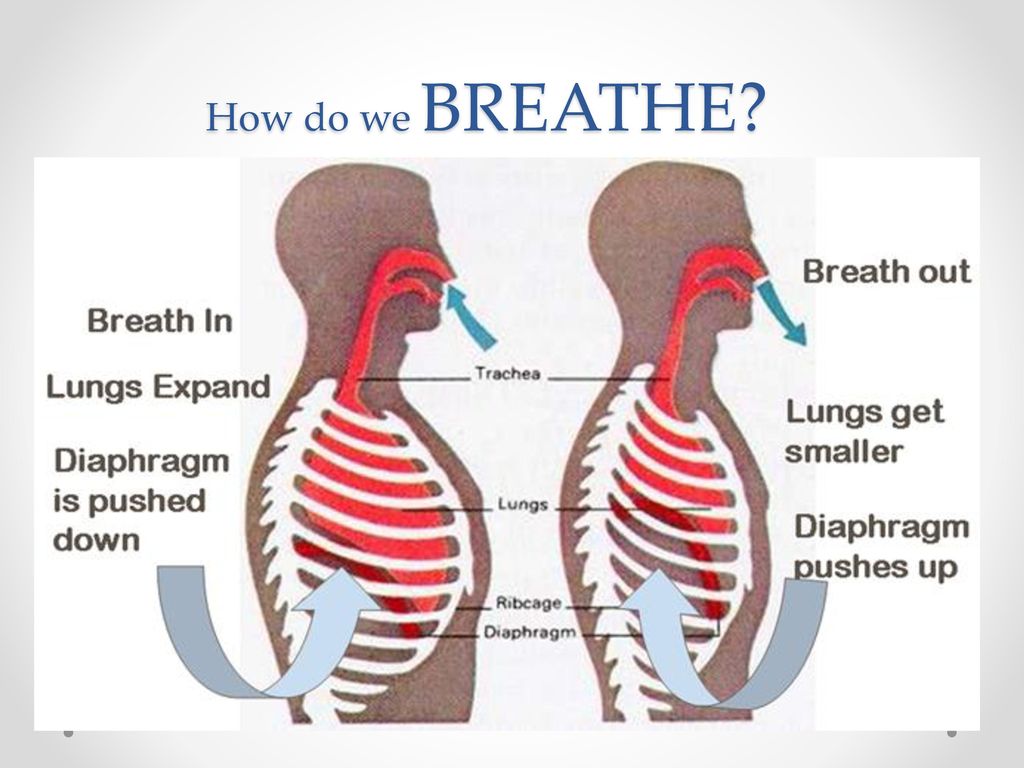
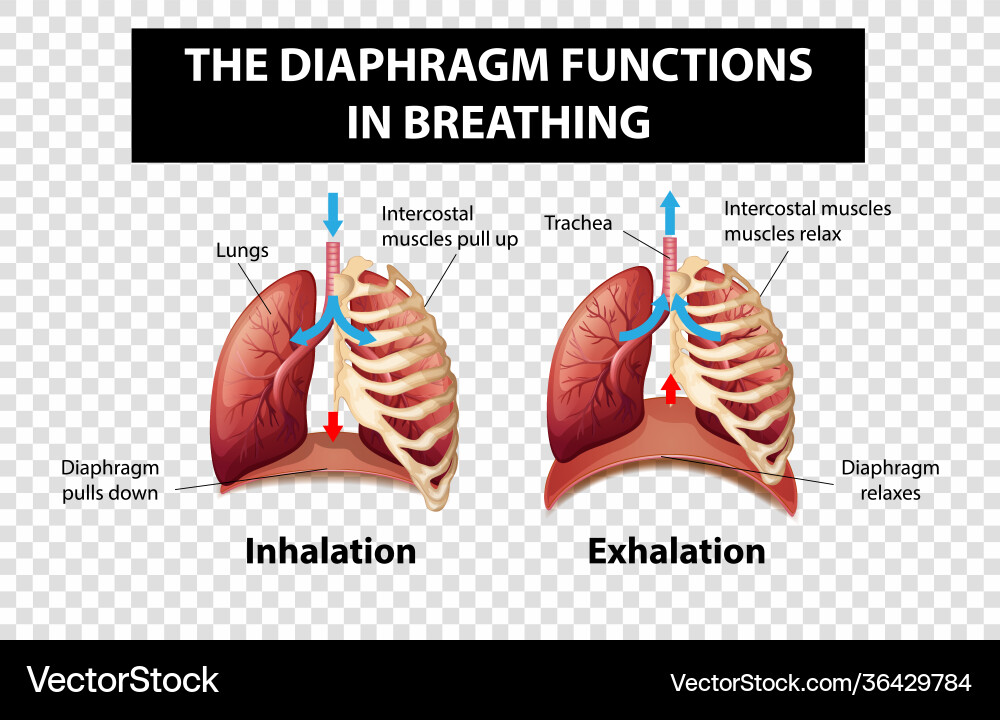
In diaphragmatic breathing, the breathing is done by contracting the diaphragm. The air enters the lungs, the chest does not rise but the belly pushes outwards.
Benefits of Belly Breathing
A growing number of empirical studies suggest that diaphragmatic breathing may help relaxation responses and benefit physical and mental health.
Some of the benefits of deep breathing are:
- Improving breathing patterns and respiratory efficiency
- Helping to reduce anxiety and stress
- Helping to reduce pain sensation
- Improving concentration / sustained attention
Diaphragmatic breathing is a widely used supporting treatment in respiratory rehabilitation programs in:
- Chronic obstructive pulmonary disease as it improves breathing patterns and respiratory efficiency
- Patients who have undergone abdominal and thoracic surgery, as it reduces post-surgery pulmonary complications
- Patients with heart failure and muscle weakness, as it improves respiratory muscle function
(List of research papers on this topic at the end of the post)
Diaphragmatic Breathing Exercise
You can practice this exercise standing, sitting on a chair or laying down on a flat surface.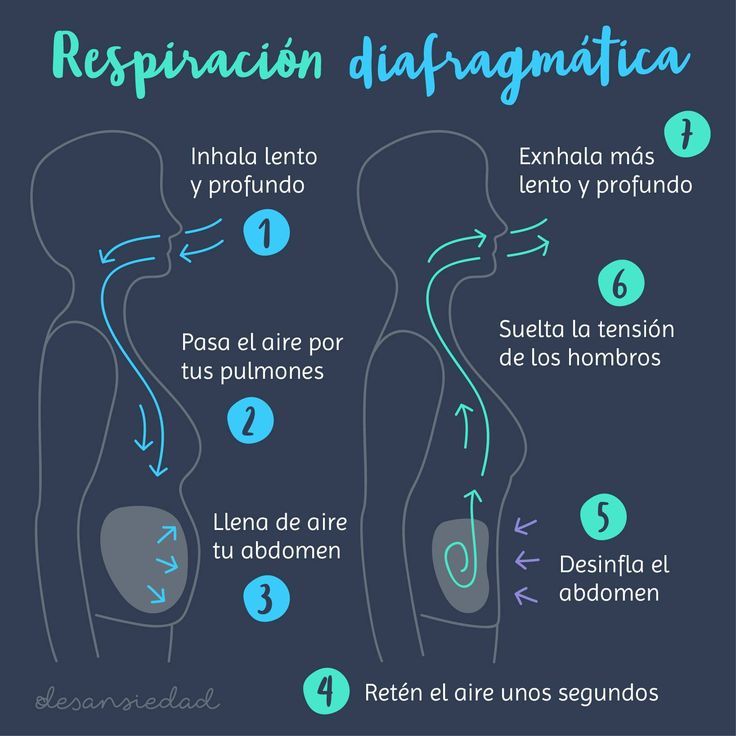 For the purpose of describing this technique (and with the aim of portraying a more relaxed setting), I’m going to assume a laying down position.
- Lie on your back on a flat surface (e.g. your yoga mat) with your head supported.
- Bend your knees (optional: you may place a pillow underneath to support your legs)
- Place one hand on your belly, right under your rib cage. It will allow you to feel how your diaphragm is moving up and down as you breathe.
- Place your other one hand on your upper chest, this will allow you to monitor that your chest does not rise.
- Breathe in slowly through your nose
- Hold your breath for 3-5 seconds
- Breathe out slowly through your mouth
Belly Breathing for Kids: Balloon Breathing & Plush Toy Breathing
This is a very simple exercise that kids will be able to learn easily. But we can make it even more fun by using two different techniques;
- Imagery: Using our child’s imagination with the “Balloon Breathing Technique”
- Using props, like a soft toy.

Even if you practice this breathing exercise, standing or sitting on a chair, it may be easier to use the laying down position with your kid.
Balloon Breathing
We will use our child’s imagination to make this exercise fun and easier to learn.
Balloon breathing script:
After your child is comfortably positioned laying on the floor, with head supported and knees bent, follow the following script:
- Imagine your belly is a balloon. This balloon will get bigger as you breathe in, and it will get smaller as you breathe out
- Now, place your hand on your belly,
- Breathe in slowly through your nose, and feel that balloon getting bigger
- Hold your breath till I count 1, 2, 3
- Breathe out slowly through your mouth.
If you chose this technique because your child was feeling a bit anxious, repeat this exercise a few times till you feel your child is settling.
Using a Plush Toy to Help Belly Breathing
In this exercise, we are going to practice belly breathing with the help of one of your kid’s plush toys.
It will be fun and it will focus the attention on the belly upward movement.
Ask your child to lie on the floor, with the knees bent.
Place a favorite plush toy on your kid’s belly.
Follow the following script:
- Your teddy (name your kid’s toy) is sitting on your belly and would love to travel up and down. But we need to do it slowly so that ducky doesn’t fall from your belly
- Breathe in slowly through your nose, and let ducky go up
- Hold your breath till I count 1, 2, 3
- Breathe out slowly through your mouth.
How Often Should I Practice Belly Breathing?
It actually depends on the reason why you are practicing this exercise.
I’ve read recommendations to practice this type of exercise 3-4 times a day for around 5 minutes.
When I first learned about this technique, it was in the context of my psychology studies, as a tool to help with anxiety. Deep breathing training was recommended following a pattern of 4/5 repetitions about 10/15 times a day, especially during stressful situations.
As I use it with my kids in order to help them settle and self-regulate, I don’t follow any of the above recommendations.
We just practice breathing exercises when we feel we need to calm down and settle. But practicing these fun breathing exercises in advance, helps us learn the technique so that we can apply it when we really need it.
Research on Benefits of Deep Breathing and/or Diaphragmatic Breathing
Reseach on this topic keep growing. You may find below a selection of studies on various benefits of diaphragmatic breathing.
- The effect of deep and slow breathing on pain perception, autonomic activity, and mood processing – an experimental study
- The Effect of Diaphragmatic Breathing on Attention, Negative Affect, and Stress in Healthy Adults-(read research)
- Comparison of two instructions for deep breathing exercise: non-specific and diaphragmatic breathing (read research)
- Can diaphragmatic breathing modify chest wall volumes during inspiratory loaded breathing in patients with heart failure? (read research)
Other Deep Breathing Resources in this Blog
- How to Practice the Lazy 8 Breathing Exercise (super effective tool!)
Other Calming Resources in this Blog
- Calming Strategies for Kids
- What is a Calming Box
- DIY Sensory Bottles
Belly Breathing for Kids: Fun Ways to Practice Diaphragmatic Breathing at Home
Formation of diaphragmatic breathing | Planning point:
Russian Federation, Tyumen region, city of Zavodoukovsk
Municipal Autonomous Educational Institution
“Zavodukovskaya secondary school No. 2”
2”
Summary of classes/ cycle of classes
Formation of diaphragmatic respiration
Nekrasova teacher Kira Aleksandrovna
Russian Federation, Zavodoukovsk
2018
Explanatory note
Breathing is one of the most important functions of the body, providing a continuous supply of oxygen to all organs and tissues. The neurons of the cerebral cortex are most sensitive to the lack of oxygen and can live without it for only 4-5 minutes. Lack of oxygen leads to oxygen starvation and disruption of the functioning of cognitive processes, and its chronic insufficient supply leads to various diseases (serious impairment of memory, attention, etc.).
Breathing is regulated by both the central nervous system and the ANS, which is very sensitive to emotional influences. Sadness, anger, anxiety, fear change the activity of the body system - breathing quickens, the heart beats more often - the load on the body increases.
Respiration is one of the vegetative functions that has voluntary regulation.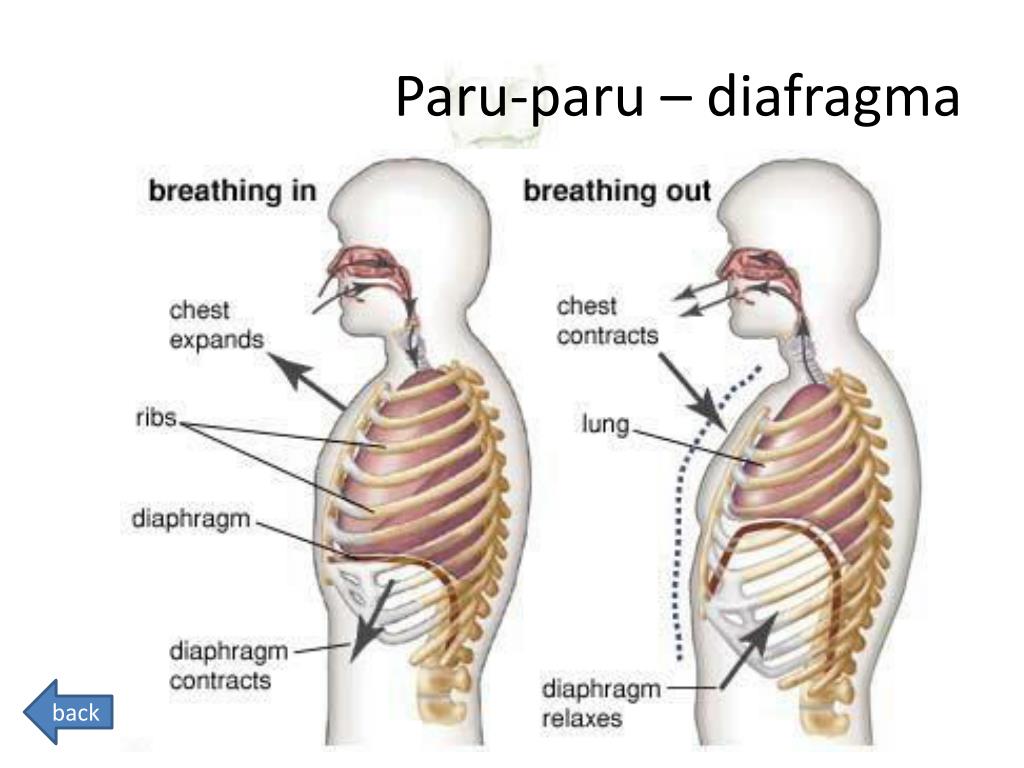 The regulation of the depth of breathing allows you to remove the emotional stress that has arisen and contributes to the achievement of a state of general relaxation.
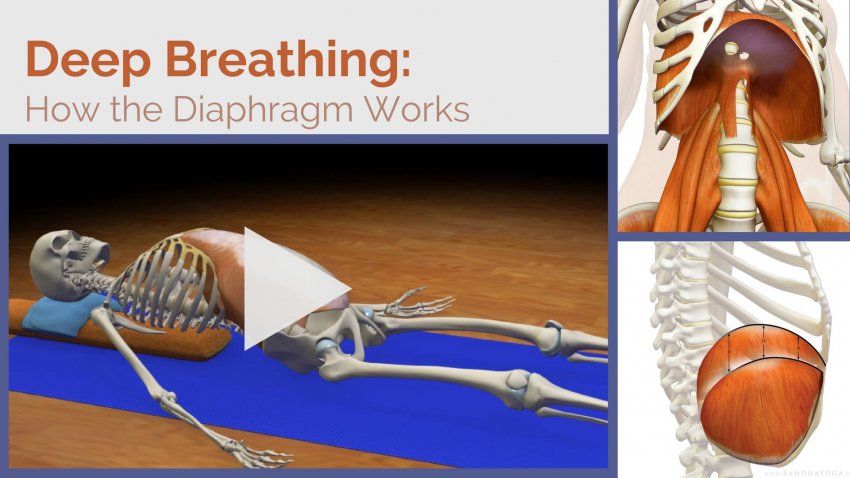
Diaphragmatic breathing is the deepest, and all parts of the lungs are filled with air.
According to Ovsyannikov's classification, diaphragmatic breathing is the most optimal and most efficient type of human breathing.
Due to the most complete saturation of the lungs with oxygen during diaphragmatic breathing, the frequency of respiratory movements is reduced, physical and emotional stress is reduced.
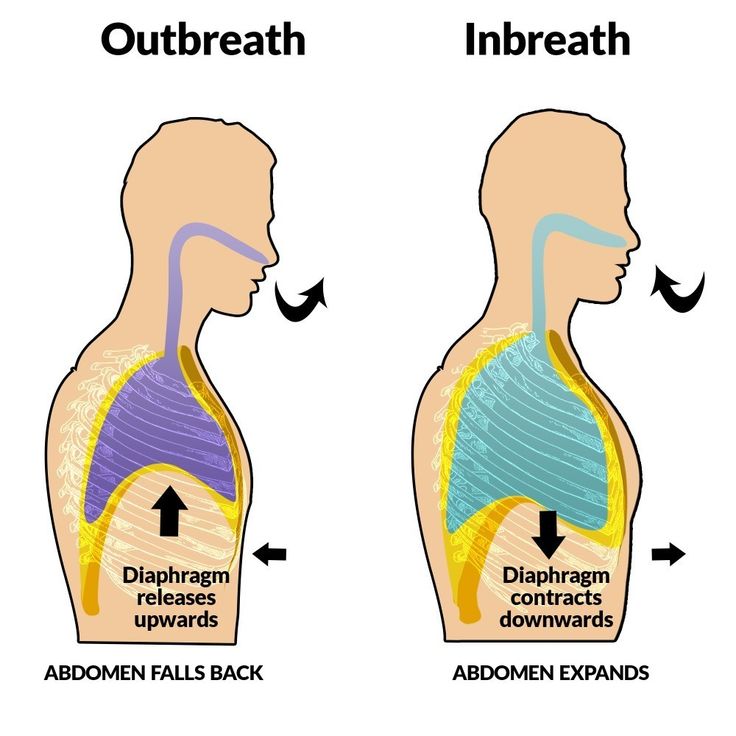
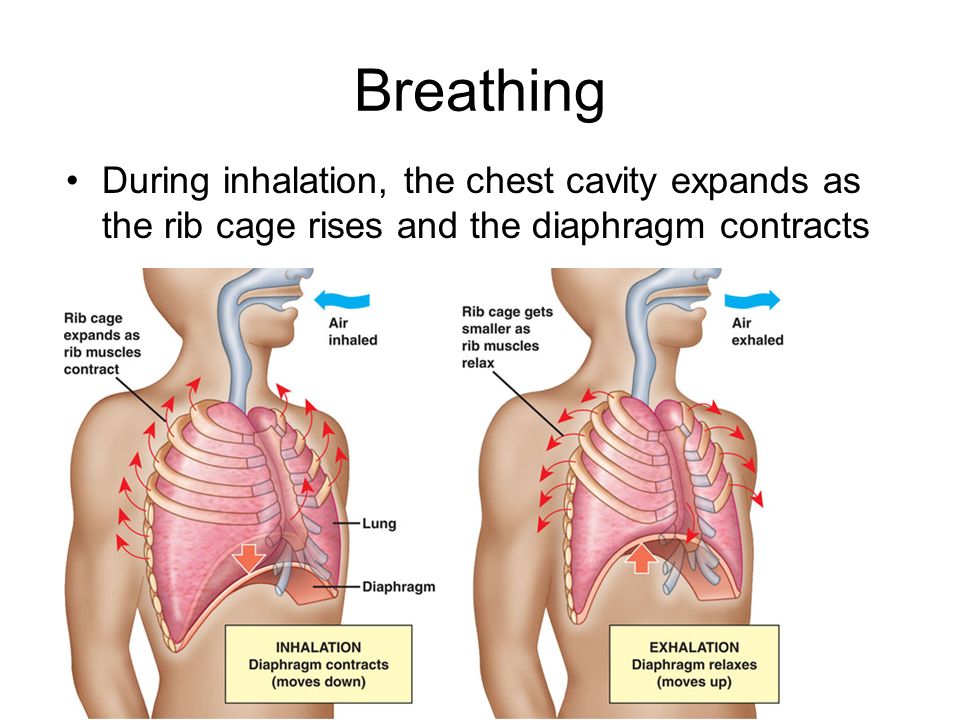
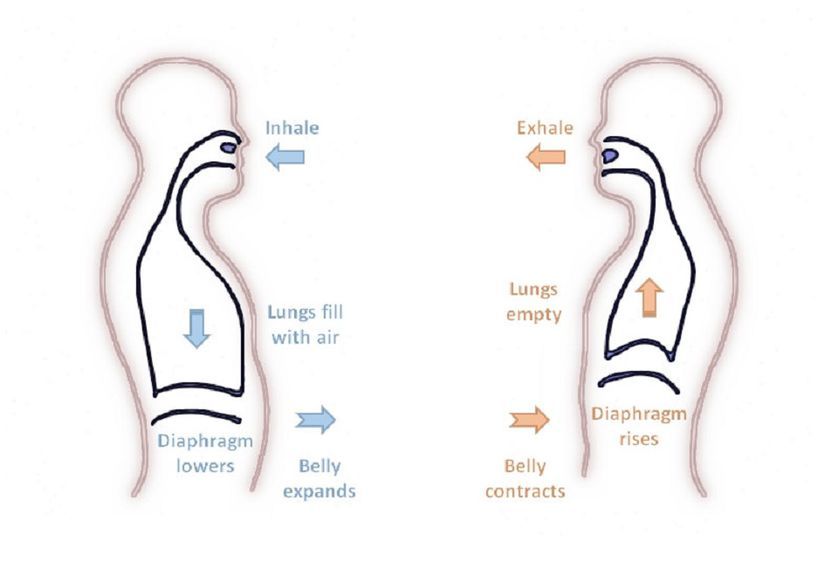
During diaphragmatic breathing:
Inhalation - calm, without effort, is carried out through the nose, while the anterior abdominal wall “protrudes forward”, and the air, as it were, is “taken in by the stomach”.
Exhalation - smooth, elongated, carried out mainly through the mouth, the abdominal wall is "drawn in", and the air, as it were, is "pushed out" by the stomach.
One of the speech disorders is stuttering.
Stuttering is manifested in violation of the rhythm and fluency of speech.
Frequent speech difficulties and failures lead to increased expenditure of nervous energy, and sometimes to serious mental trauma, which can cause feelings of inferiority, vexation, helplessness, and other negative emotions.
The most important conditions for correct speech are a long smooth exhalation, clear and relaxed articulation.
It has been established that the most correct, convenient for speech is diaphragmatic-costal breathing, when inhalation and exhalation are performed with the participation of the diaphragm and intercostal muscles. The lower, most capacious part of the lungs is active. The upper parts of the chest, as well as the shoulders, practically remain motionless.
Inhalation during speech is short, light. Exhalation - long, smooth (in the ratio of 1:10; 1:15).
In the process of speech, the functional significance of the expiratory phase increases significantly.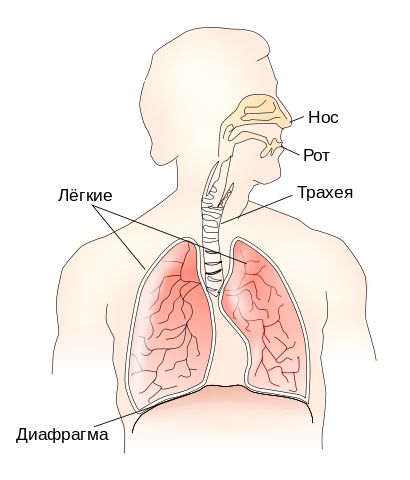 Before the start of speech, a quick and deeper breath is usually taken than at rest. Speech inhalation is carried out through the mouth and nose, and in the process of speech exhalation, the air flow goes only through the mouth. Of great importance for voicing the statement is the rational way of spending the air jet. The expiration time is lengthened by as much as the sounding of the voice is necessary during the continuous pronunciation of an intonation-logically complete segment of the utterance.
Proper speech breathing, clear, relaxed articulation are the basis for sounding voice. Improper breathing leads to forcefulness and instability of the voice.
The purpose of this training cycle is to teach diaphragmatic breathing.
Tasks:
- Correction of physiological and speech breathing.
- Relieve muscle tension.
- Removal of fear of speech.
This cycle of classes was developed on the basis of functional biofeedback technology, in particular, the comprehensive educational and preventive program "Wave" for teaching diaphragmatic breathing and psychophysiological self-regulation skills.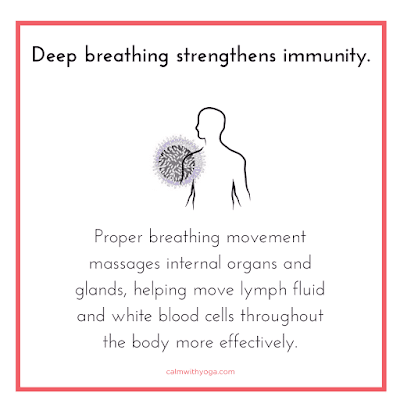
Classes with children of senior preschool age and primary school age last 15-20 minutes. Classes can be both individual and group. Groups should be small so that the speech therapist can monitor the correct execution of tasks by each child.
Expected result:
- The child has learned the correct physiological breathing.
- The muscles of the body are in a normal tone.
- Anxiety due to fear of speech is reduced.
Preparatory stage of work.
Classes are held in small groups.
Lesson 1.
Topic. Diaphragmatic breath. Diaphragmatic exhalation.
Purpose: 1. to form ideas about breathing in children;
2. Familiarize yourself with the technique of diaphragmatic breathing.
Equipment: snowflakes from napkins according to the number of children, straws for cocktails according to the number of children, paper autumn leaves according to the number of children, soap bubbles.
Course of the lesson:
1. Organizational moment.
“Friendship begins with a smile”
Children standing in a circle join hands, look their neighbor in the eyes and silently smile at each other.
Speech therapist:
We breathe when we play, sleep, eat. We all know how to breathe and breathe always. But we breathe differently. We can breathe often through our mouths, like dogs in a heat wave. Let's try. Then we inhale this much air (speech therapist inflates a small balloon). We can breathe with our chest. Let's try (breathe, sticking out your chest). So we inhale this much air (we inflate a larger balloon). And we can breathe deeply, belly. And then this is what we get a ball (we inflate the largest balloon).
We all know how to breathe, and we all don't think about how we do it. But how we breathe affects a lot of how our body works. During our classes, we will learn how to breathe correctly. Breathe so that our heart is comfortable to work; so that we feel calm and confident; so that our mood is good and cheerful.
2. Acquaintance with the technique of diaphragmatic breathing.
Diaphragmatic breathing exercises.
Ball exercise.
I.p. rest position, one hand rests on the knee, the other is pressed to the stomach.
Imagine that a small, small balloon has settled in your stomach. He loves being blown up and blown off. Try to puff it up. To inflate it big, the air must be inhaled through the nose (take a deep breath through the nose so that the stomach puffs up like a balloon). Let's see who has the biggest ball! Now try to inflate your belly faster than I can inflate the balloon.
When inhaling, only the abdomen inflates, the chest remains motionless. To help children inhale correctly, you can put your hand on their stomach while inhaling and ask them to push it out.
Snowflake exercise.
Now snowflakes will help us breathe properly (previously cut out snowflakes from napkins (it is possible with children) and hang them on a thread). Now we will take a breath, but not as usual, but with the tummy.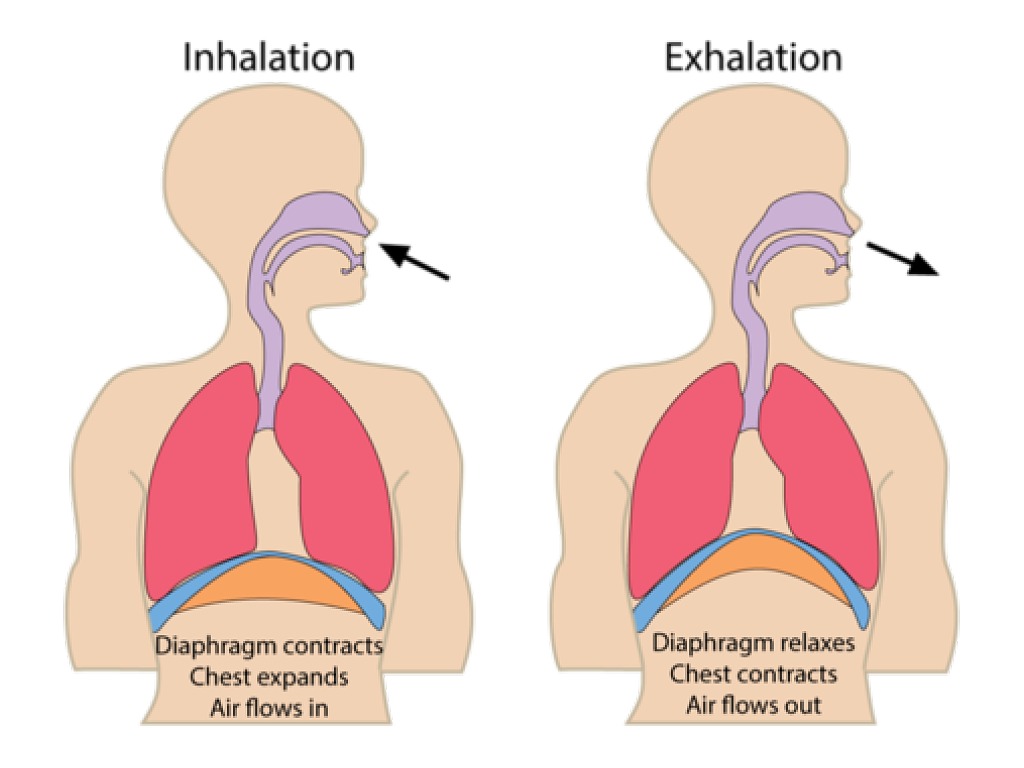 We will inhale air through the nose so that the snowflakes approach our face. At the same time, there will be more and more air, it will fill our stomach. And from this it will inflate like a balloon. And now exhale ... And the snowflakes fly away from our face.
Diaphragmatic exhalation exercises.
Exercise "Tubules".
Take straws (for cocktails) and try to slowly blow air through them, so that bubbles appear in a glass of water and gurgle.
And now try to fold your lips with the same tube and once again slowly blow out the air, a funnel should appear on the water.
When exhaling, the abdomen is drawn in, as if expelling the air. The exhalation should be free, while the muscles on the face are relaxed.
To help children exhale properly, you can put your hand on their stomach while exhaling and apply light pressure on the abdominal wall.
Exercise "Leaves".
Speech therapist distributes paper autumn leaves to children.
What season is it now? (autumn).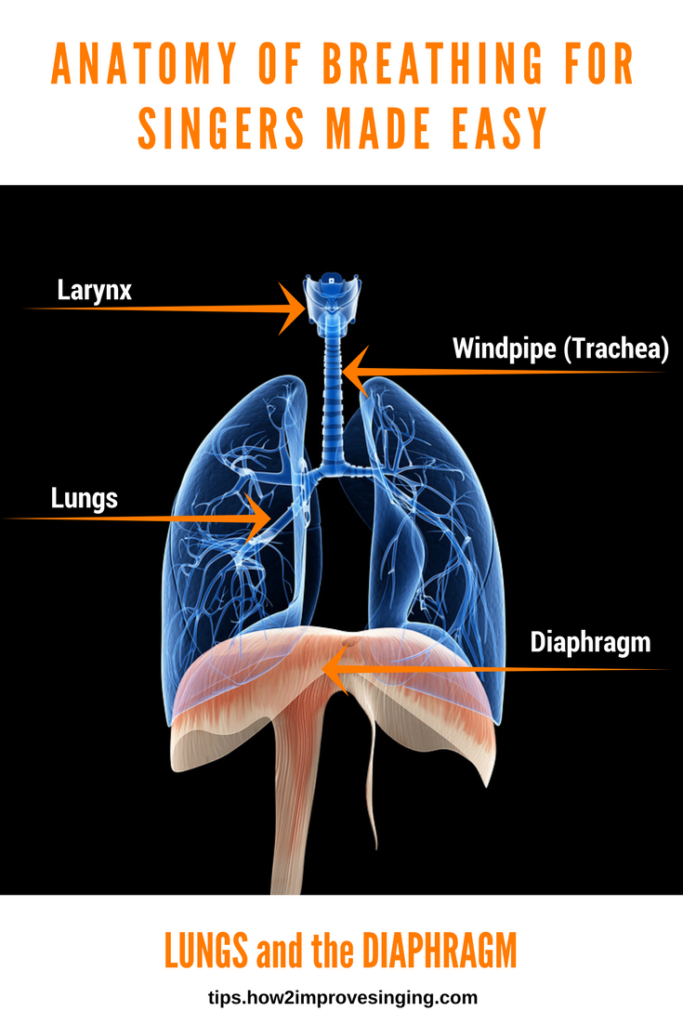 What happens in autumn? (children list the signs of autumn). Let's play leaf fall. Place the leaf in your open palm and blow at the same time. And now let's play "Whose leaf will fly farthest."
Children blow on the leaves, while paying attention to the movement of the abdominal wall.
Soap bubbles exercise.
Soap bubbles are handed out to children.
Speech therapist: Now we're going to have a Big Bubble competition. Whoever blows the biggest bubble is the winner. In order for the bubble to be very large, it must be inflated very slowly.
3. Summary of the lesson.
Guys, tell us what we did today? What have you learned to do?
Today you will have your homework: learn how to blow big soap bubbles.
And now let's all join hands, look into each other's eyes and calmly shake hands as a token of our friendship.
Lesson 2.
Topic. Combining the phases of diaphragmatic inhalation and exhalation.
Objective: to teach children how to correctly breathe in and out through the diaphragm.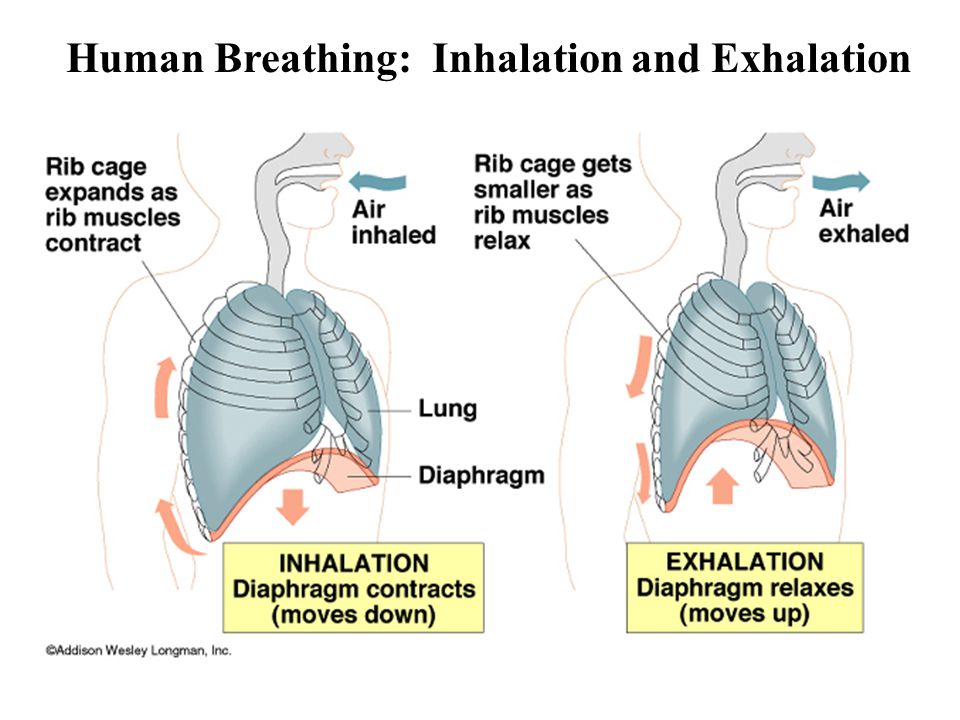
Equipment: pieces of cotton according to the number of children, 2-3 bright paper butterflies, Chinese bell "wind song", children's ceramic, wooden or plastic whistles in the form of various birds and animals, paper sultans (panicles).
Course of the lesson:
1. Organizational moment.
Exercise "Compliments".
Standing in a circle, join hands. Looking into the eyes of a neighbor, one must say a few kind words to him, praise him for something. The recipient of the compliment nods his head and says, “Thank you, I really appreciate it!” he then compliments his neighbor.
2. Combining the phase of diaphragmatic inhalation and exhalation.
Speech therapist: You and I already know how to inhale and exhale correctly. Let's try to do it together. Let's remember our balloon in the stomach and inflate it. Now try blowing it off slowly.
Speech therapist hands out pieces of cotton wool to children.
Speech therapist: You have "fluffs" on your palms.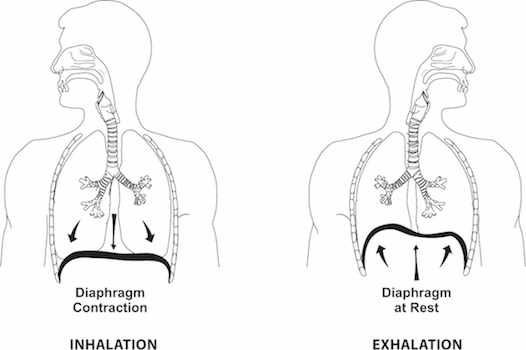 Let's inflate the "balloon" and slowly and smoothly blow on them. "Fluffs" should easily fly off your palms. Let's practice.
Speech therapist makes sure that each child breathes at a pace that is comfortable for him, without adjusting to other children.
Exercise "Fly, butterfly!"
Speech therapist: Summer is over. But in the meadows, when the sun warms, butterflies still fly by. Multi-colored beauties flew to us, look.
Paper butterflies are tied with threads 20-40 cm long, the threads are attached to the cord at some distance from each other. The cord is stretched so that the butterflies hang at the level of the faces of standing children.
Let's see if they can fly.
Speech therapist blows on butterflies.
Look, they flew! Now you try to blow. Whose butterfly will fly farthest?
Children stand near butterflies and blow on them. It is necessary to ensure that they stand straight, do not raise their shoulders when exhaling, blow on one exhalation, not getting air, do not puff out their cheeks, and slightly push their lips forward.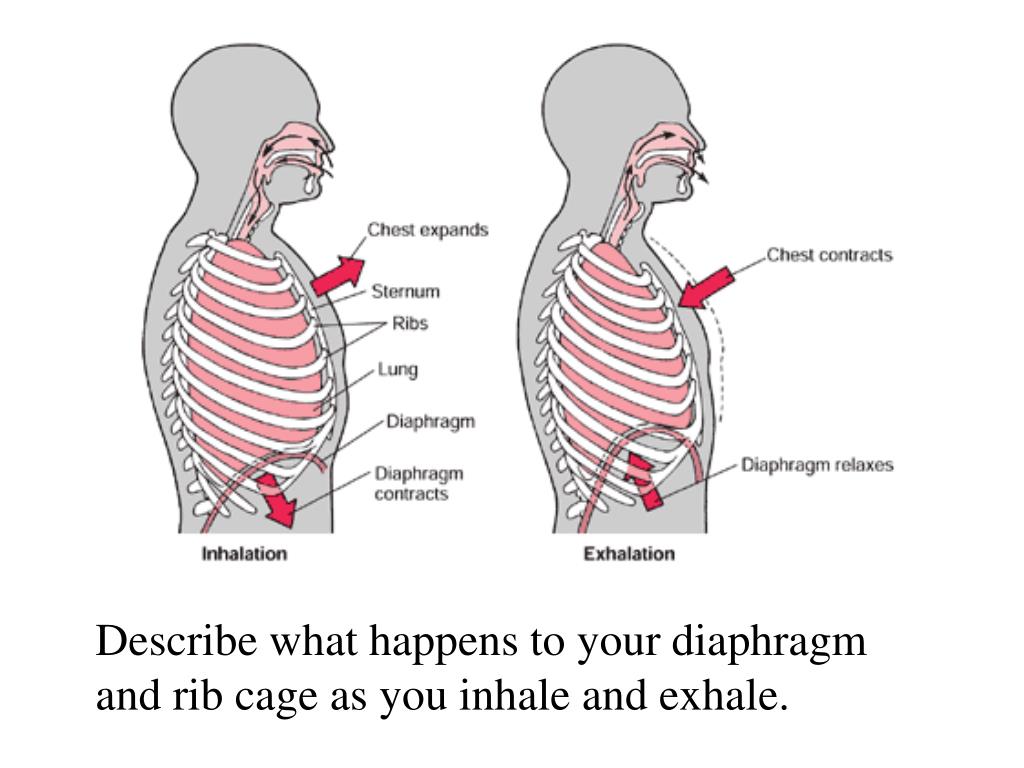 You can blow for no more than 10 seconds with pauses so that your head does not spin.
Exercise “Song of the Wind”.
The bell hangs at the level of the face of a standing child.
Speech therapist: Guys, look, this is a Chinese bell called the song of the wind. I will blow on it, and you listen to the sound, how melodic it is, shimmers.
Now blow on the bell. Now blow harder - the sound has become louder.
The children take it in turns to blow with varying force on the bell.
Exercise "Whistles".
Speech therapist distributes whistles to children: — Look at how beautiful whistle toys you have! Masha has a bird, and Vanya has a deer. Let's arrange a forest concert - each of the animals and birds sings its own song!
The speech therapist makes sure that the children blow without straining, do not overwork.
Exercise "Wind".
The speech therapist offers to play with the whisk. Shows how to blow on paper strips, then offers to blow to the child.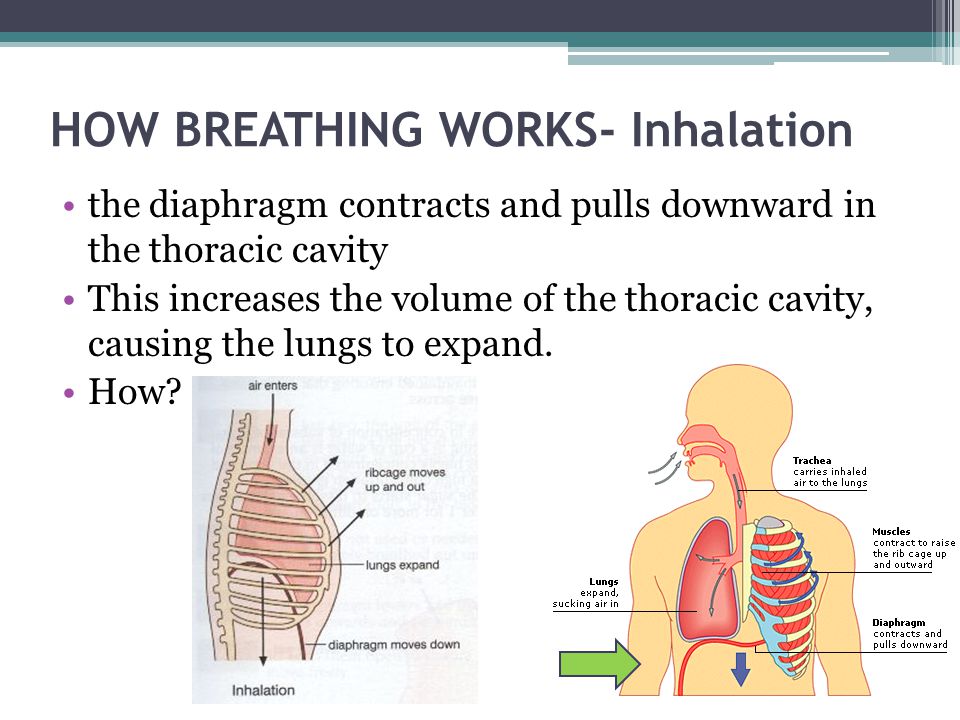 “Imagine it's a magical tree. A breeze blew and the leaves rustled on the tree! Like this! And now you blow!
The game is played first individually, then in a group of children.
Exercise "Blow the balloon".
Children stand near the chairs. Speech therapist: Spread your arms wide to the sides - you get a ball, then pronounce the sound F for a long time, while bringing your hands together in front of you - the ball is deflated. At the end, hug your shoulders - the balloon has deflated. Let's play balls! Spread your arms out to the sides - that's it! Here are the big balls. Suddenly, a small hole formed in the balloon, and it began to deflate ... Air comes out of the balloon: F-F-F! Ball deflated! Inhale more air while the balloon is inflated, and then gradually exhale it smoothly, pronouncing the sound F. You can’t get air.
3. Summary of the lesson.
Exercise "Sunshine".
Stretch your arms forward and join them in the center of the circle.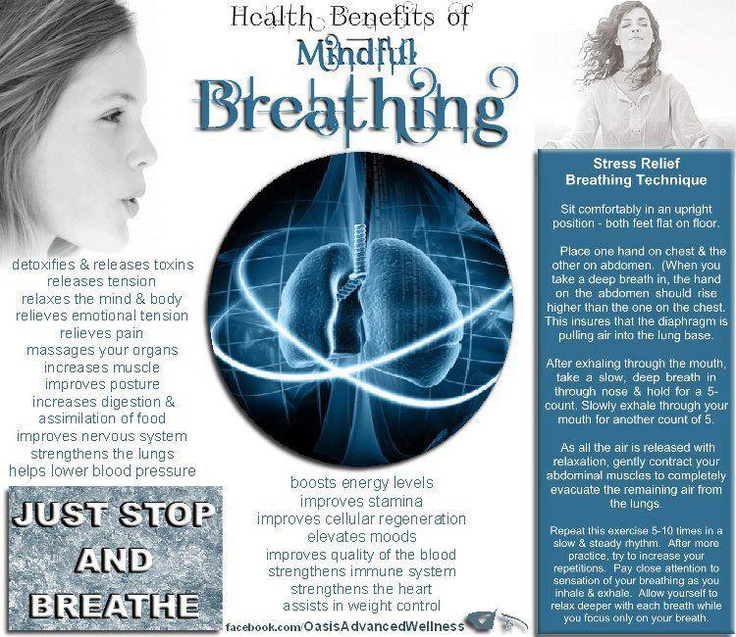 Quietly stand like that, trying to feel like a warm ray of sunshine.
Lesson 3.
Topic. Fixing diaphragmatic inhalation and exhalation.
Objectives: to strengthen children's ability to correctly breathe in and out of the diaphragm.
Equipment: ordinary balloon on a string; gas balloon, spinner toy, strips of thin colored paper (size: 15 × 2.5 cm).
Course of the lesson:
1. Organizational moment.
"Kind animal".
Participants stand in a circle and hold hands. The teacher says in a quiet voice: “We are one big kind animal. Let's hear how it breathes! everyone listens to their own breathing, the breathing of their neighbors. "Now let's listen together!"
Inhale - everyone takes a step forward, exhale - a step back. “So not only does the animal breathe, its big kind heart beats evenly. A knock is a step forward, a knock is a step back, etc.
2. Combining the phases of diaphragmatic inhalation and exhalation.
Balloon exercise.
A balloon hangs at the level of the child's face. The speech therapist blows on the ball so that it flies high.
Speech therapist: Guys, look how high the balloon flew up. Can you do that?
The children take turns blowing on the balloon.
Speech therapist throws the ball up: Don't let the ball fall. Let's blow on the balloon so that it doesn't fall down. Like this! Stronger!
The gas balloon is tied to a high chair or something on the floor (preferably with a long string).
Speech therapist: Guys, you need to blow on the balloon so that it flies as far forward as possible.
And now let's arrange a competition: two children stand opposite each other facing the balloon (the distance to the balloon is 50-60 cm) and start blowing at the same time. The winner is the one who managed to send the ball to the opposite territory (divide the territory with a ribbon or rope).
Spinner exercise.
Speech therapist: Look what turntables I have.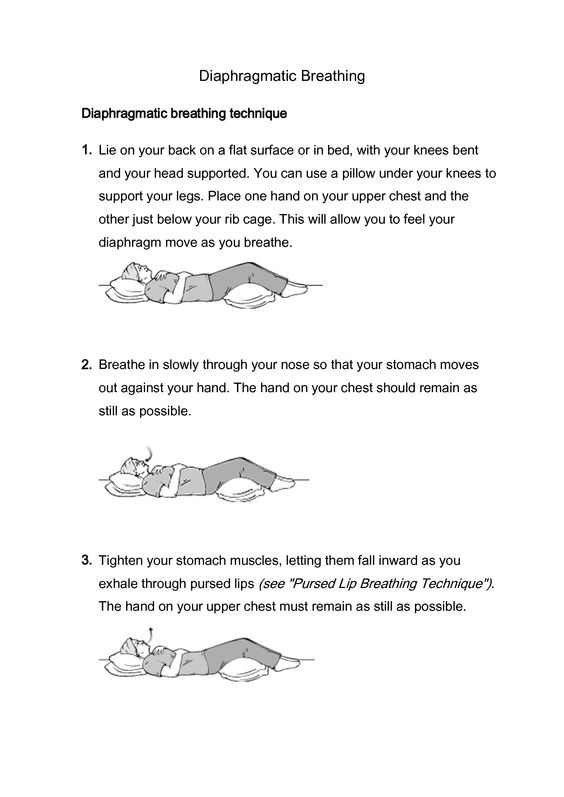 Who can say why they are called that? The spinner begins to spin from the breath of the wind. And now you are turning into breezes. - let's blow on the turntable. That's how it turned out! Blow even harder - the pinwheel spins faster.
Exercise "Paper flag".
Children are given strips of colored paper.
Speech therapist: Let's turn paper strips into real flags. Take them with your thumb and forefinger, bring them to your lower lip and blow. Our flags are flapping in the wind!
3. Summary of the lesson.
Exercise "Sunshine".
Stretch your arms forward and join them in the center of the circle. Quietly stand like that, trying to feel like a warm ray of sunshine.
Practical stage of work.
Lessons are given individually or in pairs.
Lesson 4.
Topic. Acquaintance with the comprehensive educational and preventive program "Volna" based on the technology of functional biofeedback.
Objectives: familiarization with the operating modes of the Volna program.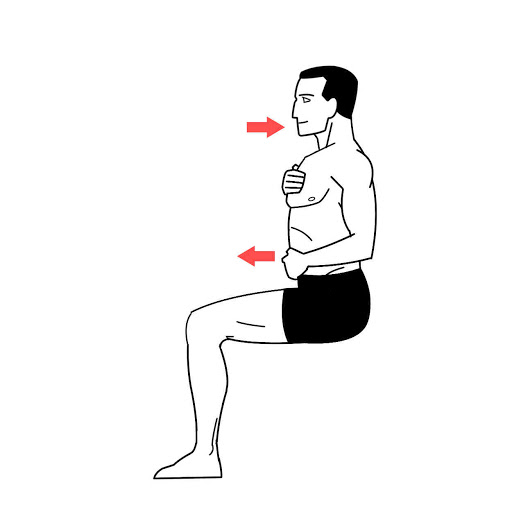
Equipment: a computer, a comprehensive educational and preventive program for teaching diaphragmatic breathing based on functional biofeedback technology.
Course of the lesson:
1. Organizational moment.
Speech therapist: In front of you is a computer and another small device. This device can hear how you breathe and tell the computer about it. If you breathe correctly, as we learned earlier, then the computer will be able to show you a cartoon about a butterfly. Let's see how it works (a demo session is being held in the Butterfly game emulation mode).
2. Game "Butterfly".
The speech therapist attaches the sensors to the child's hands and starts the game.
Speech therapist: You see an egg, it breathes. There is someone there and really wants to be born. But he is still very small and does not know how to breathe properly. Let's help him: you breathe with your stomach, and the egg breathes with you. You breathe in, the egg expands, you breathe out, it shrinks, that's how it breathes. And if you exhale as we taught (so that all the air leaves the tummy), the egg will change color in response (the child breathes while the egg changes color). Well done! Thanks to you, the egg learned to breathe correctly, and the one who was sitting inside is ready to hatch. Keep breathing with your belly and help it come into being. Who is it? (Caterpillar.) She has just been born and does not yet know how to crawl. Help her with your breath. Inhale you raise it, and exhale lower it. Do this smoothly so that the caterpillar does not hit the ground. See, she's crawling. You succeed. Look how far she crawled. Now she will rest and you will be with her. Do you know who emerges from the caterpillars? Of course, butterflies. But first they become pupae. The chrysalis is the cocoon you see. The caterpillar fell asleep there, and its breath hitched again. Let's help the chrysalis to breathe now as you did with the egg. The chrysalis expands on inhalation and decreases on exhalation. And with the right breath, it will also change its color.
 Well done! Now the butterfly is ready to be born. While she does this, you can rest. Look what a beautiful butterfly! But she can't fly. Help her fly from one flower to another: inhale lift her up, exhale lower her. See that she sits on each flower and does it smoothly (your breathing should be even). Well done! You've done a great job! Now you can relax and breathe the way you want. [1, 10]
3. Summary of the lesson.
Coloring of coloring pages by choice.
You raised a beautiful butterfly. And now I suggest you choose a coloring book with butterflies and color it with pencils or felt-tip pens.
Lesson 5.
Topic. Strengthening diaphragmatic breathing.
Objectives: to teach the child to work in the "Wave" program, to consolidate the skill of diaphragmatic breathing.
Equipment: a computer, a comprehensive educational and preventive program for teaching diaphragmatic breathing based on functional biofeedback technology.
Course of the lesson:
1. Organizational moment.
Exercise to relax the abdominal muscles "Ball".
Speech therapist: Let's think about our little, little balloon in the stomach. He loves being blown up and blown off. Let's puff him up. To inflate it big, the air must be inhaled through the nose (take a deep breath through the nose so that the stomach puffs up like a balloon).
2. Exercise "Column".
Speech therapist: Do you like to draw? I'm sure you're great at coloring bars! Let's try now to paint over the column on paper (the child is offered a sheet of paper with the image of a rectangular column, pencils, felt-tip pens). Well done! You can draw with your hands. Have you tried drawing with your breath? This is possible thanks to this device and our ability to breathe with the stomach. Let's remember once again how to breathe correctly (the "Ball" exercise is being performed). Now we will try to paint a bar on the computer with your favorite color using this skill. When you inhale, the column will be painted over, and when you exhale, the color will gradually return to you, and you can move on to the next column to paint over it too.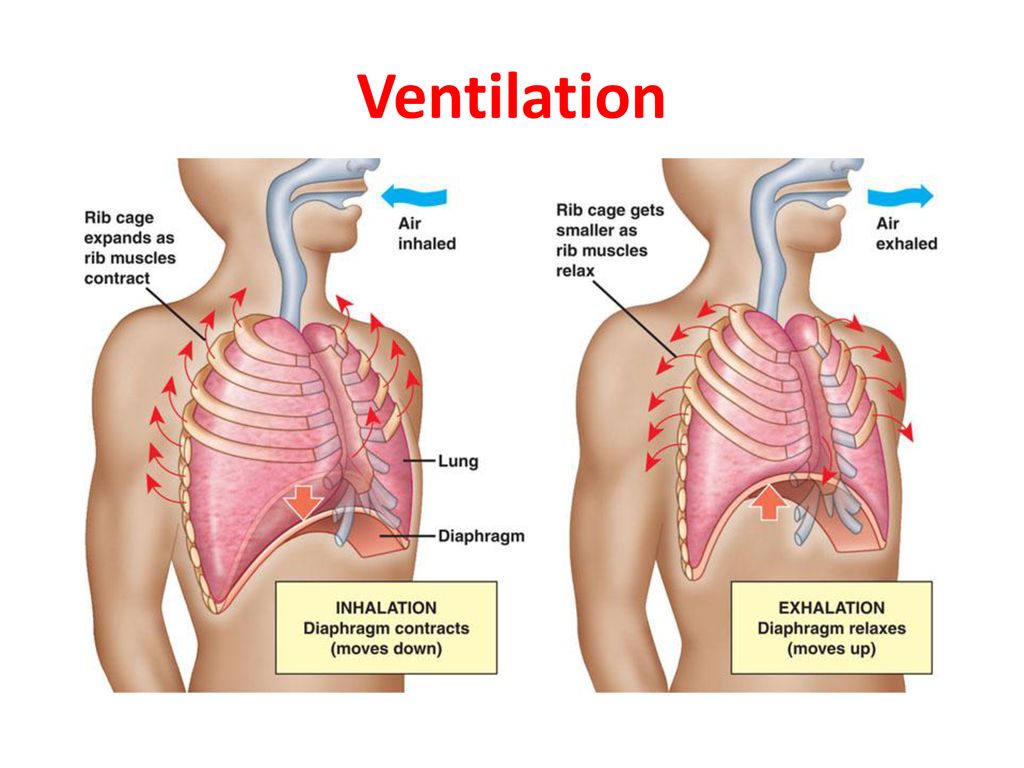 Make sure that your breathing is deep and calm, and your movements are even, then the column will be completely painted over and become beautiful. Let's first see how the computer itself does it (demo session starts). Now let's put the sensors on our hands and try it ourselves.
The child is doing an exercise.
3.Relaxation. Exercise "Magic dream".
The speech therapist says in a quiet, calm voice: Now sit comfortably in a chair.
Eyelashes droop,
Eyes close.
We are resting calmly,
We are resting calmly,
We fall asleep with a magical dream.
Breathe easily, evenly, deeply…
Our hands are resting,
Our legs are also resting…
Resting, falling asleep,
Resting, falling asleep.
The neck is not tense
And relaxed…
The lips are slightly parted,
Everything relaxes wonderfully,
Everything relaxes wonderfully.
Breathe easily, evenly, deeply…
After a long pause, children wake up from sleep.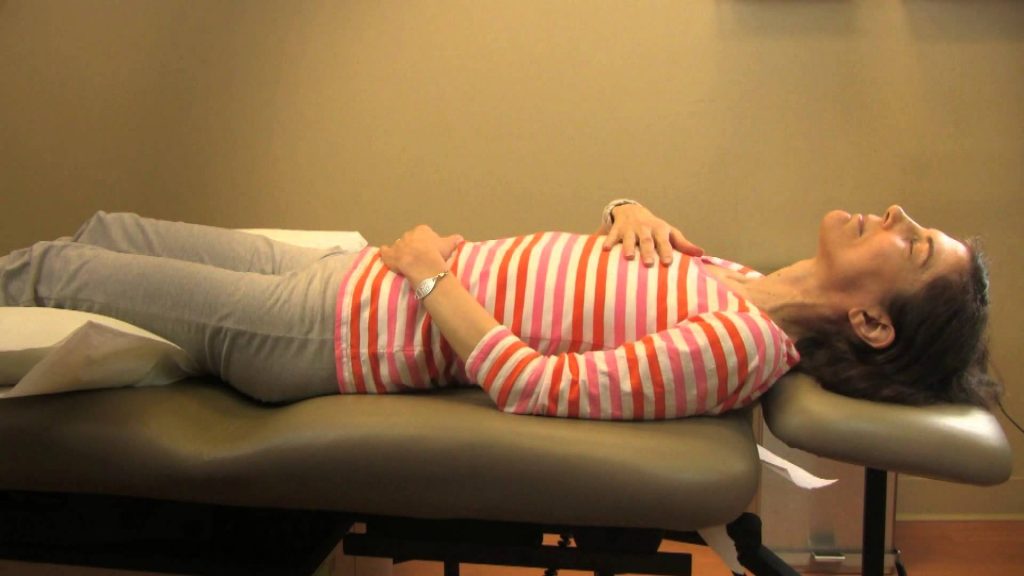
The speech therapist says in a louder voice:
It's good for us to rest,
But it's time to get up!
Squeeze the fists tighter,
Raise them higher.
Stretch, smile!
Everyone, open your eyes and stand up! [2, 30]
4. Exercise "Strip".
Speech therapist: We have learned to paint over the bars with our breath. And you're doing great. Now let's play wizards. And belly breathing will help you with this. As you inhale, you will hide the picture, and it will hardly be visible. And when you exhale, the picture will reappear.
5. Summary of the lesson.
Speech therapist: You have learned to breathe correctly. What does it mean to "breathe properly"? Remember this, especially when you start to worry. You have learned to hear and feel your breath. Strengthen this skill anytime, anywhere.
Bibliographic list.
- Luzik N.S., Portnova A.A., Fedorova N.A. Health Techniques. Teaching aid for working with children.
 NPF "Amalteya", St. Petersburg, 2006
 - Correction of stuttering in younger schoolchildren: diagnostics, planning, class notes / ed. Maslova E.N. - Volgograd: Teacher, 2001. - 104 p.
"Formation of diaphragmatic and speech breathing in children of senior preschool age using computer technology"
So, what is diaphragmatic breathing…
There are three types of breathing:
- Upper costal;
- Thoracic;
- Thoracic (aka diaphragmatic).
In any type of breathing, the diaphragm is necessarily involved, but the proportion of its participation is different. In healthy children, as physical development progresses, the most optimal type of breathing is gradually formed - diaphragmatic.
Diaphragmatic breathing (diaphragmatic-costal) is a breathing in which inhalation and exhalation are performed with the participation of the diaphragm and intercostal muscles. The lower, most capacious part of the lungs is active. The upper parts of the chest, as well as the shoulders, practically remain motionless.
Children with speech disorders, as well as somatically weakened children (they are the majority) need training through special exercises to develop diaphragmatic breathing.
Relevance
- Uneconomical and uneven distribution of exhaled air. As a result of this, the preschooler sometimes exhales the entire supply of air on the first syllable and then finishes the phrase or word in a whisper. Often because of this, he does not finish speaking, “swallows” the end of a word or phrase.
- Very weak inhalation and exhalation leading to soft, barely audible speech, making it difficult to communicate with others. This is often observed in physically weak children, as well as in timid, shy ones.
- Unskillful distribution of breath according to words. The child inhales in the middle of the word (mom and I sing - (inhale) - let's go for a walk).
- Hasty pronunciation of phrases without interruption and on inspiration, with “choking”.
- A weak exhalation or an incorrectly directed exhaled air jet, in turn, leads to sound distortion.
- Irregular jerky expiration: speech sounds either loud or quiet, barely audible.
Consider the system of work on the formulation of diaphragmatic and speech breathing.
The first stage of is the formation of diaphragmatic breathing. At this stage, we develop sensations of movement of the respiratory organs, mainly the diaphragm and the anterior wall of the abdomen. The duration of the performance is individual (about a month). During this time, the child consistently performs the exercises, first in a prone position, then sitting and standing.
The second stage is the development of speech breathing. This is the basic stage for planning a speech statement. Children learn in the process of exhalation to pronounce first:
- Sounds, syllables;
- Single words;
- Two to five word phrases; №
- Short poems.
Consider the consistent work on the formation of diaphragmatic breathing through games, exercises, for example:
1) From the lying position:
"Fish" - Put the child on his back, put a light soft toy-fish on his stomach. Taking a breath through the nose, the stomach protrudes, which means that the toy standing on it rises. When exhaling through the mouth, the stomach is drawn in and the toy is lowered.
I am rocking a fish on a wave,
Now up (inhale),
Then down (exhale)
Floats over me.
Exercises "Hippo" - the work of the diaphragm is perceived by the child not only visually, but also tactilely. We say to the child: “Place your palm on your stomach and feel how your stomach rises when you inhale and falls when you exhale. Can be accompanied by a rhyme:
Hippos were lying,
Hippos were breathing.
Then the tummy rises (inhale),
Then the tummy goes down (exhale).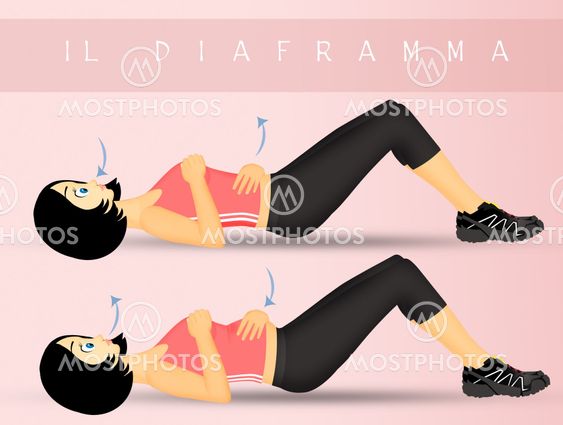
2) From a seated position.
The child sits in front of a large mirror, puts his hand on the area of the diaphragm and controls himself visually and tactilely.
Exercise "Hippos"
Hippos sat down,
Touched their tummies.
Then the tummy rises,
Then the tummy drops.
3) From a standing position.
Observation of children shows that some of them, when changing position, switch to the habitual upper costal type of breathing, their hand, placed on the area of the diaphragm, does not move. In this case, I put the child’s hand on my diaphragm and invite him to “feel with his hand”, and also see how the “belly” moves during breathing. Inhale calmly, shoulders do not rise. The computer technology of L. R. Lizunova is used, for example:
1. Exercise "Dandelions"
The child is given a game task: to help the tiger cub blow off all the "parachutes" from dandelions. To do this, you need to make an oral exhalation. You can work with this exercise in two modes: with multiple objects and with individual objects. When working with multiple objects, a long and smooth oral exhalation is practiced - “parachutes” are blown off from all dandelions at once. In the mode of working with separate objects, a sharp and short exhalation is practiced - “parachutes” are blown off from each dandelion separately. If the task is completed correctly, then the tiger cub gives a positive assessment of the child's activity, if not, an encouraging one.
2. Exercise "Kite"
A child is given a game task: to help a tiger cub fly a kite. To do this, you need to make a long and smooth oral exhalation. When the task is completed correctly and completely, the kite takes off into the sky, smiles and changes color, and the tiger cub praises the child. If the task is not completed completely, the kite returns to its original position and does not change its color, and the tiger cub advises to try again.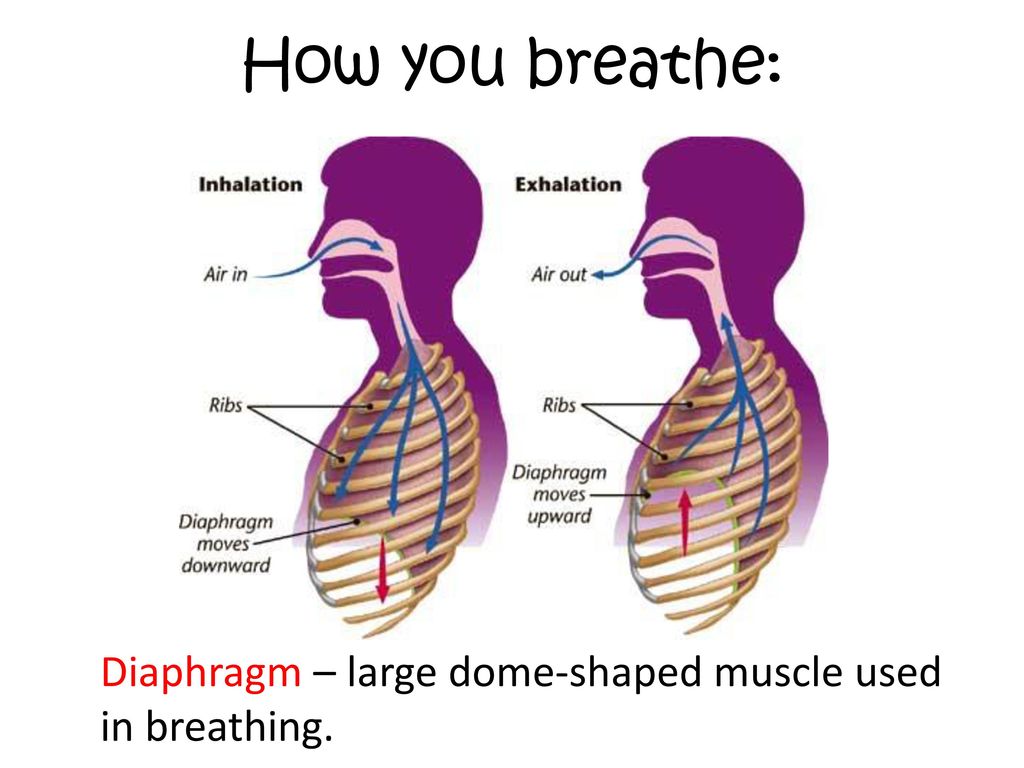
Consider the consistent work on the formation of speech breathing through games, exercises:
Inhale through the nose and on the exhale say:
Vowel sounds : “The girl is crying” : ah-ah-ah-ah-ah-ah; "The locomotive is buzzing" : oo-oo-oo-oo
Consonant sounds well pronounced by a child:
"The wolf howls": v-v-v-v-v-v-v
Consonants who have learned to pronounce, sounds:
"Tiger growls" : r-r-r-r-r-r
We use computer games:
"Pyramid"
When pronouncing individual sounds into the microphone, details of the pyramid appear on the screen. In the process of completing the task, the child is given a game task: to help the tiger cub collect a pyramid of rings. If the exercise is performed correctly, a rewarding surprise occurs: the tiger cub praises the child, and the result of the activity appears on the screen - the assembled pyramid.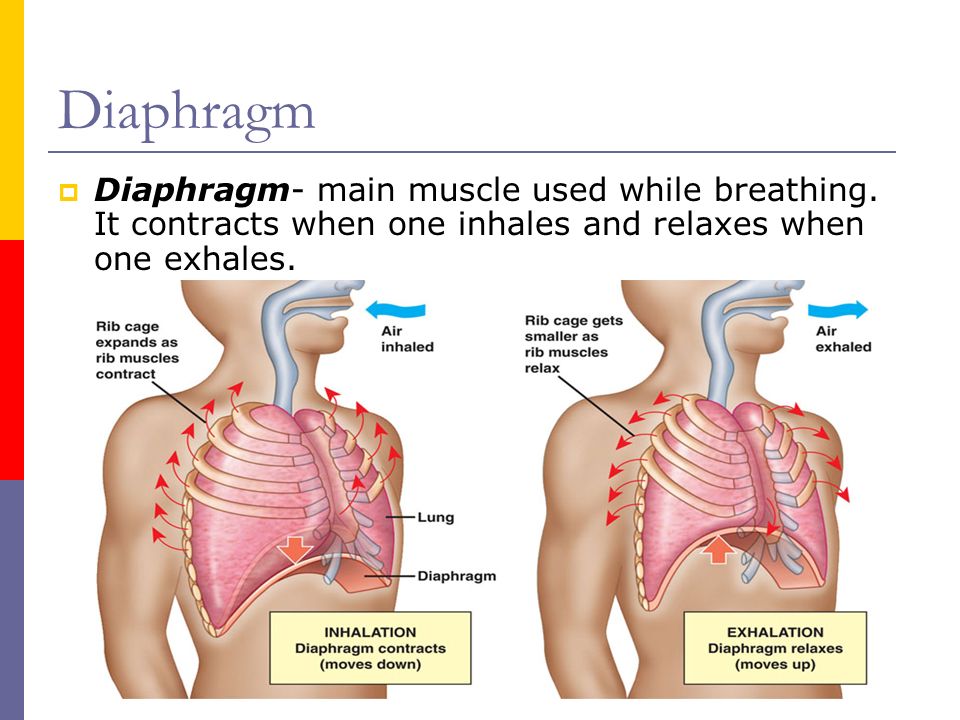 The program provides the ability to change the game picture: you can collect two different pyramids.
- At the syllable level; the words; offers we use the following games
"Bubbles"
Promotes the development of strength and duration of speech exhalation and voice.
When pronouncing words and phrases smoothly and smoothly, the tiger cub blows soap bubbles out of the straw. When speech activity stops, new bubbles do not appear, and the remaining ones burst.
Watch
Promote the development of strength and duration of speech exhalation and voice.
When there is speech activity, the hands on the watch face begin to move. When the dial goes full circle, a cuckoo peeps out of the window and calls. Consequently, it is possible to build an exercise so that the child utters a phrase or several phrases (quatrain) for a certain period of time, corresponding to a full turn of the hands on the dial on one exhalation.