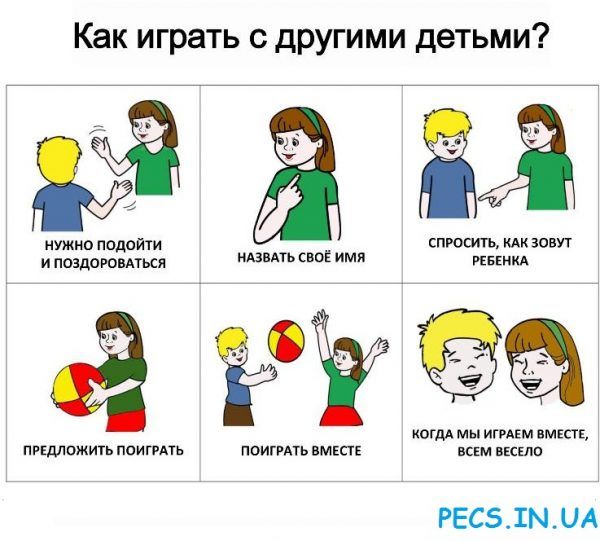
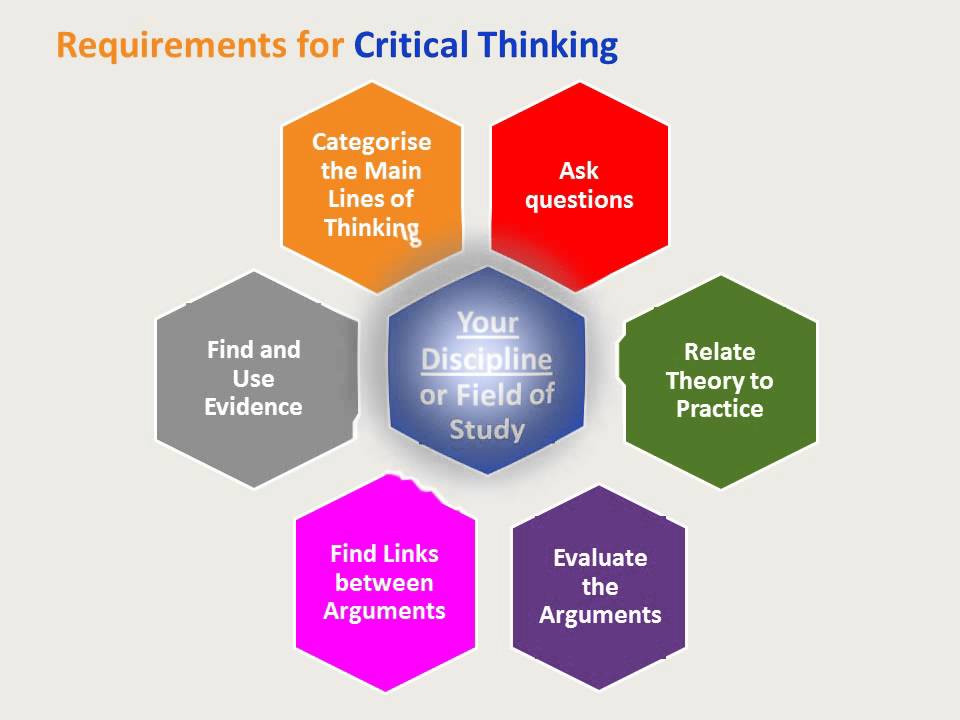
Thinking of inking diagram
Thinking of inking?
Thinking of Inking?Thinking of Inking?
Anyone who watches sports, music videos or even A&E knows that tattoos have gone mainstream; Studies have found that as many as two out of five adults younger than 40 have one. Health experts agree that getting one is less risky than ever, and tattooists trained in the arts offer more options. But before you rush to go under the needle, avoid regret (and possibly a pricey removal) by considering these questions:
- Photo-realist: Thanks to modern inks and techniques, portraits and images get far closer to the idea of “realism” than one from decades pasts.
- Biochemical: Credit the “Allen” movies with inspiring this branch of surrealism, which depicts a combination of human and robot-like parts.
- Surrealist: Just like the 20th century arts movement, this style covers everything from Salvador Dali to fantasy monsters and incoherent nightmares.
- Fine line black and gray: This technique, pioneered in the mid-1970’s in Los Angeles, involves study shaded, intricate designs and portraits rendered without color.
- Tribal: A modern U.S trend spring up in the mid-1980’s imitating the bold geometric tattoos common in many ancient tribal cultures.
- Asian: Large symbolic designs, particularly Japanese are considered timeless. Japanese koi morphing into dragons are a popular theme for arm “sleeves.”
- Traditional American: Think Betty boop, an anchor, or “mom” in a heart. Before the 1970’s, this was the only true style in the united states, when people collected tattoos like stamps. Designs were usually small with crisp lines, few colors and little subtlety, the style is enjoying the revival.
- Flash: Not a style, but a name given to the printed designs on the walls of a tattoo shop. Beware as flash designs are often trendy, then outdated.
 Remember Tasmanian devils in the 1980s?
 - Ancient:This design was found on a 2500 years old mummy in Siberia. The oldest known tattoos were black tribal designs found on the “Iceman,” a European mummy estimated to be 5200 years old.
- Epidermis, the skins color layer, acts like a limited window over the tattoo.
- Each needle injects ink, a drop at a time 1-2 millimeters below the skin’s surface.
- Dermis is the target area. Here antibodies surround the ink and trap it in place.
- If the needle reaches the subcutaneous fat, the ink will immediately spread and blur.
- Machine: Using the basic technology of a doorbell, the gizmo was first patented in 1891 and has changed little since 1929.
- Needle: A needle can puncture the skin up to 3,000 times per minute
- Lines: Small groupings of needles (often three, but sometimes just one) draw the sharp, distinct outlines.
- Shading Coloring: Larger groups of up to 32 needles are splayed like the bristles of a paintbrush
Pain tolerance varies by person, but in general:
- The fewer the needles the more it hurts
- Bony areas don’t necessarily hurt more. A better and torso are often extremely tender.
- Artist say women tend to handle the pain better than men
Interesting Facts
- Tattoos in areas with soft skin tend to be more painted.
- Reputable artists use sterile needles disposable gloves and antiseptic creams
- Sun exposure: sun fades tattoos plan to use strong sunblock all the time or get the tattoo in a well covered place.
- Aging: Tattoos in squishier areas such as the midsection will lose their shape much more quickly than those in bonier areas.
- Trendiness: arm bands and lower back “tramp stamps” are no longer popular in many areas.
- Durability: Tattoos on feet and hands tend to fade or become uneven quickly because those parts
It’s 1945, and you want a tattoo, you drive to the part of town your mom warned you about, past scruffy bars and burlesque shows, and arrive at a tiny shop offering maybe 200 designs in three or four colors. An ex-sailor who just clocked out of his day job rinses off his tattoo machine. Five minutes and $2 later, your arms bears a patriotic eagle – a nifty example of traditional american artwork, although no one will call it that for decades.
Now it’s 2011 and you want a tattoo you comb through online portfolios to choose an artist the design and book an appointment. When the day arrives, you drive to the funky-hip part of town. in a private room, the gloved artists unwrap sanitized equipment and chooses from dozens of colors and $1000 later, you’re wearing a custom piece of art – possibly in the retro- cool style of traditional American.
While getting a tattoo can still feel like a walk on the wild side, it’s a pretty safe one these days. Few government entitles police tattooing because it is considered to be cosmetic procedures rather than a medical one. But tattooist have largely cleaned up their own. –Bonnie Berkowitz
the Most Painful Spots to Get Tattooed
- Tattoo pain will vary depending on your age, sex, and pain threshold.
- The most painful spots to get a tattoo are your ribs, spine, fingers, and shins.
- The least painful spots to get a tattoo are your forearms, stomach, and outer thighs.
Getting a tattoo involves an ink-filled needle repeatedly puncturing your skin. Consequently, it's not unusual to wonder how much pain you should expect when considering a tattoo.
As it turns out, pain is a highly subjective experience, and how much discomfort you feel while getting tattoed can depend on a couple of factors including your biological sex, pain tolerance, and most importantly — the area of your body getting tattooed.
Most and least painful spots to get the tattoo
Most of the data on tattoos and pain is anecdotal, but some general rules apply. The most painful places to get tattooed are typically bony and have very little fat covering them, says Gianna Caranfa, a New York-based tattoo artist.
Quick tip: Caranfa says a simple "pinch test" can help you understand how pain can vary based on where you're getting tattooed: "Imagine the areas that hurt when you are pinched. The inner biceps would hurt more from a pinch versus the top of your forearm, this relates to tattooing too."
Alyssa Powell/Insider Alyssa Powell/InsiderThe most painful areas for all people include the:
- Feet
- Ribs
- Spine
- Stomach
- Fingers
- Chest
- Knee
- Elbow
- Shin
- Neck
- Groin
- Head and face
- The bony part of the ankle
Less painful areas to get tattooed include parts of the body with thicker skin and more fat, including the:
- Forearm
- Hands
- Shoulder
- Parts of the back
- Back of arm
- Stomach
- Outer arm
- Outer thigh
How bad do tattoos hurt?
There's no one-size-fits-all answer when it comes to how much pain you'll feel when getting tattooed. But if you're wondering what type of pain to expect, Caranfa says the experience is comparable to the feeling of a cat scratch or a sunburn.
"Long periods of irritation and tenderness are what make you feel any discomfort," Caranfa says. "The sensation of a tattoo needle is very dull compared to a syringe [and needle], it isn't the needle that causes discomfort as much as it is prolonged tenderness of being tattooed."
Importantly, different people will report varying experiences of pain based on their individual nervous systems and pain thresholds, says Channelle Charest, a California-based tattoo artist and Co-founder of tattoo scheduling platform Tatstat.
Other factors that could affect pain during tattooing include:
- Age: Studies suggest aging decreases your pain sensitivity, meaning elderly people might experience less pain when getting tattooed. Researchers have yet to determine why this happens but note that the size of parts of the brain that process pain decreases with age.
- Sex: People who are biologically female are more likely to experience greater pain intensity, a lower pain threshold, and a lower tolerance for induced pain compared to people who are biologically male. However, research is still emerging.
- Psychological expectations: If you go into a tattoo expecting it to be an excruciating experience, this might affect how much pain you actually feel. Studies suggest that people who feel anxious about and "catastrophize" pain before a procedure often experience higher levels of pain intensity and distress than people with "neutral" pain expectations.
Important: People might experience increased sensitivity to pain during menstruation.
Fortunately, most of the discomfort you feel while getting tattooed will end when your tattoo artist puts down the tattoo gun.
"The sensation is only when the needle is in you," Caranfa says, adding that while it's typical to experience some soreness, swelling, and itchiness in the days after getting tattooed, it's "not debilitating.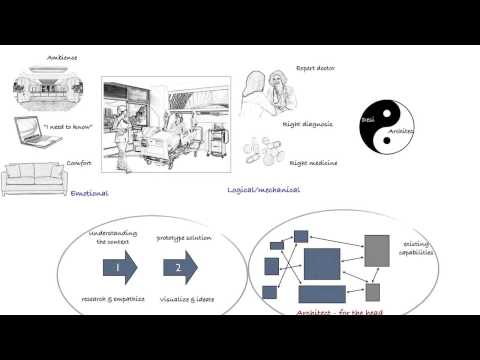 "
"
Insider's takeaway
It's natural to feel nervous about pain when getting tattooed, but there are steps you can take to prepare yourself and make the process a more pleasant experience.
"Make sure you eat an hour before you go, drink plenty of water, and wear comfortable clothes," Charest says, and always be communicative and honest with your artist if you need to take a break while getting tattooed.
If you're really worried about pain, you might opt to use a numbing cream. Remember to avoid NSAIDS or drink alcohol prior to being tattooed as they can thin your blood and cause excess bleeding, making it harder for the tattoo artist to do their job.
Lia Tabackman
Lia Tabackman is a freelance journalist covering health and science topics for Insider. com. She can be found on Twitter @LiaTabackman.
Read moreRead less
How to quickly draw a circuit in EasyEDA
This step-by-step guide with lots of screenshots is designed primarily for those who are just starting to get acquainted with electronics, or have not used EasyEDA before, however, I hope that the pros will be able to learn something useful . All screenshots are reduced for the convenience of reading the article from mobile devices, but are clickable for display in a larger size. This is not a translation of the original tutorial, but only a modest attempt by the author to share his own first steps in learning EasyEDA.
What features EasyEDA provides
What else is remarkable about the EasyEDA service
How to get started in EasyEDA
Switching the interface to Russian in EasyEDA
Creating a new project in EasyEDA
Creating a new scheme in a project EasyEDA
basic editing techniques circuits in EasyEDA
Adding components to an EasyEDA circuit
Various approaches to circuit design
Connecting circuit components
Preservation of the scheme in Easyeda
How to share your project with other
How to copy an alien public project for yourself in Easyeda
Providing access to the project in Easyeda
Conclusion
What are the capabilities of Easyeda
Easyeda, this is an cross -discomed complex. designed for the development of electrical circuit diagrams, automated layout of printed circuit boards and provides the opportunity to carry out an order for the manufacture of your boards. You may also be interested in the electronic circuit simulator, which is also included in the list of free services provided by EasyEDA. EasyEDA includes:
- editor of electrical circuits, components and ready-made modules with an extensive automatically updated library containing hundreds of thousands of components, component symbols in both American and familiar European formats. You can either create your own components and modules or edit existing ones
- tracer, layout editor (conductive pattern) of printed circuit boards
- circuit simulator (ESP8266 modules cannot be simulated of course), simulator engine from ngspice
- Gerber viewer
- production of printed circuit boards at affordable prices ($ 9.8 for 10 pieces + delivery to the Russian Federation - $ 6.
 6 (it turns out $ 1.64 for a 2-sided board 50 × 50 mm in size, including delivery - for me it's better to wait for delivery than messing around with chemistry, and the quality of the LUT is no longer satisfactory)
Ordering boards on EasyEDA is not a prerequisite for using this service and you can either not order boards at all or order them from any manufacturer of your choice (there is a free export of boards in Gerber format).
The service is free (support responds within 48 hours by email in English), with the ability to get faster technical support (response time up to 24 hours by email, and technical support by phone) and up to 10% discount on ordering boards when using a paid subscription .
In addition, an EasyEDA representative promises to answer questions from our users (unfortunately, only in English) regarding the fulfillment of orders for the manufacture of boards on our forum in a special section.
The free plan does not impose restrictions on the size of the board, the number of layers or contact pads.
For the vast majority of users, the features provided on the free plan will be enough. You can find more details about tariffs here.
At the moment, EasyEDA is about 90% Russified, which makes it quite comfortable for people who prefer localized versions to work with. Incomplete Russification, apparently, is due to the fact that the translation into Russian was carried out some time ago and new or converted features turned out to be in English. For me, this is even a good sign - it shows that the service is not dying and the owners have not abandoned it, since it is developing. And we can tolerate a dozen or two English phrases.
I consider it very important to be able to use the service in commercial projects and collaborate on one project with a team of developers, which is provided even on a free plan. You can also grant read-only access, for example, a student can grant access to view his project to his teacher, leaving his project inaccessible to other users.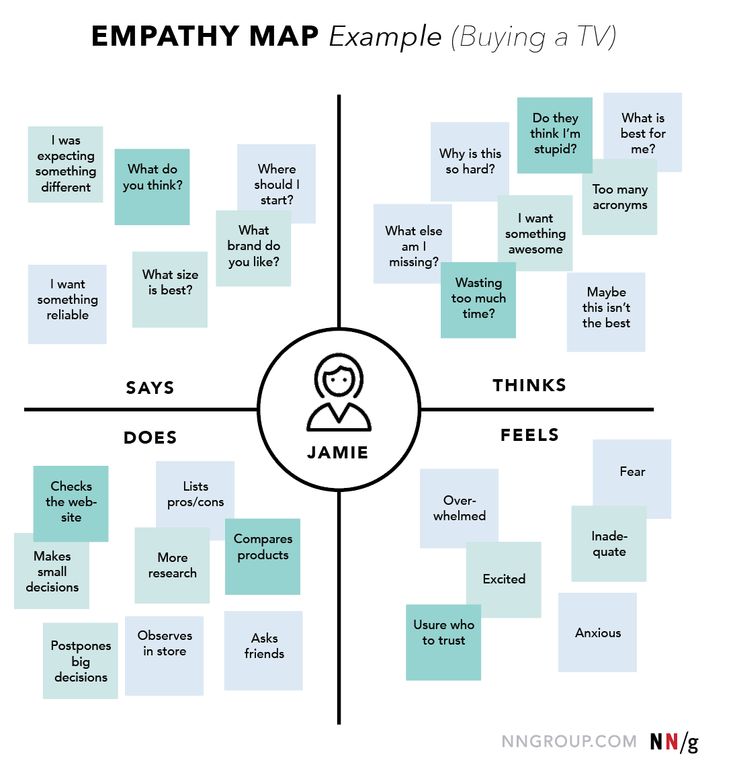
The number of projects (both private and public) on the free plan is not limited, which also made me very happy.
The project's forum is alive, and it's really possible to get help on it (it's a pity that there is no Russian-language technical support). Developers respond to bug reports and feature enhancements (in English and Chinese).
I was impressed by the ability to paste screenshots directly from the clipboard into my messages on the forum (this feature only works in chrome), which is very convenient for communicating with technical support.
What else is remarkable about the EasyEDA service
EasyEDA is not a program on your computer, but a cloud service on the Internet, which means that you can use it on a computer with any operating system. Accordingly, you do not need to install any programs and libraries to work - you only need a browser and Internet access (EasyEDA developers promise to release a program for offline work that will not require an Internet connection).
Your projects will be stored in the cloud (free of charge) and you can access them from anywhere in the world from any computer or even a smartphone or tablet.
EasyEDA works in most popular browsers, but you'll get the best experience if you use Google Chrome. Of course, Firefox is also supported (by the way, I took screenshots for this article both in chrome and Firefox). There are certain issues on Safari, so EasyEDA engineers recommend that Mac and iPhone users use Chrome when using their service.
The speed of drawing schematics and boards in the browser also impressed me - even large projects are drawn without noticeable brakes. The developers report that the maximum rendering speed is provided in Chrome, and Firefox will be slightly slower, but shows quite acceptable results.
How to start working in EasyEDA
It's better to start with registration so that the created project is linked to your account and is not lost anywhere. Registration proceeds according to a typical scenario.
Go to the EasyEDA website
Go to the Russian version of the EasyEDA website and press the button Login with your data: your nickname on the service, a password of at least 6 characters and your email address. The checkbox must be checked and means that you agree to the terms of use of the service. Term of Service is not translated into Russian, but I read it - everything is standard there: they don’t transfer your data to anyone, you will be shown ads and blah blah blah. How to fill everything out - press Register . It is clear that later, to enter the service, you fill out the form on the right with the same data as during registration. Signing in with Google works with glitches, currently I do not recommend using it. QQ is a Chinese messenger, so if you are not registered in it, you can ignore it.
Almost immediately you receive an email in which you need to click on a link to verify your email address.
EasyEDA confirmation email
That's it - registration is complete.
Switching the interface to Russian in EasyEDA
Switching the EasyEDA interface to Russian
Switching the EasyEDA interface to Russian is carried out directly in the editor. You can follow the direct link to the editor, click on your nickname in the upper right corner, in the menu that appears, at the very bottom, select Language , then Russian
Creating a new EasyEDA project
An EasyEDA project is a collection of schematics and layout data for your board. So if you plan to even just draw a diagram, then you must create a new project and create a new diagram already in it. This may seem like an extra step, but it will teach you to order to put everything in folders. You don't have all the documents on your desktop without folders, do you? Or all the same yes :)
You can create a new project from scratch or clone an existing one from someone else (how to do this will be shown below). Also, someone can give you access to their project for collaboration.
Creating your first project in EasyEDA
To create your first project from scratch, you need to go to the editor and create a new project using the button at the top left. In the future, you can create new projects directly from the main page of EasyEDA.
Creating a new project in EasyEDA
Next, you are asked to enter a project name and indicate whether your project will be public (the project will be available in the search and anyone can clone it into the editor and perform any actions on the copy), or your project will be private and outsiders will not get to it access until you want it. The publicity/privacy of the project can be changed in the future an unlimited number of times.
Enter a detailed description of your project in the field Description .
Select the type of your project: private or public
Creating a new circuit in the EasyEDA project
Let's create a new circuit in our project - this can be done from scratch (link on the right in the screenshot), from a template (link on the left) or from an external file (look for import in the menu). A pleasant surprise awaits you here: the system already has a circuit template with minimal piping for the ESP8266 module (link on the left in the screenshot). You can create your own templates to quickly start designing the same type of circuits, which can be very useful.
Creating a new schema in EasyEDA
When you create a new schema using the right link, you are not creating a schema from scratch, as I told you above. You will be asked to draw a new scheme in a frame, according to bourgeois standards
A new scheme in a bourgeois frame in EasyEDA
I think there is also an opportunity to make a frame according to GOST, if you draw your own template for it yourself and start each new scheme from it. Maybe someone has already done this, and you just have to “fork” this project.
Schematics and libraries can be imported into a project from files on your computer, popular formats are supported:
Importing Schematics and Libraries into EasyEDA
For example, we will create a new circuit from a template for ESP8266.
EasyEDA Schematic Basics
EasyEDA Schematic Editor does not have scrollbars (both horizontal and vertical). That's right - they are not there at all (although they are present in the screenshots in the original tutorial, which means they were in previous versions of the engine). If you know how to turn them on now, let me know, it might come in handy. At first I found the lack of scrollbars very inconvenient, but I quickly got used to it and now I do not notice their absence.
You can move the entire circuit or only one selected component using the keyboard arrows. It seemed to me more convenient to drag the entire scheme with the mouse by holding down the right button.
I really liked the smooth 10000% scaling of the circuit. Clearly traced, in all details vector graphics are scaled without loss of quality. It's impressive that this is implemented right in the browser - respect to the developers.
Scaling "to the width of the sheet", as in MS Word, can be done through the top menu, as we are used to, or by pressing the hot key K in the English layout
Zooming in EasyEDA
Enlarging any area is easy: you must first move the mouse pointer over this area and scroll the mouse scroll wheel forward.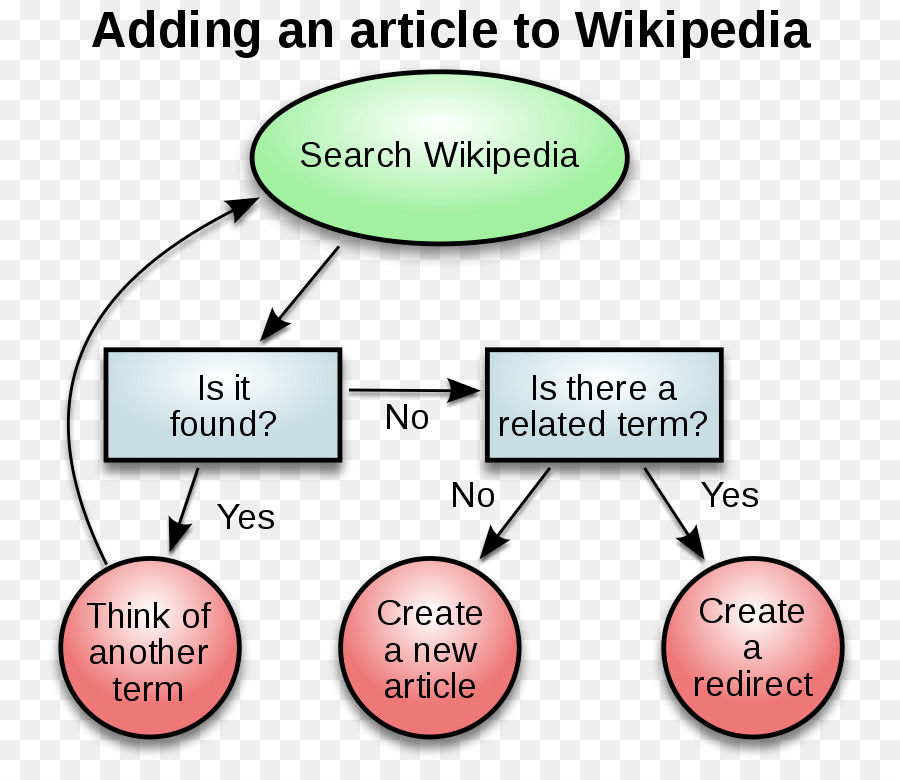 Similarly, the reduction.
Adding components to the EasyEDA circuit
Let's connect an LED to the ESP8266. As a cheat sheet, we will use the wonderful visual aid Arduino Basic Connections - connecting everything in pictures v 2.0 If you are a beginner and have not yet seen this document, then I recommend making it your reference book to avoid the many traps that lie in wait for beginner radio amateurs. I also want to inform you that both ESP8266 and ATMEGA on Arduino are microcontrollers and the principles for connecting peripherals to them are the same, so you can safely use the Arduino recommendations for ESP8266, while not forgetting that:
- Arduinos are both 5 volt and 3.3, and ESP8266 is only 3.3
- Arduino ports can handle up to 40mA, ESP8266 can only handle 12mA
Connecting an LED to the output of the microcontroller
Let's take the left option from the cheat sheet, where we see that we need a resistor and power to connect the LED. When the GPIO output is low, the LED will turn on, and when it is high, it will turn off.
Copy element VCC from the left side of the diagram: left click on the element (do not miss - you need both the inscription VCC and "a piece of wire"), then Copy on the toolbar and in the same place The procedure is absolutely similar to the actions in a regular text editor. The inserted element will “stick” to the mouse pointer and you will insert it into the right part of the diagram in the free space by clicking the mouse.
Copy and paste in EasyEDA
Adding a resistor from the EasyEDA Library
Selecting the usual “European” component symbol in EasyEDA
Different approaches to circuit design
Now we have to connect all this to one of the GPIOs of our ESP8266 module and here we can go in different ways. You can do it the old fashioned way and connect our LED and resistor on the circuit to the GPIO module output on the left side of the circuit - this is exactly what they did before (many continue to do this now, and not only in Russia). The following schemes are obtained:
Scheme of the radio receiver Speedola-230
But a new trend came to us from abroad - schemes designed differently:
Scheme Wemos D1 mini PRO 128Mbit (16 MB)
edge to edge. The modules are connected via named electrical connections (conductors) with the appropriate marking. Such schemes are less familiar and some radio amateurs find that they do not allow you to see all the details at once. Try to answer the question: what elements are connected to VCC in this circuit? It's easy to overlook a module. However, if you plan to enter the international market - it is not necessary to sell anything, even if you just place your project in the public domain, then it makes sense to think about the choice, and, perhaps, make the scheme in a modern form, generally accepted in the international community. However, this remains, of course, at your discretion.
Connection of circuit components
To connect an LED to one of the pins of the ESP8266 (for example, GPIO2 ) you need to switch from the element attribute set display mode to the mode
In the manager (on the right) you need to find the group Nets and in it GPIO2
Selecting a conductor (circuit) in EasyEDA
at the same time on the left side of your circuit GPIO2 on the ESP8266 will become highlighted in red - you need to copy it and paste it on the right side of the circuit.
It remains only to connect the elements to each other - to do this, simply drag the edge of the contact and connect the line with the next element. As a result, you should get the following:0003
How to save a schematic in EasyEDA
How to share your design with others
If you have made a public project, you can share it with others
How to share a design in EasyEDA
Starting from the bottom, the third link leads to a PNG file of your schematic - you You can embed this link in forums, send it by email, embed it in social media posts. Here is a link to our demo project.
The second link is for you personally - you can place it in your browser bookmarks to quickly switch to editing mode for this scheme.
The top one, the first link leads to the project page. This is how our project looks like for other users
Public project in EasyEDA
How to copy someone else's public project to yourself in EasyEDA
Search for public projects in EasyEDA
which you can copy for yourself, make your own edits and use in the future.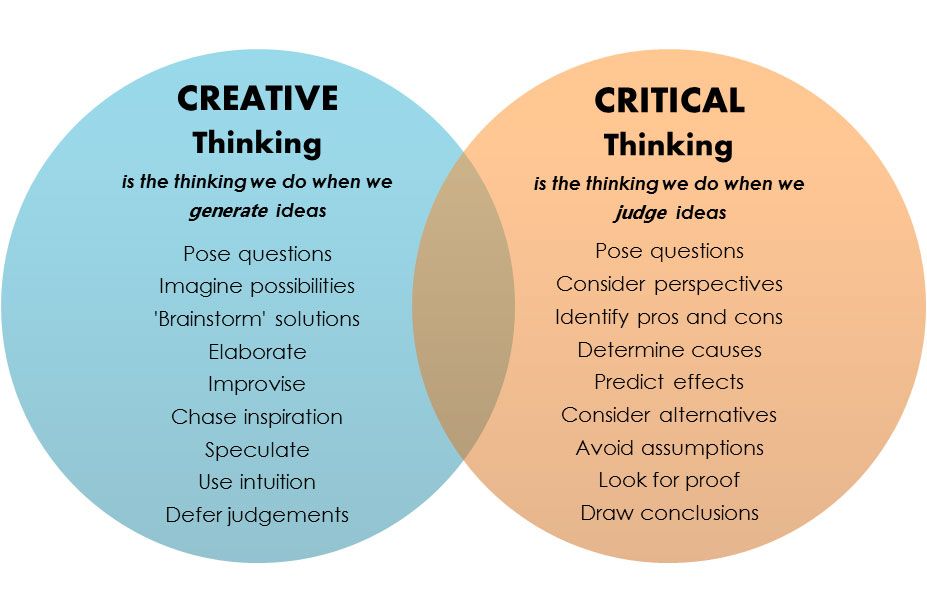 At the time of this writing, the search for projects does not work, the developers already know this and promise to fix it in the near future (search for modules and components works). You can use the search by popular tags (in the screenshot, projects with tag Arduino Based )
You can copy any public project to yourself (“fork”) and it will become available for editing in your project list in the editor
How to fork a public project in EasyEDA
A public project is already in the editor
Sharing a project in EasyEDA
By default, all your projects will be private (I remind you that EasyEDA, unlike others, does not have a limit on the number of private projects). To collaborate on a project, you can grant access to your colleague(s). You can grant read-only or full (read/write) access to a specific user by right-clicking on the project name and entering the email address that your colleague's EasyEDA account is registered to.
Sharing an EasyEDA project
Sharing a project with a specific user in EasyEDA
Conclusion
This article has gotten too long and I sincerely thank those who were able to read it to the end. Even in this volume, I did not manage to talk about many of the interesting features of EasyEDA. Perhaps this will work in the following materials.
In general, I have had a very positive impression of EasyEDA, despite some shortcomings that upset me. I remember the days when I started learning DeepTrace and spent a lot more time on my first circuit. Here, everything turned out to be much simpler, with fairly wide possibilities. So I upvote EasyEDA.
I like the spirit of open source that the EasyEDA service is saturated with - these are public projects and their ease of use and the open file format for uploading projects, which I could not talk about in this article. A sort of github, but not for programs, but for boards. By the way, support for version control of boards would be very useful :)
P.
 S.
S. I openly inform you that EasyEDA supported our site and forum (partially compensated my personal expenses for the VDS on which this site and forum work for you), and, as a thank you, I posted links to the EasyEDA service on the esp8266 website and forum .ru. I can assure you that this fact in no way affected the objectivity of this material and any other information posted by us about the EasyEDA.com service
Your IoT evangelist, Viktor Brutsky aka 4refr0nt.
Discuss this article on our forum
Overview of free online business process diagramming tools
Olga Sitnikova May 17, 2019
Archive
Reading time: 8 minutes
So far, personally, it seems natural to me that the functionality of online “drawers” is poorer than those modeling tools for which users pay for distribution and updates. However, I was pleasantly surprised by the fact that he is not so poorer.
Sitnikova Olga, IT Analyst DIRECTUM
Today I decided to make a short review of online diagramming tools available to any Internet user for free.
So far, it seems natural to me that the functionality of online “drawers” is poorer than those modeling tools for the distribution and updating of which users spend a certain amount of hard-earned money. However, I was pleasantly surprised by the fact that he is not so poorer. Consider two similar systems: Diagram.ly and yWorks.
Diagram.ly
Diagram.ly gives the impression of a system that is trying to provide the user with functionality that is closest to the capabilities of desktop clients (for example, the same Microsoft Visio). There is almost everything here that we are used to:
- A very rich selection of stencils that you can work with.
 With Diagram.ly, you can draw flowcharts, some types of UML diagrams, ER diagrams, organizational charts, BPMN diagrams, database and network diagrams, as well as telecom diagrams, geographic information diagrams, electrical circuit diagrams, and social network diagrams, as well as also create prototypes of lightweight interfaces. In fact, perhaps this gives them reason to call themselves "a mini version of Visio, accessible from your favorite browser."
- Rich text formatting options. Text can be written in one of five fonts: Verdana, Helvetica, Times New Roman, Garamond, or Courier New. The font size can be changed in the range from 6 to 60 points. You can change the boldness of the text, write in italics or underline, change the alignment of the text. The text, by the way, is entered very simply: by double-clicking on the block.
In addition to text formatting, there is also object formatting: grouping, ungrouping, moving to the back / foreground, mutual alignment of objects, changing the orientation of blocks work. For a block, you can change the color of the font, underlay, and line, add a shadow and gradient, and select an image that occupies the block.
3. Select multiple ways to display the connector. For the arrow, you can specify the type, curvature of the connection lines, line type (only solid or dashed), line thickness.
- The context menu works on blocks and pages (by right mouse button).
- Each time you log in, the user is prompted to view simple tips for working with it. These "tips and tricks" serve as a reference. Although, by and large, I personally didn’t need them, the system is so intuitive: objects are added to the board using drag-n-drop technology, the arrow that appears when you hover over the block suggests that it is the connector tool, and the one I already mentioned the context menu closes all other questions, even if somehow the user can't find the toolbar at the top.
- I was pleasantly surprised that you can work with both XML files created by Diagram.ly and VDX files created by Microsoft Visio. This way, you can change the diagrams that your colleagues have created in Visio, even if you don't have your own license for this product. The resulting diagram can be saved in the XML format offered by Diagram.ly, or exported to a raster (PNG or JPG) or vector (SVG) image.
- There are also preview options. Firstly, a scalable preview of the current scheme is always displayed in the lower left corner of the screen.
And secondly, using the "View" button on the toolbar, you can very easily make a picture that will appear in the next tab and be ready for printing.
Since it is customary to dilute a barrel of honey with a fly in the ointment, I will name some minor flaws that I managed to notice in Diagram.ly.
- There are no examples of diagrams from which you can create your own art.
- The system is apparently created by a group of enthusiasts and sometimes rather stupid bugs appear in the system (for example, on the day of writing this, I could not apply the change of fonts). However, this disadvantage is more than covered by the presence of its own Diagram.ly feed in Google Plus, in which you can openly express your wishes and suggestions.
Well, a new improved version of Diagram.ly is currently in development with a lighter, concise interface, which I like, to be honest, a little more. By the way, it is open for beta testing.
yWorks
yWorks gives the impression of a system that wants to provide the user with the minimum set of stencils and tools to work with them.
Note the conspicuous features of the system operation:
- At first glance, you can see that the toolbar of this system is not so rich, you can perform a minimum number of actions in it (rollback or redo an action, open, save or print a diagram, work with the clipboard, change the scale or view of the board display).
- It is worth admitting that without help it is difficult to guess that the text is added to the blocks using the F2 button. I think that if it weren’t for the habit of “smoking mana” at the first difficulty, I would never have guessed before. However, it is worth paying tribute: the help is written well and even with an average level of English it will be quite understandable to the user.
- There are not many types of blocks, but enough for drawing, for example, business process diagrams, UML diagrams, ER diagrams and flowcharts. You can also add custom blocks. I didn’t really like that you can only open one group of blocks at a time. So, you have to remember which group the block is in, if you suddenly want to use it again. However, it is nice that, for example, all artifact objects for a BPMN schema are hidden behind the same artifact image with the “document” type (the rest are shown by clicking on the small arrow in the lower right corner of the icon).
 This saves work space.
- Regarding the formats of work: only objects with the .Graphml extension can be loaded into the system. You can save diagrams as files with no extension at all (especially since it is not offered), as well as export as a bitmap image in PNG format. It's nice that when you export a chart to a picture, the system offers you to configure the export settings.
- The upper left corner offers a preview of the newly drawn diagram, with which you can quickly change the section of the diagram that is currently displayed on the board (it reminded me of Heroes of Might & Magic).
- For beginners, the creators of the system have prepared a bonus in the form of an opportunity to see examples of diagrams, which personally seems to me a very reasonable decision. For many people, relying on a model previously created by someone is a great help in their work.
- And especially in the end, I left the biggest plus of this system. You can specify a very large number of properties for blocks, for example, quickly change the block type, specify the position of the object on the board and its size with pixel accuracy, set text, background color, borders, and upload an image that will occupy the background.
You can read about the developer company yWorks on its official page.
A bit as a conclusion
Summarizing all of the above, I can assume that Diagram.ly will appeal more to young people who are pleased with the great variety of features, beautiful intuitive interface, high-quality page layout, etc., and people who find inspiration in yWorks who are very interested in the inner part of the question: the properties of objects, saving the workspace, easy navigation.
It must be admitted that the height that modern free (!) online diagramming tools have taken and firmly holds is indeed, if not amazing, then at least significant.