How to get rid of a kink
Kink In The Neck
What is a Crick in the Neck?
The cervical spine allows for movement of the head up and down as well as left and right. The cervical spine can be susceptible to injury in part due its relatively large range of motion which can lead to a kink in your neck.
Neck pain and headaches or shoulder muscle pain can often be due to poor posture and weak surrounding musculature.
Neck pain/sprain/stiffness can often be aggravated if your job or lifestyle requires you to sit at a desk all day. Here are some fundamental and easy ways to perform stretches that may improve posture and reduce the kink in your neck.
Is it bad to crack or pop your neck?In most instances it is not harmful to "crack or pop" your neck. However, The effects of popping your neck create a euphoric sensation from the endorphins released upon "cracking" or "popping. " The addictive aspect of these natural chemicals lead to habitual "neck cracking." Instability and worsening of degenerative or inflammatory issues in the spine may result when over-stressing the joints of the spine.
How to Get Rid of a Kink in Neck Fast?
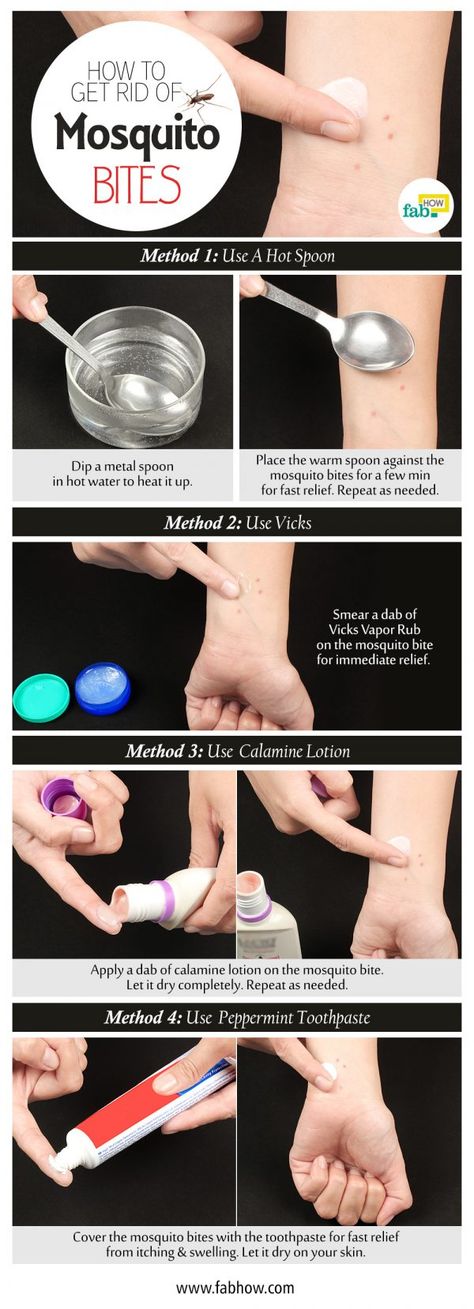
There are multiple quick answers or neck remedies to help your pain/irritation from a kink in your neck. The first thing you should do is use ice or heat to the area. Activity modification is also a good thing to do. Neck stretching exercises can be performed multiple times throughout the day to help with a kink in your neck. However, since your cervical spine is a more delicate region of the body to stretch, you should take extra care to execute the stretches in a slow and controlled manner.
Make a point not to force the stretch to the point of pain as stretching should relieve neck stiffness and pain symptoms. Attempt to hold each stretch for at least 30-60 seconds continuously in a static position.
1) Cervical Flexion Stretch
Cervical flexion stretch
Cervical flexion stretches may provide relief of neck stiffness and pain that occurs with looking up and down. Cervical flexion involves a movement to look down at the floor.
This stretch should be performed in a pain-free range and a slow and controlled manner. Attempt to perform this stretch by holding each stretch for 30-60 seconds at a time.
2) Cervical Lateral Flexion Stretch
Cervical Lateral Flexion Stretch
A lateral flexion stretch occurs when you tilt your head to one side. Take extra care to make sure you start this stretch with good posture and relaxed shoulders.
Begin this stretch by slowly moving your head in a controlled manner to one side so that your ear approaches your shoulder. Make sure that you do not make the mistake of moving your shoulder up to meet your ear but instead tilt the side of your head towards your shoulder and go as far as you feel comfortable. Reach up and gently pull the head toward the shoulder to feel a stretch in the opposite side.
Do not tilt the entire body; tilt the head. Hold this position for 30-60 seconds and then return to the upright starting position and perform the same stretch on the opposite side, sticking to a pain-free range of movement. This stretch may also help a stiff back in the upper portion of the spine.
3) Cervical Rotation Stretch
Cervical Rotation Stretch
A cervical rotation stretch occurs when you rotate or turn the head towards the left or right shoulder. You should make sure you begin this stretch with a straight back and relaxed shoulders. Start by slowly rotating your head as if you are trying to look over your shoulder.
Ensure you only go as far as you feel comfortable and do not go beyond your pain-free range of motion. Proceed to hold the stretch for 30-60 seconds, making sure to breathe evenly, then return to the starting position and repeat on the other side.
The cervical stretches described above are ideal for mild to moderate neck stiffness and pain on occasion with a kink in your neck.
What Causes a Neck Crick while Sleeping?
Neck crick with sleep
Sleeping positions play an important role in managing pain in the neck. It is typically recommended to sleep on the back or the side. Sleeping face down is not healthy for the neck and can increase the chances of having a kink or crick when you wake up.
Having a good pillow is also important. The best pillow for a neck pain or a neck crick is one that places the neck in a neutral or straight position.
Changing positions is also important for limiting pain. For example, lying too long on the right side may cause right shoulder pain and neck pain if the pillow is not at the correct height.
What if These Remedies Don't Help Crick in Neck?
If you notice your neck stiffness and pain worsening or you begin to experience symptoms of radiating pain down your arm, it may be time to see your doctor.
An MD will be able to offer you other treatments or refer you to a specialist, such as a physical therapist. An orthopedic specialist and/or physical therapist will develop an individualized program to reduce your neck stiffness and pain and get you back to pain-free function with no crick in your neck. Learn more about medical massage therapy HERE.
Therapy for a Neck Kink
Related Articles:
- Low Back Pain
- Is cracking your neck is bad?
- How To Tell if You Have a Broken Neck
- How To Sleep With Neck Pain
To schedule an appointment with an Orthopedic Neck Specialist, please call 904-JOI-2000, schedule online, or follow the link below. To make and appointment with JOI Rehabilitation, call (904)858-7045.
Click HERE to watch our online scheduling video.
Stiff Neck? Remedies to Find Neck Pain Relief – Cleveland Clinic Health Essentials
With so many of us gazing into computers or staring down at our smartphones most of the day, it’s no wonder we’re having neck pain. In fact, data from the Centers for Disease Control and Prevention’s 2018 National Health Interview Survey found that 16.1% of adults experienced neck pain within the past three months.
A stiff neck typically develops when your muscles weaken over time from poor posture or misuse, says chiropractor Andrew Bang, DC. “When your neck muscles become weak and you try to turn your head, the joint no longer moves smoothly because it’s now out of place,” Dr. Bang says. “Often the joint catches on something, either pulling a muscle or hitting the nerve irregularly, or maybe both.”
“Then you’ll have instant pain and your body has a protective spasm. Your body doesn’t want you to get hurt more, so it will clench, causing you to feel like you can’t even move — and leaving you wondering what you did to injure yourself.”
Looking down at your computer monitor all day can cause the muscles around the neck joints to tire and become overstretched. Driving for long periods of time, as well as looking at your smartphone, can have the same effect. And doing this day after day can add up and displace your neck joints.
Stiff neck remedies to try
For minor, common causes of neck pain, try these simple remedies:
Apply heat or ice to the painful area
Use ice for the first 48 to 72 hours, then use heat after that. Heat may be applied with warm showers, hot compresses or a heating pad. Be sure not to fall asleep with a heating pad or ice bag in place to avoid skin injuries.
Take over-the-counter pain relievers
Doctors recommend ibuprofen or acetaminophen.
Keep moving
However, avoid jerking or painful activities. This helps calm your symptoms and reduce inflammation.
Gentle massage
Have a partner gently massage the sore or painful areas. When doing this, communication is key. Have your partner try a variety of techniques until they land on one that feels good.
Advertising Policy
“You’ll want them to say, ‘How does this feel? Do you want more or less pressure?’ That’s what a massage therapist will do,” says Dr. Bang. “Then keep adapting until you both find the sweet spot.”
No matter what technique you choose, however, he advises that any massage movements should be directed toward the heart. This matches the way the blood flows in your veins, the bluish-purple lines visible under your skin. Too much pressure going in the wrong direction, away from your heart, has the potential to damage a valve.
Make sure you have the proper mattress or pillow
Try sleeping on a firm mattress without a pillow or with a special neck pillow.
Use a soft neck collar
Ask your healthcare provider about using a soft neck collar to relieve discomfort. Don’t use the collar for a long time. Doing so can make your neck muscles weaker.
Stretches to help a stiff neck
The key to relief for a stiff neck is proper stretching and manipulation, Dr. Bang says. Doing slow range-of-motion exercises, up and down, side to side, and from ear to ear, can help to gently stretch the neck muscles. Certain yoga poses can also help ease stiffness.
Here are some other specific stretches you can try at your desk or in the car that may help you avoid a stiff neck:
- Roll your shoulders backwards and down 10 times.
- Squeeze your shoulder blades together 10 times.
- Push your head backwards into your car head rest or hands and hold for 30 seconds.
- Bring your ear to your shoulder 10 times on each side.
Tips to prevent neck pain
Here are some ways to prevent neck pain that comes with a stiff neck.
Be mindful of your sleep positions
Dr. Bang says if your neck is bothering you, you should pay attention to your sleep positions. Sleep only on your side or on your back – never on your stomach, he says.
Advertising Policy
“When you sleep on your stomach, often you will end up twisting your head one way or the other for hours at a time,” Dr. Bang says. “Sleeping on your stomach also can affect your low back because your belly sinks into the bed if you don’t have enough support. ”
”
Practice proper computer posture
To help you avoid neck pain, put your monitor at eye level, sit up straight and avoid tilting and twisting your head down or to the side while you’re on the computer. Also, be sure to take breaks from staring at your screen.
Be mindful of how you’re sitting in the car — or while using your phone
When you’re driving or using your smartphone, be sure to take frequent breaks and avoid having your neck bent forward for long periods of time, Dr. Bang says.
How long does neck pain last?
How long neck pain lasts depends on a variety of factors. This includes what kind of injury caused the acute (or sudden) neck pain—for example, a car accident, a sports injury or a muscle pull from working outside—and how you respond to the injury.
“Many times, symptoms can resolve over a period of months if you stop doing the offending behavior,” says Dr. Bang. “Neck pain from car accidents can last a long time. But if you don’t get in another car wreck, your pain will typically go away over a few months. However, if you don’t change a habit that causes neck pain, like using a computer monitor poorly, it’s going to last.”
If pain persists and gets in the way of your daily activities, or any treatment you try doesn’t seem to be working, further discussion might be necessary. “If you tried some things on your own and after two months it’s not gone away, then it’s probably time to see your doctor to figure out if there’s an underlying issue or if there’s some behavior you need to change.”
How to remove backlash: in the steering column, in the gearbox
The concept of "backlash" - entered the Russian language from the German dictionary, in which it is usually understood as "air". It acquired its fullest meaning when it migrated to mechanics, where it began to denote an easy or free movement of elements, in other words, an undesirable gap, which often arose due to damage or wear of parts.
As a rule, even a motorist without much experience in repairing his "iron horse" is able to identify the cause of the problem on his own, and even get rid of play in the steering elements on his own. Checking the backlash consists in fixing on the ruler of the steering wheel at the moment where the front wheels begin to turn to the right - you need to set a mark on the steering wheel, for example, an elastic band or a pencil note. Then you need to turn the steering wheel to the left until the front wheels start turning in this direction, and also make a mark. Do-it-yourself play check Having carried out diagnostic work, the cause of play is usually such defects as: A loose steering wheel nut is probably the most innocuous thing that could happen to a car. The cause of this defect is most often the frequent adjustment of this assembly, or the nut was not tightened tightly enough for some other reason. To eliminate this misunderstanding, you only need to remove the casing from the fastener and, having selected the appropriate socket wrench, tighten the nut properly. If an airbag module is installed on the car, most likely it will have to be removed, because without this you can’t even get close to the steering wheel mount. All ongoing work requires special delicacy, and most importantly, do not forget in time disconnect battery terminals . Tightening the steering wheel nut A loose lock in the steering wheel often causes accelerated wear of the splines on the joint, which is fraught with an accident. If the repair has been postponed for a long time, then this situation is not uncommon. In this case, the replacement of worn parts should be carried out as soon as possible. Worn wormshaft spline Worn universal joints seem to rub the steering wheel, creating a "gear" in the intermediate shaft. This leads to a decrease in vehicle controllability, especially when driving at high speed. Usually, it is not possible to repair the components of the intermediate shaft on its own, and its complete replacement is necessary. Another type of this malfunction is the situation when the nut of the steering assembly is loosened at the point of attachment to the body, less often when the rubber gaskets between the body and the steering mechanism have sagged or worn out. In this case, it is enough to tighten the loose nut or replace the rubber elements. Adjusting shim If an increased gap is found in the design of the gears or between the rack and guides, it means that the wear process from the interaction of the rack and gears amplifies something, for example, a torn anther. This element in the steering system is distinguished by its vulnerability compared to others, since their functioning is associated with difficult conditions for their continuous operation, in which the elements of the mechanism have to deal with flows of water, mud, sand, etc. Old and new tie rods Malfunctions in this assembly are complicated by the fact that in the ball joint of the tip this leads to an expansion of axial and radial clearances, due to which the entire structure becomes unusable, and this makes the car uncontrollable. It is easy to imagine what can happen to a car at high speed with such a breakdown. However, you can try to repair it yourself. To do this, it is necessary to change the rubber-metal hinges through which the assembly is attached to the steering system. Rubber-to-metal joint It is quite simple to determine this defect - steering wheel turns will invariably be accompanied by a specific metallic knock. These hinges are pressed in, therefore, pressing equipment will be required with which new ones will be pressed in. On the other hand, it is possible to retighten the bolts securing the inner ends of the links to the assembly, using the manufacturer's instructions. Replacing the rubber joints Play in the steering system may be due to loose fastening of the adjusting rods in the toe system. The cause is usually loose tightening of these rods after calibration of the toe angle, and if the problem is not properly addressed, this rod can fly out of the tip. Increasingly, there are cars on the market where the swing arms are connected not by welding, but by bolts. In this case, the loosening of these bolts often leads to the described situation. To find out the final cause, in this case it is recommended to adjust the steering by dismantling the wheels and checking all the mounting bolts. Detecting this malfunction is quite simple - when starting the car from a place or shifting gears, distinct bumps or clicks will be heard. It often occurs when a foreign car's mileage is close to 100,000 kilometers, and for the brainchild of the domestic auto industry - close to 50,000 km. Vehicles with a pair of drive axles are particularly prone to this fault. If the fault is not triggered before the critical moment, then it is not emergency in nature. Reducer Methods for detecting a defect are quite common for all cars - measure the backlash in the gearbox. The problem has a specific value that can be measured, so if you have something knocking, it’s far from a fact that it’s knocking in the gearbox - get ready for the fact that you will have to measure not in one or two nodes. You can see more about measuring backlash in the gearbox in the video: Work begins with installing the machine on a viewing hole and locking blocks. Note that it is impossible to measure the amount of play on a suspended wheel - in this case, the measurements of the play will include not only the gearbox data, but also the amount of play: Thus, when measuring from a suspended wheel, many transmission backlashes are erroneously measured, which does not guarantee the detection of excess backlash in the gearbox, and in the case of repair work based on such diagnostics, the replacement or repair work of the gearbox shaft may completely prevent desired results. The reason for this outcome is clear. Even if this method of measurement did not affect the extraneous play of the transmission elements, the results of this measurement would not be accurate, since it requires accurate information in degrees, and in this case not everyone has a protractor at hand, and this will only be approximate froze. The correct sequence of measurements: However, this example is not universal. Here, we analyzed the measurements of the backlash in the gearbox of the bridge, mounted in the beam of the bridge with semi-axes of the classic type, known to the motorist in the line of VAZ cars. This measurement of gear backlash is called "clean measurement". We will talk about the allowable amount of backlash in the gearbox a little lower. Another variation in the design of the drive axles of the gearbox are axles with drives. For those who are familiar with the device of the domestic Niva, such a system will not be a discovery. This type of axles, as well as the procedure for measuring the backlash in the gearbox, differs significantly from the previous design, since the condition of the CV joints also affects its value. When diagnosing, it often turns out that it was the elements of the CV joint that became the main cause of the backlash, and the gearbox shaft does not have increased backlash. For accurate diagnosis of these bridges, two measurements are made: Measurements are carried out in several stages: The resulting segment from mark to mark is the total axle play. This value is measured in millimeters, which is most conveniently done with a protractor or a small ruler. As a result, we have two indicators - total and net play. Usually, the number of net backlash is much less, 3-5 times. If this is the case, then the problem is more likely in worn actuators, and not in the gearbox. In this case, in addition to adjusting the gearbox, it will be necessary to replace the drives. Answering the question about the allowable backlash, it will not be a mistake to say that the smaller it is, the better it is. A rare motorist can achieve the complete elimination of backlash in the gearbox, and no matter what we do, 2-3 millimeters “whatever one may say” remain. It is safe to say that the benchmark for backlash in the gearbox will be exactly these 2-3 millimeters, with which the vast majority of cars leave the assembly line. Turning to higher indicators, you should start from the numbers of 9-11 mm. Backlash, the value of which fluctuates in this range, as a rule, does not require special actions, and even without special diagnostics it will not declare itself. Rarely, but still there are cases when a similar or even smaller backlash causes inconvenience - in such cases, the sound is very thin and loud. A backlash of 10-11 millimeters usually occurs when the car's mileage approaches the figure of 50-60,000 kilometers, but there are exceptions to the rule - for example, when the brainchild of the Russian car industry, like the VAZ 7, already after 10-15,000 kilometers has a backlash of 15-25 millimeters, or, conversely, when a 6 with a mileage of more than 100,000 kilometers does not have a backlash of even 5 millimeters. Turning to specific recommendations, we note: Hello everyone. Today got around to repairing the differential. But first, a little theory of the issue. Now to practice. It is very desirable to work on the lift and together. Of course, you can twist one in the pit. But take my word for it, it will be very difficult. You can see the spare parts kit here. All sorted. We change the washers, the axis of the satellites, the axle lock, oil seals, rubber rings and some other hell of a bald one and assemble everything in the reverse order. Set the differential bolts on the threaded lock out of harm's way. The tightening torque is up to the first bunch) Namely, 70nM. Trust me, that's a lot, given that the diff in the boards doesn't want to stand rigid. I think it's unnecessary to talk about cleanliness during assembly. You don't need sand in a box or leaks, do you? Subscribe to the topic Subscribe to this forum Download/Print Theme Constantly breaks gear 9T, they are expensive, what to do? Differential, its types, torsion, planetary. I have a backlash in the diff, is that how it should be? I keep breaking the bearing on the differential box, what should I do? What do the Z260 pins break - PIN 2.5x12mm? In striving for perfection, you choose the best. AS8 Club - those who have made their choice. Message Marta75 »Armed Forces Mar 05, 2017 9:36 PM Message MARTA75
Causes and ways to remove play in the steering column
 Carrying out diagnostics of the node will require from the motorist:
 Then measure the difference in the length of these marks.
Worn steering wheel nut


Rod wear

Causes and ways to remove backlash in the gearbox
Checking a simple gearbox
 On the other hand, even if you measure the length of the divergence between the serifs on the wheel and the floor of the garage, then most likely, such a distance will be largely determined by the radius of this wheel.
 Nevertheless, its cleanliness is rather conditional, since in this type of main axle, not only the gearbox contributes to the appearance of a backlash, but also, albeit slightly ground off the splines of the semi-axes. However, the influence of splines can be ignored, since they will increase the play by no more than 1-2 millimeters.
 Measuring backlash in a gearbox with drive shafts
 However, the incorrect procedure for replacing the backlash in this bridge is not a rare reason for erroneous replacement of the gearbox.

Allowable backlash in the gearbox

Should there be play in the gears of the differential
The problem, like many, is play when the jacked wheel rotates and unhealthy knocks and bumps in the transmission when driving. Many, even in the service, attribute this to worn-out internal grenades. This is partly true, worn internal hinges also manifest themselves as shocks. But this is very easily diagnosed by simply turning the two halves of the hinge relative to each other.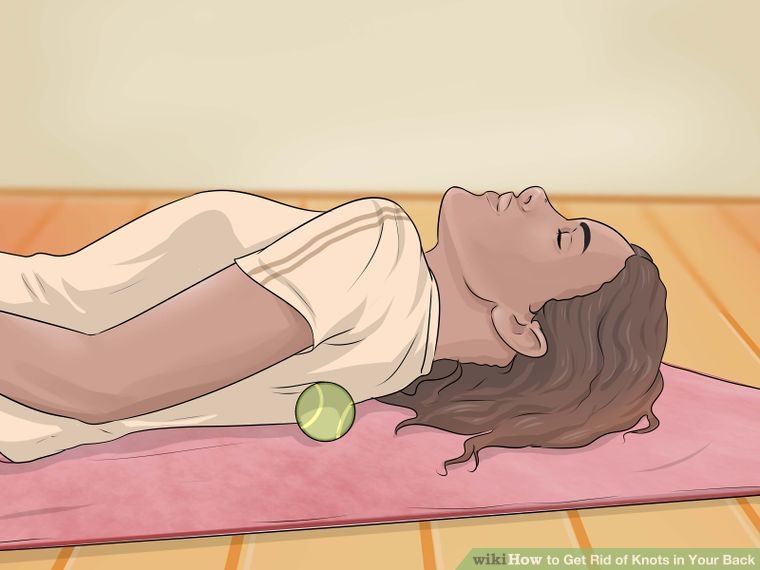 In my case, the internal hinges are healthy, without even a hint of any play. But the blows were still there, and quite sensitive. And it was precisely the play in the differential, which was confirmed by the autopsy. Here is a video I took before starting work.
Since I almost did not take a photo, my hands were in oil for the most part, I will simply describe the order of work.
1. Raise the car and remove the front wheels.
2. We wrap and separate the ball joints of the levers from the hub on both sides.
3. Drain the gearbox oil by unscrewing the sump. We unscrew the bolts gradually, because at first the oil does not seem to flow at all, and then it erupts in a stream)
4. Using direct mounting, we pull out the internal hinges from the gearbox. We bring the hinges up to the box so that they do not interfere.
5. Unscrew the jet thrust bracket of the engine (well, or the bottom cushion). We take out the axis of the backstage and remove the bracket to the side.
6. Thoroughly clean the slotted nut on the left side, and the plate with 5 bolts on the right side from centuries of dirt. Those. we are preparing for dismantling, you can douse it all with WD-40 or something else.
7. Mark the position of the castle nut! If you are not going to change the bearings, then you will just need to align the marks later. Loosen the castle nut retainer.
8. Unscrew everything that was poured) I advise you to first remove the castellated nut a couple of turns. It's very hard at the beginning. After that, you can completely unscrew the right plate with 5 bolts. The plate is held after unscrewing only due to the rubber ring. Therefore, boldly, but gently loosen it and pull it out.
9. Then, while supporting the differential by the gear, you can completely unscrew the nut. Achtung! Catch the differential! He can only fly down! Diff is in your hands.
10. We clamp the differential by the gear of the main pair through a pair of boards in a vise and unscrew the bolts. The bolts sit on a threaded retainer. They are very reluctant.
11. Turn the differential over so that the gear of the main pair is at the bottom and, leaning on the board, separate the gear from the differential housing with light blows. She just sticks to the oil.
12. Using a suitable drill as a drift, we knock out the retainer of the axis of the satellites. We put the drill on the side of the differential marking. Those. knock out the gears.
13. The axis of the satellites sits without much tension, it is simply pushed out with a finger.
14. Very carefully turn both satellite gears simultaneously by 90 degrees, thereby ensuring their removal from the diff body.
15. Pull out the remaining gears.
A few pictures of the process. Sorry, but there was simply no one to take a picture)
Notification by e-mail about replies to the topic while you are away from the forum.
Email notification of new topics on the forum while you are away from the forum.
Download the theme in various formats or view the printable version of the theme.

Differential repair (how to get rid of play)
Re: Differential Repair (how to get rid of play)
Re: Differential repair (how to get rid of backlash)
Message Marta75 »Armed Forces Mar 05, 2017 9:47 PM
Re: Differential Repair (how to get rid of backlash)
Templar » Armed Forces Mar 05, 2017 10:00 PM
Re: Repair of differential (how to get rid of backlash)
Post MARTA75 » Sun Mar 05, 2017 10:03 pm
Re: Repair of differential (how to get rid of backlash)
Post Sun 5 2017 10:10 pm
Re: Differential repair (how to get rid of play)
Message Marta75 »BC 05, 2017 10:27 PM
Re: Differential Repair (how to get rid of backlash)
MARTA75 666666666 » Sun Mar 05, 2017 10:31 pm
Re: Differential repair (how to get rid of backlash)
Message Svetik » Sun Mar 05, 2017 10:40 pm
get rid of backlash)
Message Svetik » Sun Mar 05, 2017 10:41 pm
Differential repair (how to get rid of backlash)Message Templar » Mon Mar 06, 2017 10:51 am
48 am
Re: Differential Repair (how to get rid of play)
Message Templar »Mon Mar 06, 2017 12:23 PM
Re: How to get rid of play)
Message Marta75 " Mon Mar 06, 2017 2:07 pm
from backlash)
Message Marta75 »Mon Mar 06, 2017 3:04 PM
Re: Differential Repair (how to get rid of backlash)
Message Marta75 » Mon Mar 06, 2017 3:06 PM
Re: Differential repair (how to get rid of backlash)
Message Templar » Mon Mar 06, 2017 4:08 pm
Re: Differential repair (how to get rid of backlash)
Message Mon 06 Mar0 6 » 2017 7:59PM
Re: Differential Repair (how to get rid of play)
Message Templaire "VT Mar 07, 2017 10:35 AM
Re: Differential Repair (how to get rid of backlash)
Message MARTA75 » Sun Mar 12, 2017 8:31 pm
Re: Differential repair (how to get rid of backlash)
Message _SauBeR_ how to get rid of backlash)
Message Marta75 »Armed Forces Mar 12, 2017 10:36 PM
Re: Differential Repair (how to get rid of backlash)
Message _SAUBER_ " Armed Forces Mar 12, 2017 10:44 PM
Car differential VAZ - conical, two-satellite.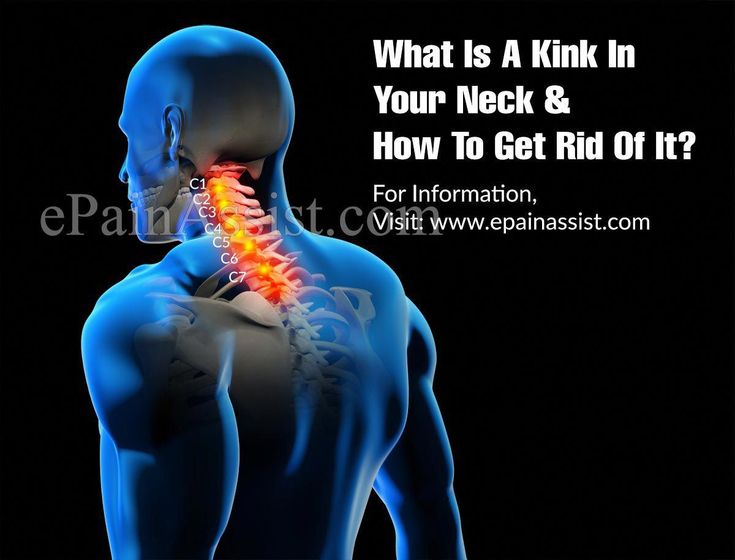 Satellites are bevel gears (z=10) mounted on an axle in a box (housing) of differential gears. The axis of the satellites is kept from falling out by the driven gear, which covers the axle holes in the box.
Replacement of differential gears for VAZ cars, disassembly and assembly of the differential.
Side gears (z=16) are installed in the cylindrical sockets of the box and rest on it through the support washers. During operation of the differential gears, when the side gears rotate relative to the box, the support washers rotate with them.
By selecting the support washers according to the thickness s, the axial play of the gears of the axle shafts is set within 0-0.1 mm. In some books on the repair of VAZ cars, it is indicated that the moment of resistance to rotation of the differential gears should not exceed 1.5 kgcm, which corresponds to a force on the maximum diameter of the side gear ring gear of about 45 kgf.
Obviously, here we are not talking about zero play, but about some kind of preload.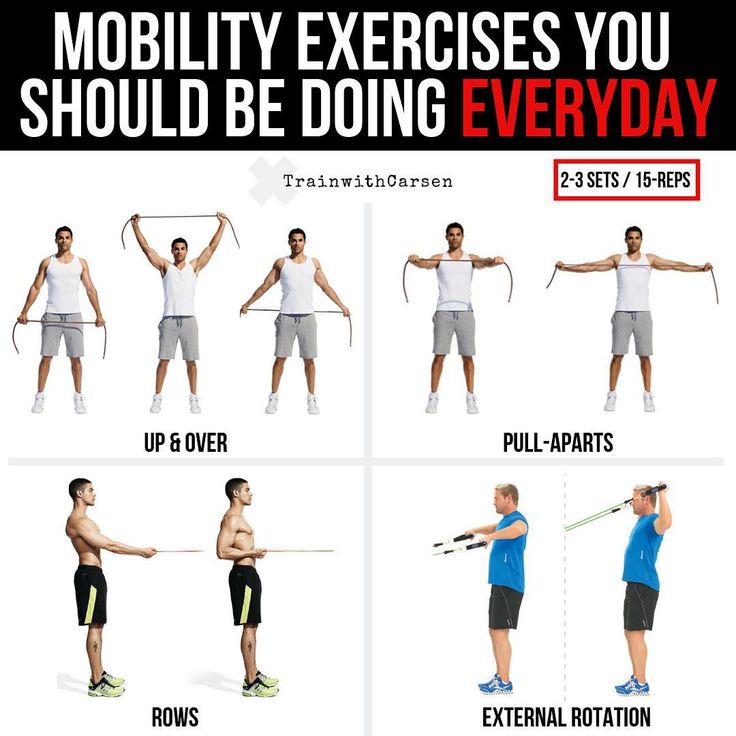 In practice, a differential box with gear preload simply cannot be assembled. All nominal and maximum wear clearances of differential gears are shown in the figure below.
Mounting the driven gear to the differential box with set screws.
Increasing the clearances of the differential gears beyond the limit may cause noise when the vehicle is cornering. Knocks when starting the car or when shifting gears are usually associated with wear on the axis of the satellites and holes in the differential box and satellites. Constant noise during movement can come from the differential in the event of wear on the bearings or the spline connection of the gears with the axle shafts.
Dismantling of the differential of VAZ cars.
To disassemble the differential, unscrew 8 bolts (S17, M10x1.25) securing the driven gear to the box flange. The bolts are tightened to a significant moment (8.5-10.5 kgcm) and given that even more torque is required to unscrew the bolts, the differential box must be secured in a vice. Fastening is carried out along the planes of the box windows.
Before removing the gear, mark its position relative to the box. With paint or a core, we put a mark on the outer diameter of the box flange against any letter or number stamped on the conical surface of the driven gear (it will not be possible to put a mark on the gear - it has a too hard surface).
The pinion shaft does not normally need to be knocked out, it can be removed freely. The satellites turn towards the windows, through which they and side gears with support washers are removed. Fix the installation locations of the differential side gears with support washers. Pay attention to the end surfaces of the washers to make it clear which part it rotates relative to. On the non-worn side, if necessary, you can install an additional washer (gasket).
All friction surfaces must be shiny, clean and smooth, as if polished. If there are traces of slight seizing (seizure), these surface damages are recommended to be eliminated with sanding paper with a grain size of 10-M40.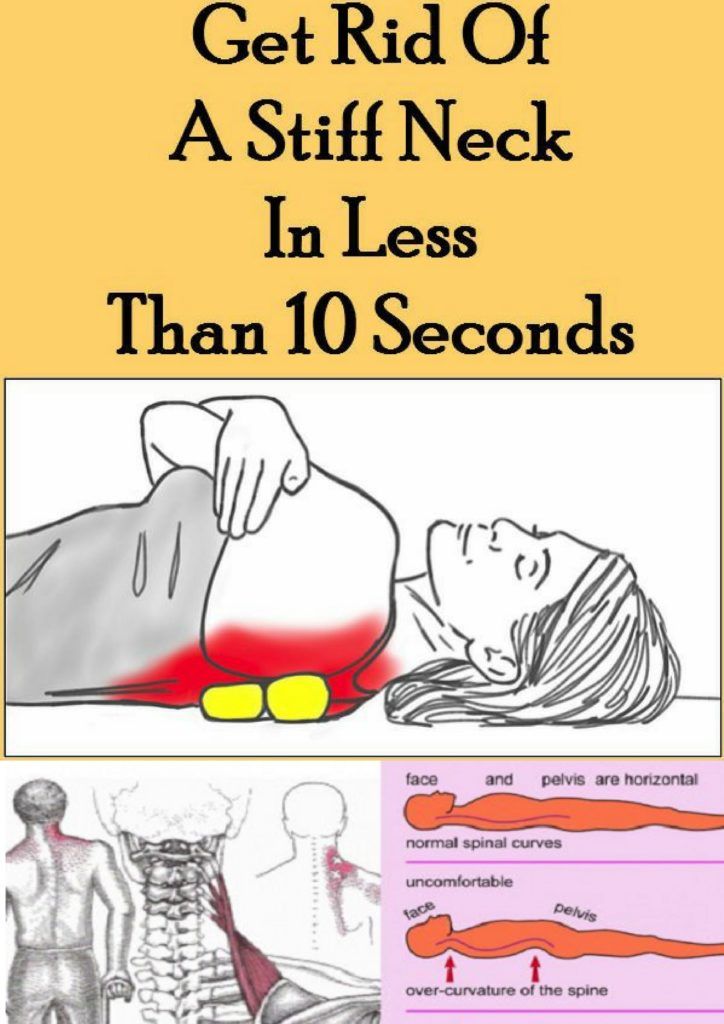 Especially carefully inspect the satellites - if there are any cracks, chips, they are no longer suitable for further use.
Usually the pinion axle wear is most noticeable. Knocks when starting off and shifting gears are clearly audible with a minimum axle diameter at junctions of 15 mm (axle diameter size 15.988-16 mm). As a rule, the axle is sold complete with gears and support washers, so the listed parts are replaced as a set.
The failure of the differential box is a rather rare occurrence. This can happen, for example, when the spherical surfaces of the box and satellite are jammed (seized), as a result of which the spherical surface of the box is most severely damaged.
Differential assembly for VAZ vehicles.
When assembling the differential, we install side gears with support washers through the windows. Through the window, we introduce the satellite into engagement with the side gears. We insert the axis into the hole of the satellite, and on the other side we install the second satellite on the axis and, if necessary, turning the gears, we introduce the second satellite into engagement with the side gears.
Holding the satellites, take out the axle and turn all the gears (regardless of their movement) so that the satellites enter the differential box and their holes coincide with the holes of the box. Having inserted the axis of the satellites, we measure the axial play of the semi-axial gears. The axial play of the semi-axial gears should be within 0-0.1 mm. With increased backlash, replace the support washers with thicker ones.
If no backlash of 0-0.1 mm can be achieved with washers with a maximum thickness of 2.1 mm, it is recommended to replace the gears. The backlash can be increased not only due to wear of the gear teeth, but also due to wear of the spherical surfaces of the satellites and the box. In addition, in practice, one has to deal with spare parts, in which the dimensions may already be equal to the maximum allowable.
Therefore, the axial play is usually set to two to three times the allowable (0.2-0.3 mm) for the reason that it cannot be eliminated or reduced with thicker support washers or additional washers.