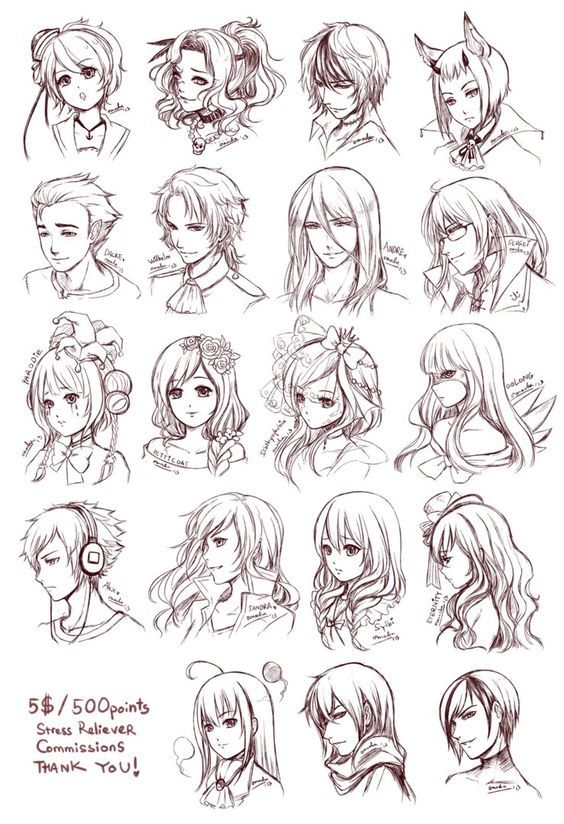
How draw art
How To Draw Archives - Art For Kids Hub
You are here: Home / Archives for How To Draw
Here is where you'll find every single on of our how to draw lessons! It's a massive drawing library! You'll find lessons for young and old kids. You'll find everything from how to draw cupcakes to how to draw sharks. So, what are you waiting for? Grab a marker and follow along with us.
Follow along with us and learn how to draw a fox in a Frankenstein Halloween costume. Art Supplies This is a list of the supplies we used, but feel free to use whatever you have in your home or classroom. Sharpie (or something to draw with) Paper (we use marker paper) Markers to color with […]
Filed Under: Animals, Halloween, How To Draw
Yay! Today, we’re learning how to draw a cute butterfly skeleton! This lesson is really fun and a great decoration for Halloween! We hope you and your kids enjoy customizing this lesson. Art Supplies This is a list of the supplies we used, but feel free to use whatever you have in your home or […]
Filed Under: Halloween, How To Draw, Insects
In this lesson, we’re learning how to draw an autumn elephant! We hope you have a lot of fun following along with us. Art Supplies This is a list of the supplies we used, but feel free to use whatever you have in your home or classroom. Pencil and erasure Sharpie (or something to draw […]
Filed Under: Animals, Autumn, How To Draw
Today’s drawing lesson is specifically for younger artists. We’re learning how to draw a vampire for Halloween by using shapes. We hope your little artists have a lot of fun drawing with us. Art Supplies This is a list of the supplies we used, but feel free to use whatever you have in your home […]
Filed Under: Halloween, How To Draw
In this art lesson, we learn how to draw a Halloween mouse popping out of a pumpkin jack-o-lantern. We hope you and your kids have a lot of fun drawing with us. Art Supplies This is a list of the supplies we used, but feel free to use whatever you have in your home or […]
Filed Under: Animals, Halloween, How To Draw
This video is a collection of our favorite farm drawing lessons for kids! Also, here’s a list of the lessons and time codes. 00:00:00 Hey art friends! 00:00:16 How To Draw A Barn 00:09:43 How To Draw A Farm Truck 00:19:16 How To Draw A Farmer 00:26:33 How To Draw A Sheep 00:30:41 How To […]
Filed Under: How To Draw
In this drawing lesson, Austin and I are learning how to draw a funny slime monster! This is a great lesson to change and add even more monsters to. We hope you enjoy this lesson a lot. Art Supplies This is a list of the supplies we used, but feel free to use whatever you […]
Filed Under: Halloween, How To Draw
In this lesson, Olivia and I are learning how to draw a seahorse by first learning how to write the letter S. We hope your little artists have a lot of fun following along with us. Art Supplies This is a list of the supplies we used, but feel free to use whatever you have […]
Filed Under: Animals, How To Draw, How To Draw The Alphabet - Preschool Art Lessons, Ocean
Today, we’re learning how to draw a cool skull emoji! We hope you and your kids have a lot of fun drawing this with us. You can also cut this drawing out and use it as decoration. Art Supplies This is a list of the supplies we used, but feel free to use whatever you […]
Filed Under: Halloween, How To Draw
In this drawing lesson, Austin and I are learning how to draw a funny kid in a Halloween costume! Follow along with us and add even more spooky decorations in the background. Art Supplies This is a list of the supplies we used, but feel free to use whatever you have in your home or […]
Filed Under: Animals, Halloween, How To Draw, Prehistoric
In this art lesson, Austin and I are drawing a cool pumpkin goblin! We hope you and your kids have a lot of fun following along with us. Art Supplies This is a list of the supplies we used, but feel free to use whatever you have in your home or classroom. Sharpie (or something […]
Filed Under: Halloween, How To Draw
Today, Hadley and I are learning how to draw this cute ghost with a unicorn horn! We hope you and your kids have a lot of fun following along with us. Also, challenge your kids to add extra Halloween details. Art Supplies This is a list of the supplies we used, but feel free to […]
Filed Under: Halloween, How To Draw
Today, Olivia and I are learning how to draw a robin by first writing the letter R. We hope your little artists love following along with us. Art Supplies This is a list of the supplies we used, but feel free to use whatever you have in your home or classroom. Crayons Paper Visit our […]
Filed Under: Animals, Birds, How To Draw, How To Draw The Alphabet - Preschool Art Lessons, Spring
Yay! Teryn and I are learning how to draw a cute witch owl for Halloween! We hope you and your kids have a lot of fun following along with us. Remember to color and add extra details to your drawing. Art Supplies This is a list of the supplies we used, but feel free to […]
Filed Under: Halloween, How To Draw
Follow along with us and learn how to draw flint corn! Art Supplies This is a list of the supplies we used, but feel free to use whatever you have in your home or classroom. Sharpie (or something to draw with) Paper (we use marker paper) Markers to color with (we use Bianyo) Colored pencils […]
Filed Under: Autumn, Food, How To Draw, Thanksgiving
Happy Friday, art friends! Today, Teryn and I are learning how to draw a funny chocolate-covered pretzel! We hope you have a lot of fun following along with us. Art Supplies This is a list of the supplies we used, but feel free to use whatever you have in your home or classroom. Pencil and […]
Filed Under: Dessert, Food, How To Draw
Follow along with us and learn how to draw a Dalmatian firepup! We hope you have a lot of fun drawing with us and even changing your drawing. Art Supplies This is a list of the supplies we used, but feel free to use whatever you have in your home or classroom. Sharpie (or something […]
Filed Under: Animals, Dogs, How To Draw
Olivia and I are learning how to draw a quail by first learning how to write the letter Q! We hope you have fun following along with us. Art Supplies This is a list of the supplies we used, but feel free to use whatever you have in your home or classroom. Crayons Paper Visit […]
Filed Under: Animals, Birds, How To Draw, How To Draw The Alphabet - Preschool Art Lessons
In this lesson, Austin and I are learning how to draw a funny cartoon pumpkin stack! This is also a folding surprise, so be sure to add extra funny things to the inside. Art Supplies This is a list of the supplies we used, but feel free to use whatever you have in your home […]
Filed Under: Autumn, Halloween, How To Draw
The leaves are starting to change! Today, Olivia and I are learning how to draw a pile of leaves with a kid jumping into them. Art Supplies This is a list of the supplies we used, but feel free to use whatever you have in your home or classroom. Sharpie (or something to draw with) […]
Filed Under: Autumn, How To Draw, People
Follow along with us and learn how to draw a funny, cute fall gnome! Art Supplies This is a list of the supplies we used, but feel free to use whatever you have in your home or classroom. Sharpie (or something to draw with) Paper (we use marker paper) Markers to color with (we use […]
Filed Under: Autumn, How To Draw
Hey, art friends! Today, we’re drawing another character from Minecraft. We’re learning how to draw a Minecraft bat! We hope you have a lot of fun following along with us. Art Supplies This is a list of the supplies we used, but feel free to use whatever you have in your home or classroom. Sharpie […]
Filed Under: Animals, Halloween, How To Draw, In Video Games
This lesson is meant for younger artists, but still fun for everyone! Olivia and I are learning how to draw a parrot by first writing the letter P. We hope you and your little artists have fun following along with us. Art Supplies This is a list of the supplies we used, but feel free […]
Filed Under: Animals, Birds, How To Draw, How To Draw The Alphabet - Preschool Art Lessons
Follow along with us and learn how to draw a funny Frankenstein burrito! Art Supplies This is a list of the supplies we used, but feel free to use whatever you have in your home or classroom. Sharpie (or something to draw with) Paper (we use marker paper) Markers to color with (we use Bianyo) […]
Filed Under: Dinner, Food, Halloween, How To Draw
I would definitely order lunch from this food truck! Follow along with us and learn how to draw a funny Halloween food truck. Art Supplies This is a list of the supplies we used, but feel free to use whatever you have in your home or classroom. Sharpie (or something to draw with) Paper (we […]
Filed Under: Food, Halloween, How To Draw, Vehicles
This lesson is specifically for younger artists. Today, Olivia and I are learning how to draw an octopus by first writing the letter O. Art Supplies This is a list of the supplies we used, but feel free to use whatever you have in your home or classroom. Crayons Paper Visit our art supply page […]
Filed Under: Animals, How To Draw, How To Draw The Alphabet - Preschool Art Lessons
Hot dogs and a full moon are super scary! Today, we’re learning how to draw a funny hot dog werewolf for Halloween! Art Supplies This is a list of the supplies we used, but feel free to use whatever you have in your home or classroom. Sharpie (or something to draw with) Paper (we use […]
Filed Under: Food, Halloween, How To Draw
We love Halloween! To start celebrating, we thought it would be fun to learn how to draw a cupcake witch! Be sure to add even more spooky decorations to your drawings. Art Supplies This is a list of the supplies we used, but feel free to use whatever you have in your home or classroom. […]
Filed Under: Dessert, Food, Halloween, How To Draw
Today, we’re learning how to draw a cute ice cream dragon cartoon for Halloween! We hope you have so much fun following along with us and drawing your own kawaii dragon! Art Supplies This is a list of the supplies we used, but feel free to use whatever you have in your home or classroom. […]
Filed Under: Dessert, Food, Halloween
This video has some of our favorite fall art lessons for kids! Grab all of your art supplies and some hot chocolate and draw with us! Chapters 00:00 Favorite Fall Art Lessons For Kids! 00:08 How To Draw Cute Cartoon Hot Chocolate 06:25 How To Draw Funny Cinnamon Rolls 12:57 How To Draw A Cute […]
Filed Under: Autumn, How To Draw
Art Projects for Kids · Step by Step Drawing Lessons for Kids
Stop searching.
 Now you can get your no-prep, step-by-step elementary art lessons delivered daily, and it’s free!
Stop the Sunday Search
For teachers who are tired of having their Sundays swallowed up by lesson planning, Art Projects for Kids has a free daily email that serves up easy-to-use art projects your students will love — without ever opening Pinterest.
Quality lessons ready to use!
It used to take forever to find art lessons that connected to the classroom curriculum that were age appropriate. My attempts to “age up” or “age down” projects to the right age level were labors of love and not always successful. Thanks to Art Projects for Kids, I now have quality lessons ready to use, all in one place!
Ronna Traylor,
Art Teacher
I love the step-by-step directions!
I used to struggle to find art lessons. With Art Projects for Kids, I love that the lessons are not complicated to understand or implement because I don’t have time to study the lessons. I love the minimal prep, just pull it up on my smartboard and follow along with your directions.
Brittany McHargue,
Classroom Teacher
Meaningful and easy to do!
My biggest challenge was finding readily available ideas using common art supplies. I love that your art work is so easy to use and at my fingertips when I need them.
Corene,
Classroom Teacher
Fun, Meaningful Art Activities with 90% Less Planning Time
The only options most teachers have for how to find art lessons is by spending hours weeding through the millions of ideas that come up on Google and Pinterest. Or to scour Teachers Pay Teachers for expensive supplements to your local curriculum. Or to try to force-fit the overwhelming school art program that requires all kinds of fancy materials (all in your “free” time, right?).
But even after giving up most of Sunday afternoon searching for ideas, all you turn up is one or two puny lesson plans with instructions that are about as easy to follow as IRS Form 13909. You need a faster way to find fun art projects with user-friendly directions that will engage your kids. But…how? Enter: Art Projects for Kids.
ART PROJECTS FOR KIDS CREATOR, KATHY BARBRO
Prep Your Art Lesson Plans, Effortlessly
The Art Projects for Kids step-by-step method of elementary art instruction breaks the often anxiety-inducing subject of art down into a simple, fun process (for students AND teachers) that boosts your students’ confidence and allows them to create with joy.
Each of your kids can set their own pace to create artwork they can be proud of. And you can feel empowered to instill your kids with the delight of creativity (even if you tend to be a left-brained, “in the box” thinker yourself).
But after 20 years in the classroom as an art teacher, I also know what it’s like to give up every Sunday afternoon (and most evenings) to plan the week’s lessons. You shouldn’t have to give up all your free time to bring your students meaningful art instruction. That’s why at Art Projects for Kids, you’ll find a variety of easy, step-by-step lessons your kids will love all in one place. The result is an instant extra 90 minutes minutes back in your weekend — just by signing up for our emails (and it’s free!).
Integrated Art History Projects
SEE ALL >
Relax, Knowing No-Prep Art Lessons Are en Route to Your Inbox
No more feeling guilty for not having the bandwidth to thoughtfully integrate more art projects into your lessons. No more cringing at not coming up with more “creative” ideas and projects to put on your bulletin boards. No more doubting your ability to teach art. No more feeling helpless when your kids are too afraid to create.
Instead, enjoy a classroom brimming with perseverance and playfulness.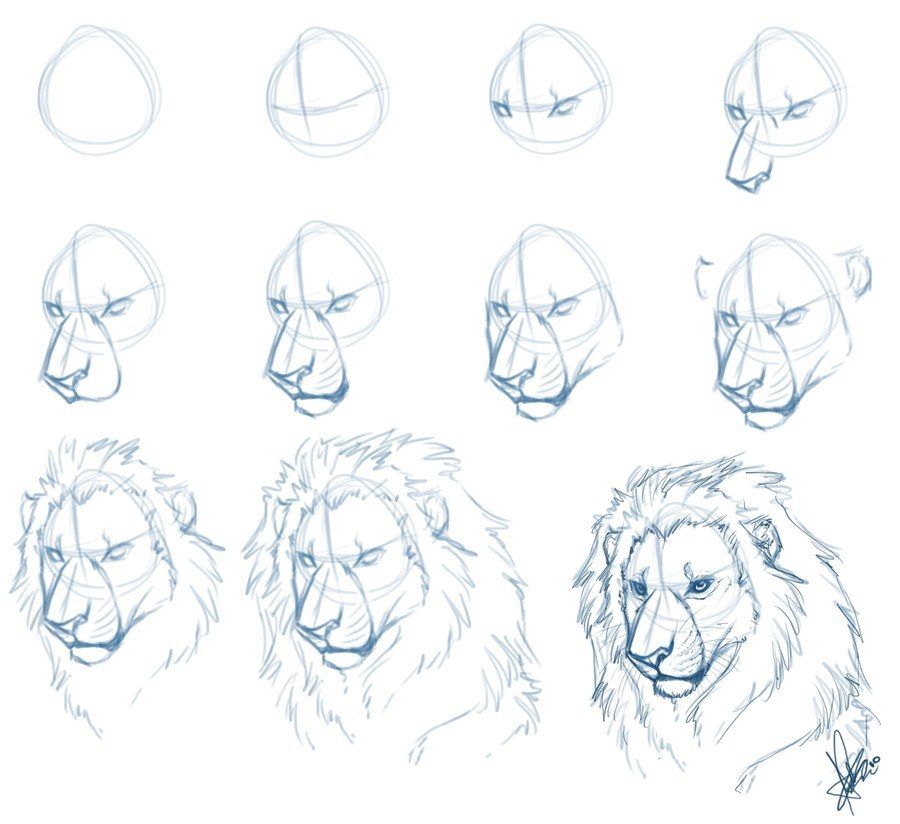 Wake up looking forward to walking into your classroom armed with your easy lesson plans and even videos you can play for your class. Smile as you watch your creative kids discover that, yes, they CAN have fun doing art. Feel truly prepared (maybe for the first time ever). Treat yourself to a relaxing Sunday with your feet up. Maybe even reading a book that didn’t come out of the kids section of the library. And know that your (free) email membership to Art Projects for Kids is powering all of this, like your magical teaching fairy godmother. And even when you rest? It won’t.
I love the step-by-step directions!
My biggest challenge in teaching art was finding accessible and doable projects for my elementary students. With Art Projects for Kids, I love that I get a legitimate art educator’s perspective. The lessons make it easy to differentiate for “exceptional” learners without oversimplifying and the projects are interesting for my kids to do.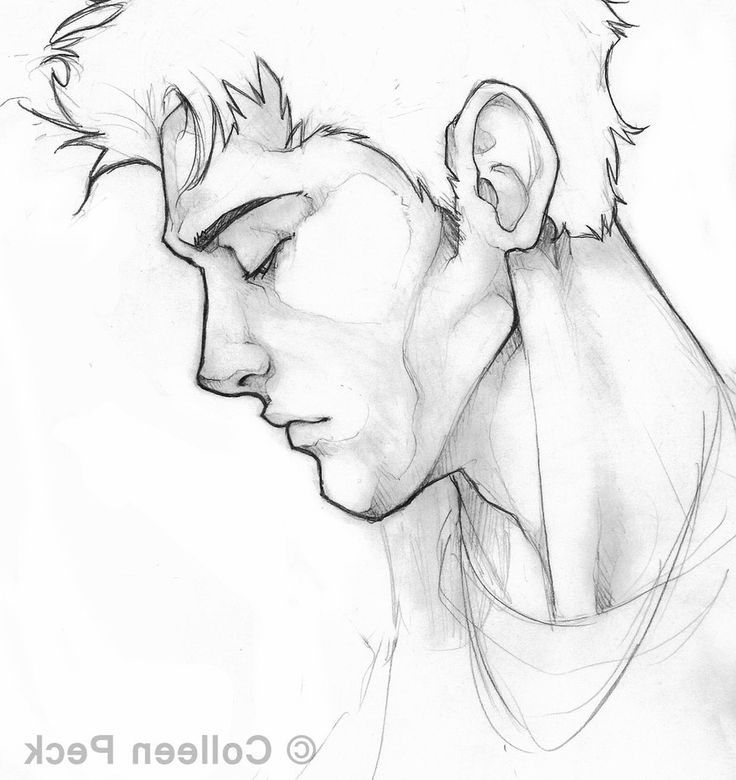
Bonnie T.,
Classroom Teacher
Really boosts their drawing confidence!
I used to spend hours finding projects my kids could enjoy and successfully complete. Art Projects for Kids is the perfect go to when I need a prompt in a hurry. The downloads have given my students actual art to learn, and they’ve become more confident in their abilities with the step-by-step directions.
Jessica H.,
Art Teacher
Nice art work that is kid friendly!
Breaking down art projects into easy to follow steps used to take forever, and the directions on other sites were not as user-friendly for my students. I love that Art Projects for Kids provides popular characters and animals that students like with step-by-step tutorials that allow me to teach my students independent leisure skills.
Laurie E.,
BCBA (Behavior Analyst)
Find Literally Any Picture Your Students Want to Draw, All In One Place
SearchView Project Ideas by Grade Level
You Don’t Need as Much Time as You Think to Integrate Art into Your Classroom
You won’t have to spend all day searching Pinterest for ideas.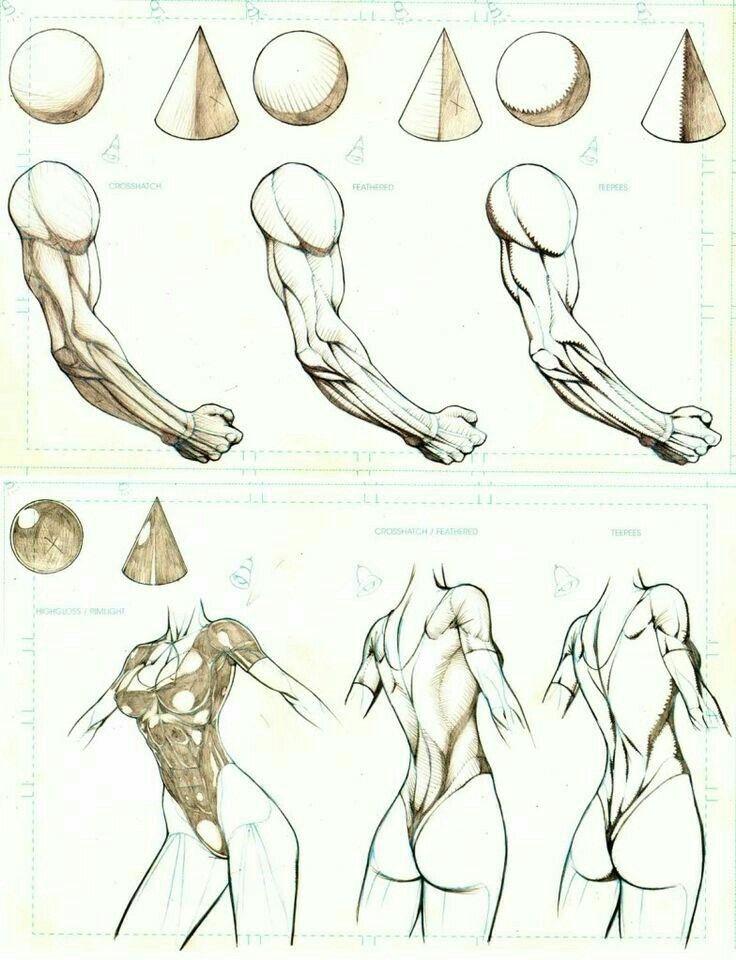 You won’t have to spend hours prepping or studying the art lessons. You won’t need to beg your administration or parents for high-end supplies or purchase expensive curriculum.
All you have to do is say “yes” to the Art Projects for Kids daily email and watch as the 3,152 minutes you’re losing each year to searching for art activities slowly come dripping back into your life. Because what busy teacher doesn’t want another 3,152 minutes per year without doing anything differently at all? Get the Art Projects for Kids daily email, and let us do the heavy lifting for you.
Find More Easy, Step-by-Step Art Lessons in our Shop
Latest From the Shop
Collaborative Mural Templates for Kids
See All >
How to learn to draw: 10 painting tips for beginners
Julia Skripnik
Many want to learn how to draw, but are afraid to start.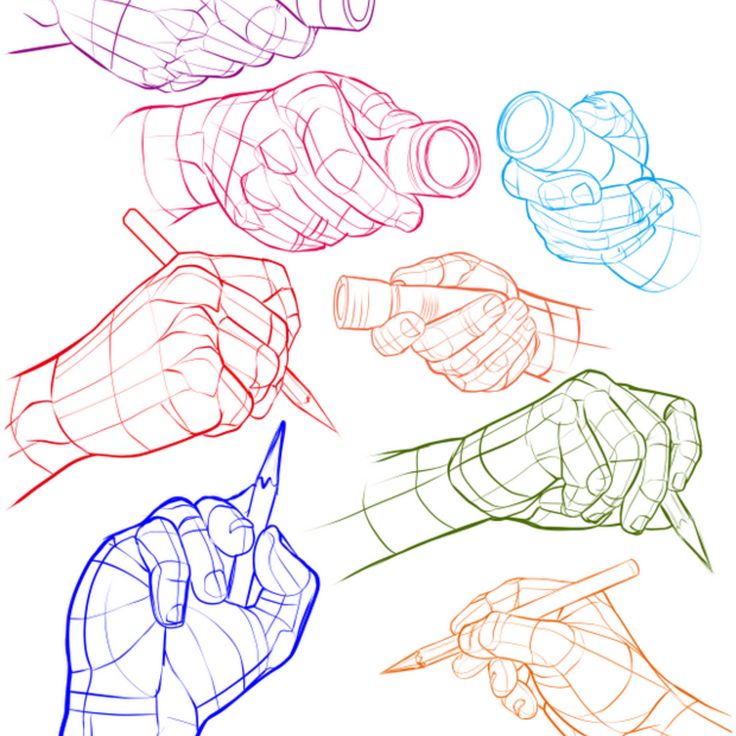 How to approach paints? Which brush and paper to choose? Where to start? The Painting From Scratch guide has the answers to all of these questions. Here are the basics, where to start painting lessons. Follow these tips, do the exercises and you will no longer be afraid of a clean slate. You will receive the necessary knowledge and basic skills. Painting will become closer, clearer and will bring a lot of pleasure.
Part 1: Preparatory
1. Find an inspiring object to draw
There are times when you've got everything ready, but you can't find an object that inspires you. This should be taken care of in advance. Something interesting must have been lying around in cupboards and drawers. Look for items at sales, consignment and grocery stores. Study the paintings of your favorite artists.
The collection should include objects that are pleasant to look at: this is important for creating a successful work.
Interest in color and form will motivate you in the process of working on a painting. There is a connection between feelings for an object and the ability to reveal one's abilities. You can do more than you think.
For the first painting, a simple one-color symmetrical container, such as a regular coffee cup, will do. Illustration from the book
2. Get to know brushes and paints
Take a soft round brush and a bristle brush and compare their bristles. Squeeze some acrylic paint from the tube onto the palette. Try applying undiluted paint with different brushes to canvas or watercolor paper. strokes should be bright and embossed. Feel the difference in strokes with different brushes. Add some water and apply the strokes again. The average consistency of the paint has the same color intensity as undiluted, but its texture is smoothed out. And do this exercise again with a weak paint solution. Note how quickly the paints dry the first, second, and third times.
Illustration from the book
Try different types of brushes - oval soft, synthetic fine, bristle flat.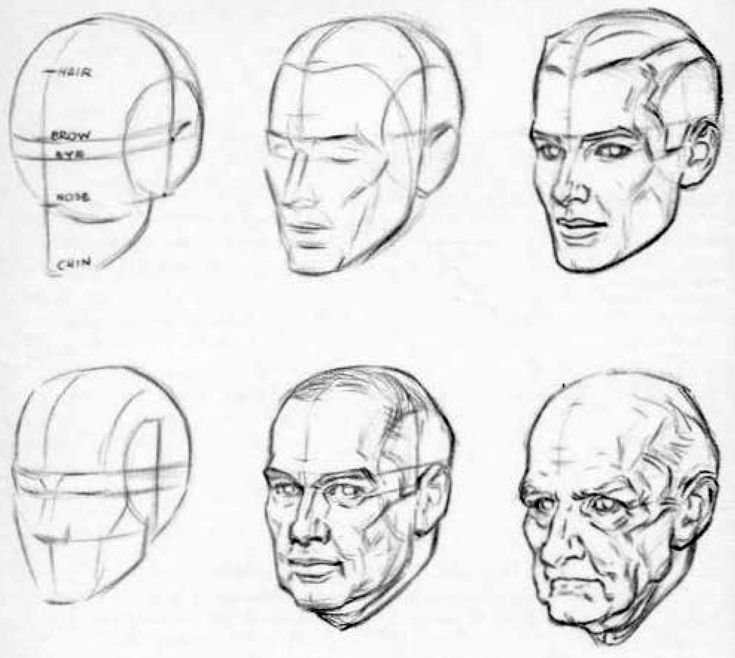 Try each brush until you are sure you know which brush to use to complete your design.
Illustration from the book
3. Useful palette tricks
The colors in the paintings we see are usually obtained by mixing: pure color from a tube is usually too intense. These tricks will make it easier for you to get the right color.
- 1Squeeze out the paint from the tube to the edge of the palette, leaving space between the colors. Use the center of the palette for blending. Knead the mixes away from each other to prevent unwanted mixing.
- Pick up pure color on the brush from the edge of the palette, and not from above and not from the middle of the extruded "sausage".
- Intense dark colors such as black (although it is not considered a color scientifically) add with care: even a small amount can significantly change the color being mixed.
- It is necessary to mix the colors with each other until the mixture becomes completely homogeneous.
- Don't spare the paint. Squeeze out as much as you need - usually it is a circle the size of a ruble coin (for whitewash - about five rubles). Paint consumption is an integral part of the painting process. If you save too much, you will never learn how to use paint.
4. Learn to get neutral colors
Neutral colors are present in any painting - "visually gray". Due to their low intensity, they are invisible at first glance, but this is the most useful tool for creating a harmonious color composition. Let's see how to achieve this.
Mix blue and orange in any proportion. Now let's try to change the color temperature due to the proportional ratio of warm and cold colors in the mixture. If the result is more purple, try making it rusty by adding more orange paint and then white for a lighter peach color. If a rusty color is formed in the first step, add blue to get a cool color close to purple, and then white to get a light purple-gray.
Repeat the previous steps for another pair of complementary colors - yellow and purple, red and green.
Pairs of complementary colors are connected by short vertical strokes. The colors of each pair are mixed together to produce two neutral colors, each dominated by one of the parent colors, located to the right of the respective parent. Illustration from the book
5. Primary, secondary and tertiary colors
Draw a circle, then divide it into three equal sectors. Paint the upper sector with medium cadmium yellow, the lower right sector with ultramarine blue, and then mix the main red from raspberry naphthol and light cadmium red and paint over the lower left sector with it.
On the primary color wheel, draw semicircles centered at the intersection of the sector boundaries with the outer outline of the color wheel. Fill in these semicircles with secondary colors, placing them above the "parents": cadmium red light above the border between red and yellow, violet dioxazine above the border between red and blue. Add yellow to the green FC and paint a green half circle over the border between yellow and blue.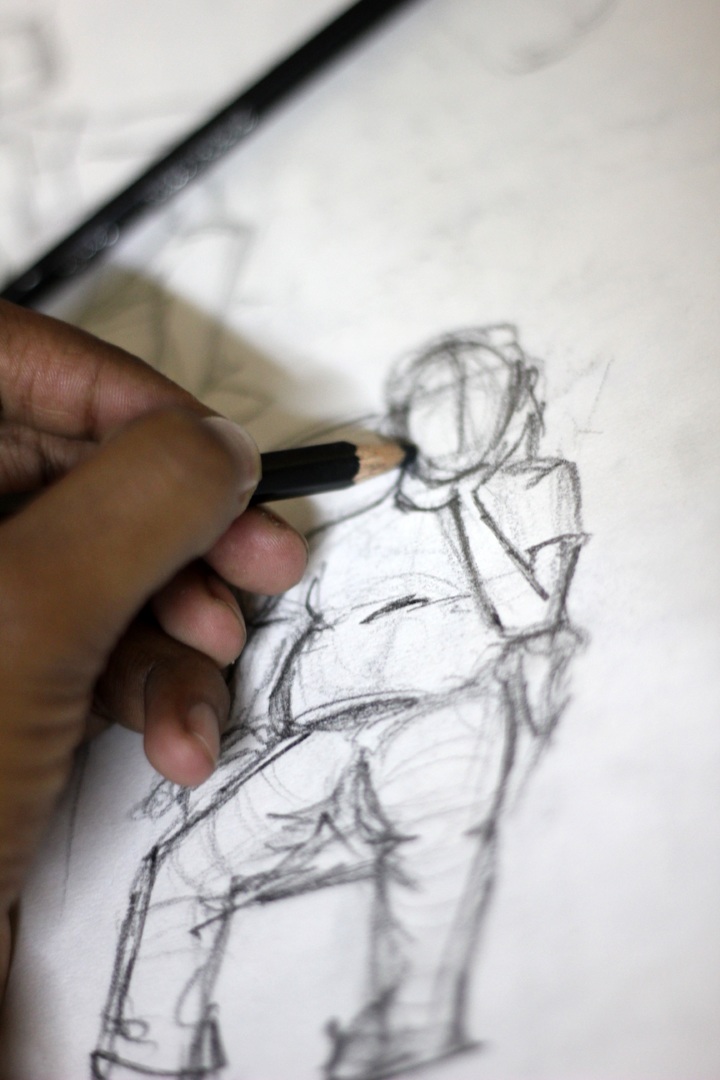
The primary color, when mixed with the adjacent secondary color, produces a tertiary color. Add one triangle on each side of the semicircle, for a total of six. Color each triangle based on the labels.
Primary, secondary and tertiary colors. Illustration from the book
Part 2. Drawing
6. Start with abstractions
Abstraction is a fun and easy way to prepare for a realistic piece. It is important to choose 3-4 colors that you like in order to feel an emotional connection with the painting. Draw a continuous, angular or rounded line over the entire surface of the sheet with a simple pencil. It may overlap several times.
Paint over the shapes in the drawing with the colors and shades, paint consistency and brush that you like. Listen to your inner voice. The main task is to do what you like, forgetting about everything else.
Illustration from the book
7. Scheme of strokes
Beginners are often unsure how to apply strokes. In the figure, the arrows show the direction that will help to achieve a good depth of the depicted space using the example of a circle.
Smear scheme and result. Illustration from the book
8. How to apply shadows
Shadows play a key role in creating a three-dimensional image: they must first be learned to see and write. There are four types of shadows in total:
- Custom shadows located on objects. These are areas of dark tone that contrast with the illuminated parts of the depicted form. They usually have a sharp border on the outer contour and a smooth transition on the border with areas of light tone of the object. They play the main role in creating volume.
- Halftone areas are narrow, soft-edged areas located on the border between the own shadow and the illuminated area of the object. These shadows are the middle tone between the contrasting dark and light tones of the subject.
- Drop shadows are the silhouettes of an object "fallen" or cast by it onto any surface other than itself.
 They give the impression that the object is on some surface.
 - T Point of contact - The darkest area of the cast shadow that lies next to the object. They are responsible for the "stability" and mass of the object. These shadows are also called accent, the darkest area among dark tones. An accent is the dark twin of a highlight, the lightest area among highlights.
To draw a shadow, use black paint or paint that is darker than the main color. And in the second step, cover this darkened area with the main color. The black color in the midtone should show through under the new paint layer, creating a colored shadow. If you want to make the shadow darker, apply more black from the sharp edge of the shadow and blend with the color at the midtone.
Shadow on the example of a cylinder. Illustration from the book
9. How to apply highlights
To create a realistic highlight, mark the lightest area on the object with a dry brush with white as many times as necessary for sufficient brightness. In the middle of the highlight, put a small smear of thick paint for more brightness.
Two examples of overlay highlights. Illustration from the book
10. Paint pictures in your imagination
As you go about your daily activities, paint pictures in your imagination. Mentally look for a match between the surfaces and textures you see around you and the way you work with a brush and apply paint.
Based on the book "Painting from scratch".
Drawing - HiSoUR Cultural History
Drawing is a form of visual art in which a person uses various drawing tools to represent paper or other two-dimensional medium. Tools include graphite pencils, pen and ink, ink brushes, wax colored pencils, crayons, charcoal, chalk, pastels, various kinds of erasers, markers, styluses, various metals (such as silver dot), and electronic drawing.
The drawing tool releases a small amount of material onto the surface, leaving a visible mark. The most common support for drawing is paper, although other materials such as cardboard, plastic, leather, canvas, and board may be used. Temporary drawings can be done on a blackboard, or on a blackboard, or even almost any. This medium has been a popular and primary medium of public expression throughout human history. This is one of the easiest and most effective ways to convey visual ideas. The wide availability of drawing tools makes drawing one of the most common artistic activities.
In addition to its more artistic forms, drawing is often used in commercial illustration, animation, architecture, engineering and technical drawing. A quick drawing, usually not intended for work, is sometimes called a sketch. An artist who practices or works in technical drawing may be referred to as a filmmaker, draughtsman, or draughtsman.
Drawing is one of the main forms of expression in the visual arts. It usually concerns the marking of lines and areas of tone on paper/other material, where an accurate representation of the visual world is expressed on a flat surface. Traditional drawings were monochrome, or at least had a little color, while modern colored pencil drawings may approximate or cross the line between drawing and painting. In Western terminology, drawing is distinct from painting, although similar media are often used in both tasks. Dry media usually associated with drawing, such as chalk, can be used in pastel paintings. Drawing can be done with a liquid medium applied with brushes or pens. Similar supports can also serve both: painting usually involves applying liquid paint to a prepared canvas or panels, but sometimes washing is done first with the same support. Drawing is often exploratory, with a heavy focus on observation, problem solving, and composition. Drawing is also regularly used in preparation for painting, further blurring their distinction. Blueprints created for this purpose are called studies.
There are several categories of drawing, including drawing drawing, cartoon, drawing, free hand, and shading. There are also many methods of drawing such as line drawing, hatching, shading, the surreal method of entopic graphomania (in which dots are placed on areas of impurities on a blank sheet of paper, and then lines between the dots), and tracing (drawing on translucent paper such as tracing paper, around the outline of the preceding shapes that appear through the paper).
A quick, unrefined drawing can be called a sketch.
In fields outside of art, technical drawings or plans for buildings, machines, circuits, and other things are often referred to as "drawings," even if they have been transferred to another medium by printing.
Drawing as a form of communication Drawing is one of the oldest forms of human expression, testifying to its existence prior to written communication. Drawing is believed to have been used as a specialized form of communication prior to the invention of written language, demonstrated by the production of cave and rock art created by Homo sapiens sapiens about 30,000 years ago. These drawings, known as pictograms, depicted objects and abstract concepts. Sketches and paintings created in prehistoric times were eventually stylized and simplified, leading to the development of the written language as we know it today.
Drawing in art Drawing is used to express one's creativity and is therefore prominent in the art world. For most of history, drawing has been seen as the foundation of artistic practice. Originally, artists used and reused wooden tablets to make their drawings. After the widespread use of paper in the 14th century, the use of drawing in art increased. At this stage, the drawing was usually used as a tool for reflection and research, acting as teaching material while the artists prepared for their final work. In an era of artistic flourishing, the Renaissance led to drawings showing realistic representational qualities, where there were many influences from geometry and philosophy.
The invention of the first widely available form of photography led to a shift in the use of drawing in art. Photography took over the role of painting as a more advanced method for accurately representing visual phenomena, and artists began to abandon traditional painting methods. Modernism in art encouraged "imaginative originality" and artists' approach to painting became more abstract.
Drawing outside of art Although the use of drawing is extensive in art, its practice is not limited exclusively to this area. Before widespread literature, 12th-century monks in European monasteries used intricate drawings to prepare illustrated, illuminated manuscripts on vellum and parchment. Drawing has also been widely used in the field of science as a method of discovery, understanding and explanation. In 1616, astronomer Galileo Galilei explained the changing phases of the moon through observational telescopic drawings. In addition, at 19In 24, the geophysicist Alfred Wegener used illustrations to visually demonstrate the origin of the continents.
A medium is a means by which ink, pigment or color is delivered to a drawing surface. Most drawing media are either dry (such as graphite, charcoal, pastel, conte, silver) or use a liquid solvent or carrier (marker, pen, and ink). Watercolor pencils can be used like regular pencils and then dampened with a damp brush to achieve various painterly effects. Very rarely do artists paint with invisible ink (usually decoded). A Metalpoint blueprint usually uses one of two metals: silver or lead.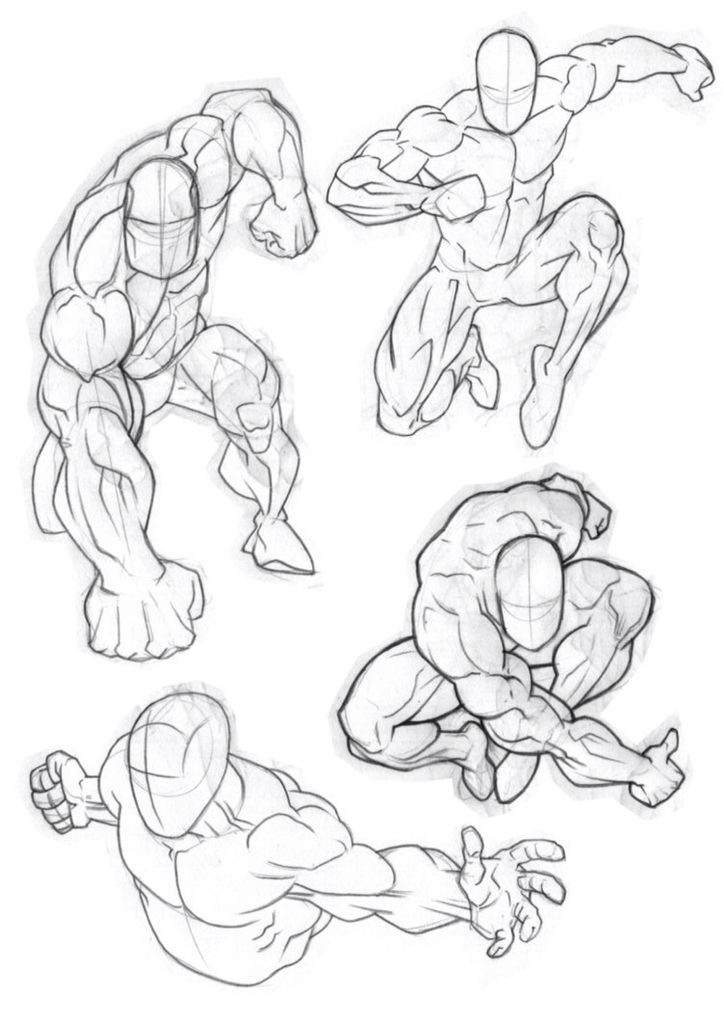 Less commonly used are gold, platinum, copper, brass, bronze, and pewter point.
Paper comes in a wide variety of sizes and qualities, from newsprint to high quality and relatively expensive paper sold as single sheets. Paper may vary in texture, hue, acidity and wet strength. Smooth paper is good for rendering fine detail, but more "toothy" paper holds the paint material better. Thus, coarser material is useful for deeper contrast.
Newspaper printing and printing paper can be useful for practical and rough sketches. Tracing paper is used for experimenting with semi-finished designs and for transferring designs from one sheet to another. Cartridge paper is the main type of drawing paper sold in cushions. Bristol plates and even heavier acid-free plates, often with smooth finishes, are used for fine detailing and do not distort when applied in wet environments (ink, wash). Vellum is extremely smooth and suitable for very fine details. Cold print paper can be used for drawing ink due to its texture.
Acid-free archival quality paper retains its color and texture much longer than wood pulp based paper such as newsprint, which turns yellow and becomes very brittle.
The main tools are a drawing board or table, a pencil sharpener and an eraser, and for drawing with ink. Other tools are the circular compass, ruler and square. Fixation is used to prevent crayon and pencil smudges from smearing. The ink ribbon is used to secure the paper to the drawing surface, as well as to mask the area so that it does not contain accidental marks such as sprayed or splashed materials and detergents. A steel or tilt table is used to keep the drawing surface in a suitable position, which is generally more horizontal than the position used when painting.
Almost all draughtsmen use their hands and fingers to apply media, with the exception of some handicapped people who draw with their mouth or feet.
Before working on an image, the artist usually researches how different media work. They can try different drawing tools on the practice sheets to determine value and texture, as well as how to apply the tool to create different effects.
The selection of an artist's drawing pattern affects the appearance of the image. Pens and ink drawings often use dashed groups of parallel lines. Cross hatching uses hatching in two or more different directions to create a dark tone. Broken hatches or lines with discontinuous breaks form lighter tones - and the control of the density of the gaps achieves a gradation of tone. Stippling uses dots to create tone, texture, and shadow. Different textures can be achieved depending on the method used to create the tone.
Drawings in dry environments often use similar techniques, although pencils and rice sticks can provide continuous tone changes. Usually the drawing is filled in based on which hand the artist is providing. The right artist paints from left to right so as not to blur the image. Erasers can remove unwanted lines, brighten tones, and clean up stray marks. In a sketch or sketch drawing, lines often follow the outline of an object, creating depth, appearing as shadows cast from light at the artist's position.
Sometimes the artist leaves an area of the image untouched, filling in the rest. The shape of the retained area can be painted with an oily liquid or cut from a clipping and applied to the drawing surface, protecting the surface from stray marks until the mask is removed.
Another way to preserve the area of the image is to apply a spray-on fixative to the surface. This holds the loose material firmly on the sheet and prevents it from smudging. However, fixative spray usually uses chemicals that can harm the respiratory system, so it should be used in a well-ventilated area such as outdoors.
Another method is subtractive drawing, in which the drawing surface is coated with graphite or charcoal and then removed to make an image.
Shading is a method of changing tonal values on paper to represent the hue of the material as well as the placement of shadows. Careful attention to reflected light, shadows and highlights can result in a very realistic rendering of an image.
Blending uses a tool to soften or spread the original drawing strokes. Blending is most easily done with a medium that does not immediately fix itself, such as graphite, chalk, or charcoal, although fresh ink may be smeared, wet, or dried for some effects. For shading and blending, the artist may use a blending stump, cloth, kneaded eraser, fingertip, or any combination of these. A piece of suede is useful for creating smooth textures and for removing material to lighten tone. A continuous tone can be achieved with graphite on a smooth surface without blending, but the technique is painstaking, with small circular or oval strokes with a somewhat obtuse point.
Shading techniques that also introduce texture into a drawing include shading and shading. A number of other methods create texture. In addition to the choice of paper, the drawing material and technique affect the texture. A texture can be made more realistic when it is drawn next to a contrasting texture; the rough texture is more obvious when placed next to a smoothly blended area. A similar effect can be achieved by bringing different tones closer together. The light edge next to the dark background stands out to the eye and almost seems to float above the surface.
Measuring the size of an object while blocking a drawing is an important step in creating a realistic representation of the subject. Tools such as a compass can be used to measure angles from different angles. These angles can be reproduced on the drawing surface and then rechecked to make sure they are accurate. Another form of measurement is comparing the relative sizes of different parts of an object with each other. A finger positioned at a point along the drawing tool can be used to compare this size to other parts of the image. The ruler can be used both as a ruler and as a device for calculating proportions.
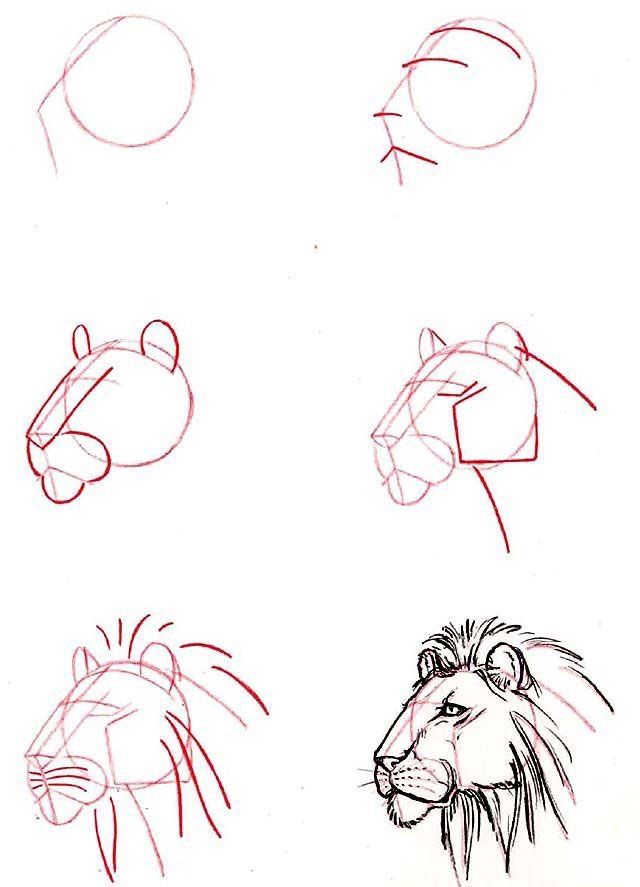
When trying to draw a complex shape such as a human figure, it is helpful to first imagine the shape with a set of primitive volumes. Almost any shape can be represented by some combination of cube, sphere, cylinder, and cone. Once these basic volumes are assembled into a likeness, then the drawing can be refined into a more precise and polished form. The rows of primitive volumes are removed and replaced with the final image. Building foundational construction is a foundational skill for fine art and is taught in many books and schools. Its correct application removes most of the uncertainties about small details and makes the final image stable.
The more refined art of figure drawing relies on an artist with a deep understanding of anatomy and human proportions. A trained artist is familiar with skeletal structure, joint placement, muscle placement, tendon movement, and how different parts work together during movement. This allows the artist to exhibit more natural poses that do not appear artificially rigid. The artist is also familiar with how proportions vary with the age of the subject, especially when painting a portrait.
Linear perspective is a method of drawing objects on a flat surface so that the dimensions shrink with distance. Each set of parallel straight edges of any object, be it a building or a table, follows lines that eventually converge at a vanishing point. Usually this point of convergence is somewhere along the horizon, since buildings are built flat with a flat surface. When multiple structures are aligned with each other, such as buildings along a street, the horizontal tops and bottoms of the structures typically converge at a vanishing point.
When drawing the fronts and sides of a building, the parallel lines that form the side converge at a second point along the horizon (which may be from drawing paper). This is a dot with two dots. Converging the vertical lines to a third point above or below the horizon then creates a three point perspective.
Depth can also be depicted in several ways in addition to the perspective approach above. Objects of the same size should appear smaller the farther from the viewer.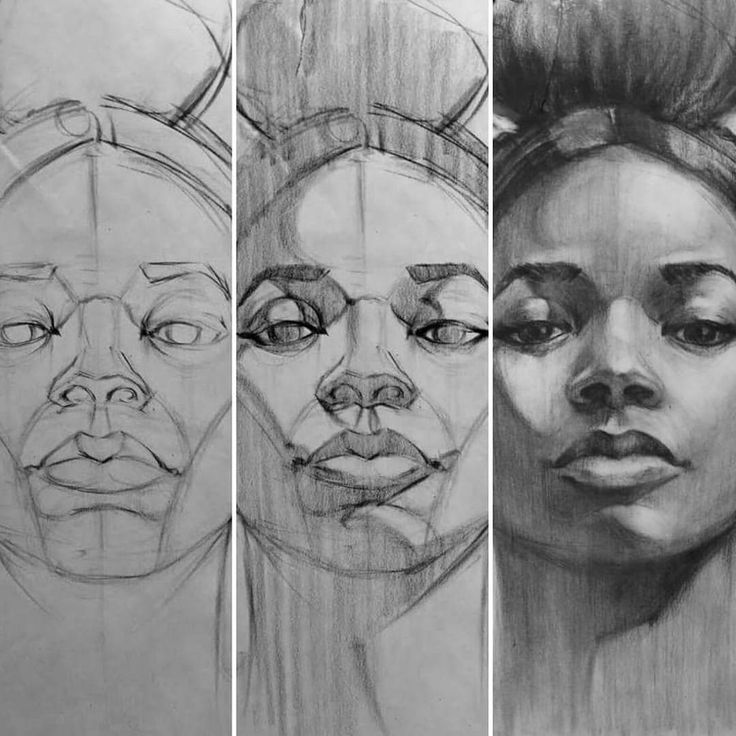 Thus, the rear wheel of the cart appears to be slightly smaller than the front wheel. Depth can be represented using a texture. As the texture of the object moves further away, it becomes more compressed and busy, taking on a completely different character than if it were close. Depth can also be portrayed by reducing the contrast in more distant objects and making their colors less saturated. This reproduces the effect of atmospheric haze and forces the eye to focus mainly on objects drawn in the foreground.
Image composition is an important element in creating an interesting work of artistic merit. The artist plans the placement of elements in the art to convey ideas and feelings to the viewer. Composition can define the focus of art and lead to a harmonious whole that is aesthetically appealing and stimulating.
Lighting an object is also a key element in creating an artwork, and the interplay of light and shadow is a valuable technique in the artist's toolbox. The placement of light sources can greatly affect the type of message that is presented.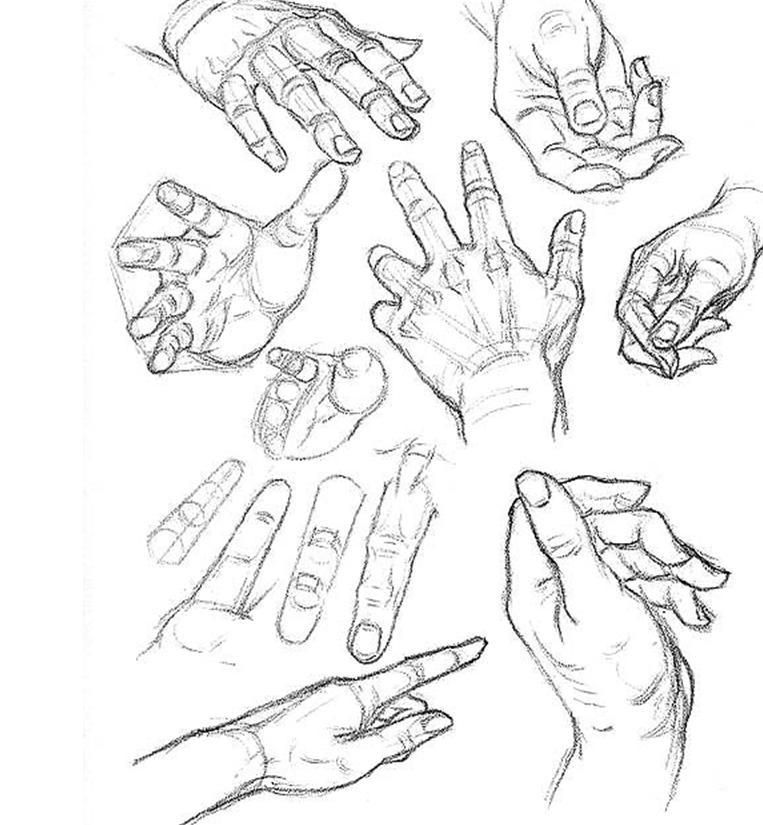 For example, multiple light sources can wash away any wrinkles on a person's face and give a more youthful appearance. In contrast, a single light source, such as harsh daylight, can serve to highlight any texture or feature of interest.
When drawing an object or drawing, an experienced artist pays attention both to the area in the silhouette and to what lies outside. Appearance is called negative space and can be just as important in representation as the figure. Objects placed in the background of the picture should display correctly, no matter where they are.
A study is a draft drawing that is done in preparation for a planned final rendering. Research can be used to determine the appearance of specific parts of the completed image, or to experiment with the best approach to achieve the end goal. However, a well-designed study can be a work of art in its own right, and many hours of careful work can complete the study.
Individuals show differences in their ability to produce visually accurate drawings.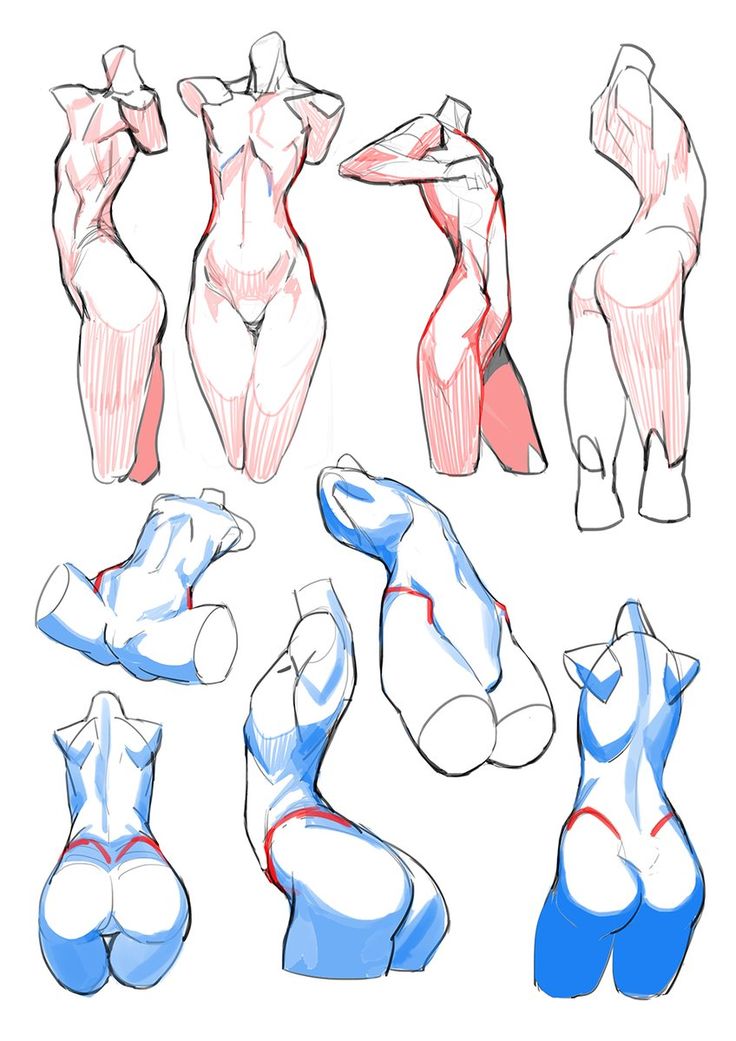 A visually accurate drawing is described as "recognised as a specific object at a specific time and space, rendered with little visual detail added that cannot be seen in the represented object, or with little visual detail removed."
Exploratory research aims to explain why some people see better than others. One study looked at four key abilities in the process of drawing: the perception of objects, the ability to make good representational decisions, the motor skills needed to create markers, and one's own perception of a drawing of its drawing. Following this hypothesis, several studies have attempted to conclude which of these processes is most important in affecting the accuracy of drawings.
Motor control is an important physical component in the "Production Phase" of the painting process. It has been suggested that motor control plays a role in drawing ability, although its effects are minor.
It has been suggested that a person's ability to perceive the object they are drawing is the most important step in the drawing process.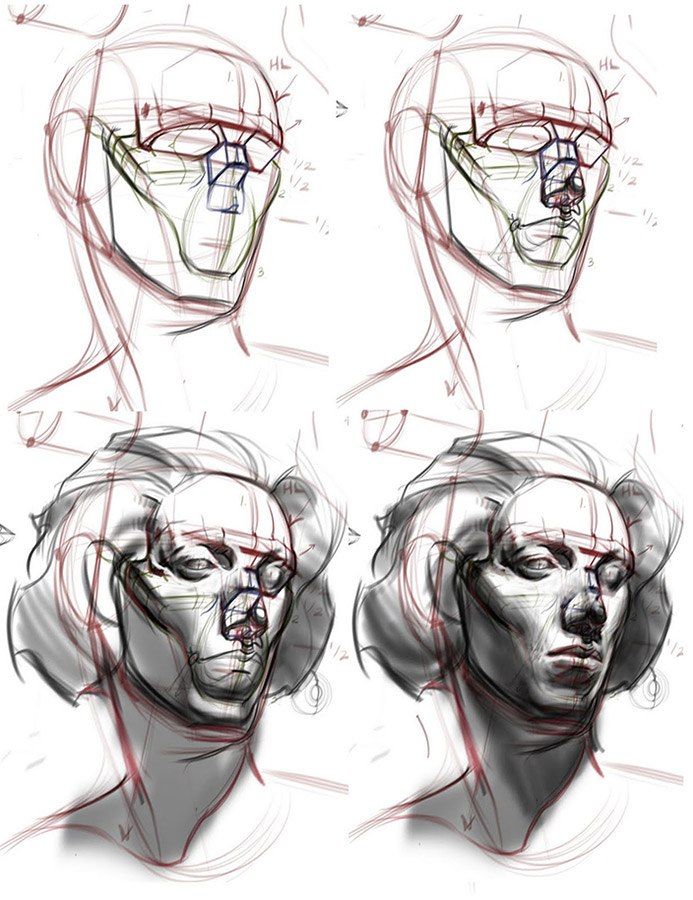 This proposal is supported by the discovery of a reliable relationship between the ability to perceive and draw.
This testimony was the basis for the practical book Leaning on the Right Side of the Brain by Betty Edwards. Edwards aimed to teach his readers about drawing based on the development of the reader's receptive abilities.
In addition, the influential artist and art critic John Ruskin emphasized the importance of perception in the process of drawing in his book The Elements of Drawing. He stated that "since I am almost convinced that once we see sharply enough, it is very difficult for us to draw what we see."
It has also been shown to affect the ability to create visually accurate drawings. Short-term memory plays an important role in drawing as a person's eye moves between the object they are drawing and the drawing itself.
Some studies comparing artists with non-artists have shown that artists spend more time thinking strategically when drawing.